

TK 22686
-
Posts
128 -
Joined
-
Last visited
Content Type
Profiles
Forums
Gallery
Articles
Everything posted by TK 22686
-
I had that same problem. Go to Photobucket.com and create a free account. Size your pictures to about 336x448 and that will keep the picture size down on the thread. Then upload them to Photobucket and grab the Direct URL and paste it into the image box where you want it on the post. You can post as many pictures as you'd like.
-
I held a HFx "D Grade" E-11 over the weekend and it feels pretty good. Solid rubber, and looks nice to the casual person. It had a lot of imperfections due to being a "D Grade", but I would imagine the Standard and Elite E-11's would look that much better. My only gripe was that the magazine on the left side of the sterling was too short.
-
E_Palpatine's Anovos Build
TK 22686 replied to TK 22686's topic in Build Threads Requireing Maintenance
From my pictures today...it won't seem like I got much done...but I made considerable progress with my kit today and I can feel myself getting closer to completion. Hosted my first armor party today....we had 4 total show up over the course of a late morning/early afternoon. But it was a beautiful 70 degree day in Minnesota, and I wanted to build outside in my garage. Couldn't ask for more beautiful weather! I was working on my shins....he was sanding his kit. We were watching some Episode 7 and discussion some of the minute details of the movie. I'll be hosting another in a couple weeks, and I'm going to need a wider table. The first thing I started off doing was re-configuring my belt for basic approval. I removed the 2 top screws of the holster (will use them when re-attaching the plastic belt to the Kittle cloth belt when I get around to ordering that. That way I can hold onto the old one and use it when I'm going somewhere particularly dirty...like the Renaissance Festival here. I then cut the stitching off 3 sides of the velcro at the very end. There was a bit of fabric sticking up where the belt was folded over for the velcro at the end. Cut a few swatches of that off and E6000'd it over the holes where the Chicago Screws used to be. Next...it was onto the dreaded Shingate. I referenced Ukswrath's build threat as well as Obsidian's Anovos Build blog that I found online to get a handle on this once and for all. I finally had a switch flip on after I had trimmed the front of the shins down to the 10mm length on either side and looked at the very top of the shin connections to understand. 2 of the shin pieces have a narrower bump on the top and 2 of them have a wider bump (for lack of a better term). I lined them up, and the tops matched perfectly. I also have longer edges on the inside of my boots. For me, Left Shin = 24 and 27 and Right Shin = 25 and 28. I got the fronts flush and realize that I really can't take any off the back as my calves are on the bigger side. I may need to re-shape them a bit to make the fit better. Next, I wanted to get a good start on the thighs. The fronts took a little work as the front butt joint connection really is not as straight as the forearms or shins were. I referenced Ukswrath's build extensively to determine where I need to mark and trim from to get the butt joint down to 20mm total. It took some trial and error, but I got there...+/-a few mm here or there. The backs are not fitted because I needed a break from them. The last thing I managed to get done was starting on gluing my cover strips on. I hate to say that the first coverstrip I cut may be a hair short on the top and bottom of the left forearm, but honestly, I don't think it looks bad. The left bicep turned out a little better. I now have a feel for it and the rest of the cover strips should go better. I also had some trouble getting both sides at the same time.....so what I did was glue the cover strip to one half of the piece...held in place with magnets, then glued the other piece and slit it on the cover strip. Then I slid the magnets so they were on the whole strip and clamped the ends where I could. Much easier that way. I did the fronts today, will do the backs tomorrow...and then the left arm will be complete, minus strapping. My other time was spent with cutting down return edges that I missed, sanding...and watching Episodes 4-7. Overall, it was a great build day. -
Making Latex Handguards
TK 22686 replied to TK 22686's topic in Boots, Soft Parts, and other Accessories
Thanks. After getting some reference pricing on mold making materials and latex and such...I may do this later on down the road to have something for me to troop with...but I'll most likely order from here off FISD. I believe there is a set for $28 (including shipping). That'll get me through Centurion approval. In hindsight...there are at least 3 other places that would have been more appropriate to post this thread...my apologies. -
Which size TKBoots?
TK 22686 replied to TK Goatee's topic in Boots, Soft Parts, and other Accessories
I would say if you're a 7 and don't need any stretching...stay with a 7. I have a pair from a run in February, and I'm a 10 1/2. I ordered an 11 and while an 11 1/2 would be perfect....I'm happy with how they fit. Most importantly, my feet are really wide (and the boots run slightly narrow) but after wearing them with thick socks, they've stretched out comfortably to fit my feet. I may take them to a cobbler and see if they can be stretched just a little more. -
I found someone who was approximately the same height who was EIB approved and looked at his application pictures. I reached out to him to find out what he did and looks like I will have to heat the top connections of the back plate up so that the angle is much softer. That will allow it to get closer to my back and go lower, and hopefully that gap will be gone. I'll start and see how it goes, asking questions later on if things still don't work. How much return edge are we allowed to remove from the back plate? I do have a build thread going, you can pop in once in a while to make sure I'm on the right track. I'll probably end up doing a major update after tomorrow as I'm hosting a build party (hopefully a bunch show) and plan to get everything ready to assemble. The forearms and biceps need gluing, but I have to figure out my shins and trim the thighs. Here's the link if you want to pop in here and there... http://www.whitearmor.net/forum/topic/36455-e-palpatines-anovos-build/
-
I'm looking to buy one from Kittle...but he needs the waist measurement (preferably with the armor on) and that what I'm trying to figure out. I'm going to try to get a few pictures tonight of the back to kidney connection.
-
Question about the positioning of the backplate, kidney plate, and butt plate. They're all supposed to line up without gaps and be pretty much uniform across the back. I tried taping the pieces up together last night so I could get a fit idea for one of T. Kittle's belts. I couldn't get a measurement because having the kidney and butt plate where they need to be leaves a bout a 3-4" gap between the Kidney and the Back plate. I'm only 5'11 1/2" (I round up to 6'0") and I know others haven't had much of an issue. Am I just wearing these pieces wrong? I've looked at reference pics from others and something just doesn't seem right.
-
Making Latex Handguards
TK 22686 replied to TK 22686's topic in Boots, Soft Parts, and other Accessories
Sorry if I started something. It doesn't matter to me if the Anovos OTK is a recast or made from sculpts or whatever....Disney gave them the go ahead to sell and an official license...that's all I need. It really is a beautiful set of armor compared to some I've seen :: cough, cough :: Rubies :: cough, cough ::<br><br> I know how recasting is viewed in this group. I've also read a lot about the ups and downs in Replica Prop Forums and the 405th. <br><br> Honestly, I just really like the look of the Anovos hand plates compared to some of the others that are sold, and want to keep it with the style of the armor. Thanks for the advice...I didn't think to pour it inside the handguards itself. I think I trimmed mint to about a 5mm thickness or maybe a little more. <br><br> I'll probably run to Michaels and see what they've got. My biggest worry is that I'll melt the hand guard or that somehow the latex would bond and not come off of the piece. <br><br> Thanks guys. -
E_Palpatine's Anovos Build
TK 22686 replied to TK 22686's topic in Build Threads Requireing Maintenance
Got the Thermal Detonator assembled and done last night. Total length is about 7.35". I had to cut about 1/4" off of the tube otherwise it would have been just a bit too long. Got the screws painted black, so that is ready for Centurion approval. -
Totally understandable. I'm new to much of the armor building world, but I've been doing a lot of reading and viewing on the forums here, and elsewhere. I'm not 100% familiar with all of the practices, but figured I would chime in with my ideas when I see an opportunity. Why make more work doing something that seems fairly simple when you don't have to? I want to get this done and start trooping already!
-
Hello everyone, I just wanted to pose this question: How hard/intensive/expensive would it be to make a mold of your Anovos handguards so that you could make your own set of Latex ones? Now, this is not to mass produce and sell, just for my own personal use so that I can hit Centurion after I get my outfit done. The handguard pieces from Anovos are actually pretty sharp and I know you could definitely sharpen them up if they come out a little softer. I've just never had any experience making molds, pouring latex, etc. I've got nothing against vetted sellers of handguards on here, and will most likely end up buying a set....but there's something about making your own pieces that is very gratifying.
-
I installed my #6-32 screws yesterday after painting them white, and they look excellent. Thanks for the info and doing the trial and error of finding the right ones!
-
Anovos belt, removing holster screws?
TK 22686 replied to BlayneFitz's topic in Boots, Soft Parts, and other Accessories
If you modify the stock Anovos cloth belt it will only be good for Basic or EIB approval. You will have to replace the cloth part of the belt completely to reach Centurion approval. This was confirmed by Ukswrath in his build thread. -
I was pretty intimidated at first when I opened up the box as well. A great place to start is the Thermal Detonator. You have an easy piece to glue so you get practice with E6000 and it's a pretty simple assembly.
-
E_Palpatine's Anovos Build
TK 22686 replied to TK 22686's topic in Build Threads Requireing Maintenance
Now I'm trying to figure out the Shins. I know that the front return edge is only 10mm each side, but 2 of the shin pieces have really faintly marked return edges (especially on the bottom) that Im not 100% sure where to trim them. Also, there has been so much speculation about which shin piece goes with what, that I'm not sure what the correct assembly is for them. It has been said that 2 pieces are more angular, and 2 pieces have softer curves....I think I captured that in these pictures...but what would you say are the inside and outside pieces? (I believe the top are much smoother and the bottom are more angular). Here is another look at 2 of the pieces....I want to say that these are the inside pieces: That's all I had time for this weekend, but hopefully I can get the forearms glued up tonight and have the arms ready to assemble by the end of this week. -
E_Palpatine's Anovos Build
TK 22686 replied to TK 22686's topic in Build Threads Requireing Maintenance
Next, it was onto the Thermal Detonator.... I picked these up at Home Depot to replace the inaccurate screws. Also, here they painted. Then I mocked up the TD... The tube initially was exactly 7.5" It would have been just a little too long once the caps were installed, so I ended up trimming just under 1/4" off of the end of the tube, sanded it down flat, and re adjusted. Then it was time to try my hand with E6000. I had never worked with the stuff before, so I decided to use it on the TD before I used it on the forearms, biceps, etc. It wasn't bad to work with honestly. It was a little harder in texture than I was expecting, but definitely allowed for enough time to get things in place. -
E_Palpatine's Anovos Build
TK 22686 replied to TK 22686's topic in Build Threads Requireing Maintenance
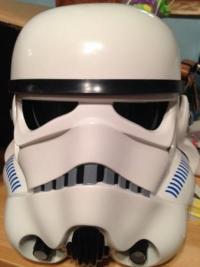
Well, it was a weekend full of getting the little details wrapped up! I ordered 100 Line 24 snaps, as well as 15 S Poppers for the various visible ones around the armor. I'll be getting them tonight and Thursday, respectively. I then went out and got my hands on Testors gray, semi-gloss black, gloss white, french blue, and most importantly...enamel thinner. Cleaning the brushes without it, or switching color is nearly impossible. Finally, I went to Home Depot and picked up these.....Ear replacement screws for Centurion Accuracy.....and here they are painted. Helmet Ears Before and After..... Before After -
I'm glad a ruling on this is being worked out.... Looking over the CRL, it just says that ideally there is no gap for Centurion. There is no mention that only the kidney plate should be shimmed...just that there needs to be the 22 mm x 22 mm notch on both sides of the bottom. From everything I've been reading...as long as the visible seam is as centered as possible, shims could be added to both sides. I'll be waiting to hear to hear the answer.
-
Very nice. I know they're slightly smaller than screen accurate...and will probably get mentioned in the centurion approval process, but I think I can live with that. Nice work!
-
Did you screw the ear screw into the TD yet? How did those turn out?
-
Bicep strap & an ANOVOS TK = not happening?
TK 22686 replied to DarkTrooper's topic in Assembly, Mods, and Painting
Is increading the length of the hook and adding some slack to the bicep strap an option? That would allow it to hang a little lower. -
Why couldn't you just shim the Ab plate instead of the Kidney armor? I think I'll end up having to add about an inch or so on each side, but instead of messing with the Kidney Plate and the notches....if you just extend it from the Ab plate, then the butt plate still lines up and you don't have to re-cut any notches.
-
Do the ear screws work at screen accurate TD clip screws? I'm replacing the ear screws with V shaped, slotted screws that will be painted white...but thought I read somewhere that the old ear screws could be used on the TD clips. If this is not the case, does anyone have a picture of what works at Home Depot? I went into the hardware aisle last night...but didn't know where to begin looking for replacement TD clip screws.... Also...what have people been using to remove the overspray from the frown? I heard mineral spirits work, but just wanted to be sure I don't do any unwanted damage to it.
-
Helmet & Ab paint detail reference guide
TK 22686 replied to Billhag's topic in Assembly, Mods, and Painting
Looking at the old colors.... Does Testors 1747 still work, or does it have to be the semi-gloss 1597? 1138 is pretty common to find, so I'm good there. Anyone know of any retail stores that sell the French Blue 2715? For white, do you recommend the Gloss, or Semi-gloss white?
