TK 22686
-
Posts
128 -
Joined
-
Last visited
Content Type
Profiles
Forums
Gallery
Articles
Everything posted by TK 22686
-
.
-
You don't even need sand paper. Get mineral Spirits or 91% rubbing alcohol and it will come right off. I used the 91% RA and repainted my whole frown.<br><br> Stay away from Acetone as you'll melt your frown...and I've never had luck with paint thinner.
-
Thank you for the responses...but I was actually referring to this. The little section of ABS between the cut line and the return edge from the pull on the Ab plate. I'm going to assume that it needs to go...but would be convenient if it could just stay. I left the extra material, because I knew the closure would be tight.
-
Not quite what I was talking about...it's hard to explain it without a picture. I'll snap one tonight when I get home.
-
I definitely needed to water bath it. Took the return edges off and worked it for about an hour...but still not happy with it. I'm about 6'0" and have a 2-3" gap between the Back and Kidney plate without doing this mod. Wanted to re-try it last night, but too tired and needed a break. Have a free night tonight so I'll try pressing it against the counter and maybe holding it for a few minutes while it cools. Probably wouldn't hurt to put an ice pack down on it first to cool the counter down to accelerate the cooling. Also about the shimming of the Ab/Kidney connection. I left the excess outside of the trim line on my Ab Plate (just took off the return edge from the pull) so it sticks out about an extra inch on either side. Would I be ok leaving this on and shimming up to it, or do you recommend taking it off and just extending the main shims for the extra length?
-
Tony, I completely missed your post about the hot water modification on this part...as this is currently what I'm working on. Did you run it under cold water to set...or did you just hold it on the surface until it cools? I've been wrestling with mine...it looks like they won't bent past a certain point....I had one person on FB tell me that they should be fine where they are at...they'll pull close to he body when everything is attached. I don't know how accurate that is. I think the right strap warrants another shot as I see a little bit of sagging that needs to be re-shaped.
-
Yeah, must be the firewall here at work. I'll probably end up trying my hand at heating up the straps and bending them again tonight. I get the pot to boiling...put in the strap for 30-50 seconds, bend it and then run it under the cold tap (gets pretty cold) and doesn't seem to stick. Was at it for quite a bit last night. I'm afraid I slightly warped my right strap. How far did you submerge the piece?
-
Any idea why your pictures aren't showing up? I was looking into how you got your back plate straps moved up, as mine don't seem to want to straighten out past a certain point. Did you find that you had to over-bend them to a point to get the correct shape that you wanted?
-
Can some of you guys who also ordered the Anovos kit post some detailed, close up pictures of the top of your left shin and the sniper knee plate? Maybe include a few top downs? I have my shins organized, been told by a few that I had them correct...and I went to size a few things up and see how the sniper plate would attach...but it seems like the top of the shin that you would glue it too is way too narrow...unless you're supposed to glue right on top of the cover strip, and the two ends where you can pinch them together...but then it just doesn't look right.. Here are my shins as I have them right now....
-
E_Palpatine's Anovos Build
TK 22686 replied to TK 22686's topic in Build Threads Requireing Maintenance
The last thing I managed to get done was gluing the button plates to the Ab section. The smaller of the button plates went on without a problem. I had to redo the larger plate because it slid down when I put the tape over it (didn't realize it moved) and to me looked really bad. I pried it off, cleaned it up, and re-glued it. I know it didn't move, so it should be good...but will be taking the magnets off tonight, so I'll update pictures then. Probably get my paint done on that as well. Button Plate Mistake Button Plate Mistake -
E_Palpatine's Anovos Build
TK 22686 replied to TK 22686's topic in Build Threads Requireing Maintenance
-
E_Palpatine's Anovos Build
TK 22686 replied to TK 22686's topic in Build Threads Requireing Maintenance
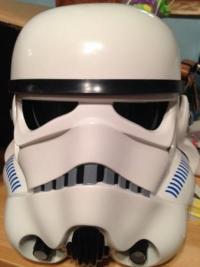
It's been a while since my last update...I've been busy with things and have been doing stuff when I can....here's what I've been working on.... Got my right forearm completed. I ended up removing the back cover strip to even out the butt joint. It sits much more flush and I have a much better curve on the back side of my forearm. I'm thinking of doing a hot water bath on the left side of the forearm, as it seems a little narrow. It's like a teardrop shape at this point. Wrist Side Elbow Side Next up...I glued my Right Bicep. This, like my left, was pretty straight forward and I'm pretty happy with how they turned out. Now my arms are completed, with the exception of the upcoming hot water bath for my right shoulder bell, my right forearm, and the strapping that needs to be done. Top Cover Strip Back Cover Strip Bicep Shape I needed to make another helmet modification...not needed to I suppose...but since I was going to be painting on the extra teeth, I felt it was necessary to repaint the whole frown. I initially tried with 70% rubbing alcohol and didn't have any luck. I picked up some 91% and it took the frown paint right off. I will say though, that getting the frown how I wanted it was a very frustrating experience. I'm still not completely happy with it, but it will do for now until the time when I want to try again, or can think of a full proof way to get the paint exactly how I want it. Frown Stripped Frown Painted Frown (Left Side) Frown (Right Side) -
Thanks. I'm most likely going to at least get the standard. I have seen a few Facebook pics of the Elites on HFx's page....they are really pretty. I've held one of their Frankenstein "D Grade" blasters that was pieced together...and overall those blasters are the ones for me. It just depends on how much you want to spend.
-
E_Palpatine's Anovos Build
TK 22686 replied to TK 22686's topic in Build Threads Requireing Maintenance
I don't mind the look of the belt...as long as it's modified to be more rigid. You can definitely tell who has an Anovos kit when trooping by who has the saggy belt (unless they've upgraded of course). I think I'll re-enforce my old one and attach the plastic belt to the new canvas one with chicago screws. That way I can swap them out depending on where the troop is. One place I'm planning on venturing out to is the Renaissance Festival I work at. We're doing a Star Wars themed last day for security. I want to weather my new belt, but not with that much dust/dirt. I'll be able to swap it out and maybe leave off the holster (not able to bring weapons). -
I'm saving up for an E-11 right now...about $70 a week over a few weeks to get this. I could get a B Grade..but the thought of an Elite sounds really tempting. It would be nice to have something you could put on display, and troop with at the same time........which do you prefer? I'm not going the resin kit route..at least at this time, as I don't want to watch it shatter as I'm prone to dropping things from time to time. I did see a build for a real, metal E-11, but the blueprints/templates are nowhere to be found...I'd like to try and get my hands on them and make a real, heavy...somewhat functional E-11 down the road.
-
Anovos and RS side by side.
TK 22686 replied to TK bondservnt's topic in Hard Armor (General Discussion)
Here's a picture of the left and right forearms if anyone has an RS picture they could throw out.... ----------- The left forearm (I believe) are the two pieces on the right. -
E_Palpatine's Anovos Build
TK 22686 replied to TK 22686's topic in Build Threads Requireing Maintenance
These are the pics of the last few days of building. I have the left arm completely glued together and all I have left to do is to strap it up and add my elastic strap that will go around my bicep to the shoulder bell. The right arm will be completely done tonight and then I'll be taking the rest of the week off as I'll be out of town leading a retreat weekend. Hopefully when I resume next week my stronger, more plentiful magnets will arrive and I'll get the gluing done more quickly so that I can move on to strapping, fitting, and adjusting. Here is my completed left forearm: Top Cover Strip Back Cover Strip Forearm Shape Here's the completed left bicep: Top Cover Strip Back Cover Strip Bicep Shape I also got my helmet padding velcro'd in: Here's also the belt modifications I made to the Anovos Belt to get by with Basic and EIB certification until I get my armor complete, order the correct sized Kittle belt, and completely convert it to Centurion standard: -
Anovos and RS side by side.
TK 22686 replied to TK bondservnt's topic in Hard Armor (General Discussion)
In their advertisement page....they said they had access to the digital archives...much like DICE had when making Battlefront. They had scans of suits and access to a suit from a collector or some such thing. Maybe the reason the similarities are so prevalent with the suits is that the materials Disney made available allowed them to make sculpts/molds of some very accurate pieces...while allowing them to take their liberties such as cleaning it up, sharpening details, etc. I agree with Tony. I'm excited to be getting into the 501st at this point in time. Star Wars is growing and we'll get to influence so many people. Let's focus on what's to come and not get so wrapped up in something like this that it all passes you by. -
Did a consensus get reached on this? I'm poised to go off of our Grand Moff TM's advice and do whatever it is that looks best. It's only about an extra inch on either side...
-
I recommend reading this. If you look at the tops of the shins when they're lined up, it may hold the clues to what they should be. For me, this was the combination that worked....24/27 and 25/28. What sealed it was seeing how the tops of the shins lined up when the front joint was trimmed down to 10mm on each side. http://obsidiustk.blogspot.com/2016/02/shinale-resolving-conflict-of.html
-
Anovos and RS side by side.
TK 22686 replied to TK bondservnt's topic in Hard Armor (General Discussion)
I'm trying to wrap my head around why people are bad mouthing it at all. Just be happy that a company put out a pretty decent kit. There have been some disasters and dumpster fires that have been sold here and there.... If people choose to buy Anovos, RS, ATA, TM, etc...that's their choice. I would have to imagine that many of the sign offs and decisions were made by Disney. Maybe some of the anger should be thrown in that direction? From my understanding....aren't re-casted kits usually much softer on details? Why are the details on the Anovos kit so sharp? -
E_Palpatine's Anovos Build
TK 22686 replied to TK 22686's topic in Build Threads Requireing Maintenance
Thanks! I still haven't decided if I am going to shim or naturally try to close the gap. It's great motivation for getting back into the fitness routine...but how long do I want to wait to go for centurion? I'll probably just leave it and maybe use elastic instead of nylon until I can close it up. That way It can stretch a little and shrink back down over time. Then I'll replace it with nylon when it's closed up. Thanks. Now that I'm in the gluing process, I feel like I'm much closer to being done...but I know I still have a lot of work ahead of me. Pass some of that over here! Thanks. It's definitely been a learning experience so far. -
E_Palpatine's Anovos Build
TK 22686 replied to TK 22686's topic in Build Threads Requireing Maintenance
I've been doing some Assembling from Sunday through today...just waiting for the glue to dry and my extra 50 magnets to come in. I'll post some pictures tonight of my completed left forearm/bicep and how the belt came out. I'm in the middle of gluing the right forearm and will need most of my current magnets for the back side of that tonight as I definitely could have used a few more on the back side of the left. -
I'm totally new, what should I buy?
TK 22686 replied to kmlagimoniere's topic in Hard Armor (General Discussion)
You certainly don't have to spend $1k to $3k to get approved into the 501st. I would believe that to hit basic approval with many reasonably priced kits...you would be somewhere between $600 and $800...but if you want to go for higher CRL's, add in extras like electronics, holsters, fans, weapons, etc...you will easily go over the $1K mark. I bought an Anovos kit for $650, and with boots, some extras, and building towards Centurion...I think I'm in the $1025 range, but I haven't gotten my blaster, fans, and voice electronics yet. I figure when I'm all done, I'll probably have spent nearly $1600 or so on my suit. SShhhhhhh, don't tell the misses! -
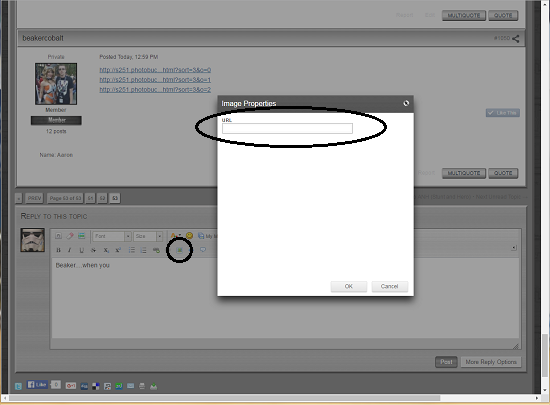
Beaker....go back and edit your message...but look for the Image button in the tools...right under the smiley and just to the left. That'll bring up a box prompt to paste the Direct URL into and that will allow the pictures to show up on the thread. As for your pictures...it looks like the chest plate is high up on your chest by itself, with the return edge jutting right up against your neck. That's going to make it hit your helmet. Can you slide it down some? Maybe strapping it to the Ab Plate using nylon instead of elastic....