

Dynamic1
-
Posts
204 -
Joined
-
Last visited
Content Type
Profiles
Forums
Gallery
Articles
Everything posted by Dynamic1
-
Hey all, on a side note, noone is getting back to me w/ regards to a neck seal...any help would be appreciated
-
JAFO'S FIRST ORDER STORMTROOPER BUILD (Jimmiroquai)
Dynamic1 replied to JAFO's topic in Build Threads Requireing Maintenance
Great work buddy! Your a machine -
Alright..SUPER pleased w/ how the final coats of paint shaped up ...The pics don't do the shine justice. This weekend I plan to do a suit-up minus the belt. Stay tuned ; )
-
Well not part of my build however, definitely share worthy! A friend of mine just sent me this from the LA auto show. UNREAL to say the least!!!
-
After looking at a couple more reference images I decided to bring the pill boxes up about 1/4". Adjusted above...new height is approx 2 1/4" from the bottom of the bicep. Sent from my iPhone using Tapatalk
-
finished up beautiful!!! Great work buddy
-
Although the weather stinks, I was able to get the clips adhered both on the shins as well as the biceps. I also applied the pill box decals. For those that haven't put these on yet I measured 2 3/4" from the back section of the recessed area of the clip, and 2 1/4" from the bottom of the bicep to the top of the first pill box in succession. We'll see how the temperature is mañana.....Stay tuned...
-
It's supposed to rain a bit today..as much as we need it here in Cali, I hope it waits a day
-
I've worked with magnets before on a boba I did...however, Evan set the stage for the placement on this one so I can't take full credit ; )...I do have an anchor method I'm going to share with you guys once the paint dries. Thanks for the push guys!!! Sent from my iPhone using Tapatalk
-
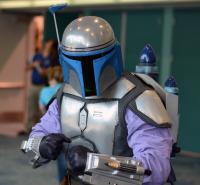
Yet again, another successful day. Achieved everything we discussed yesterday and a bit more. Was able to get 2 light coats down on the ab section as well as 2 light coats on the chest and back. One more coat tomorrow and nearing completion. Here is what I am looking at: 1. Try everything on again once dry so that I can size the belt. 2. Waiting on my belt spacer from JAFO which should be here any day. That being said, I need to mount the belt boxes. 3. Waiting to hear from Landher Props for neck seal. If I don't hear from him soon I will just go with TB. 4. Submit pics for 501st approval so I can nerd out w/ some of my buddies ; ).. Looking forward to completing this build! BTW, how do my glutes look
-
Was a pretty productive Turkey day. Was able to figure out another reinforcement for the chest piece (pics later), lay down a couple gloss coats on the shoulders, shins and biceps, followed by the last coat of white on the butt plate. Tomorrow I plan to gloss coat the butt plate and possibly a third coat on the biceps and shins...we'll see how it looks. Im going to move forward and put down the initial coat of white on the chest and back as well.....Keep you guys posted
-
JAFO'S FIRST ORDER STORMTROOPER BUILD (Jimmiroquai)
Dynamic1 replied to JAFO's topic in Build Threads Requireing Maintenance
Lets get moving!!!! ; ) -
Alright..Was able to attach the center webbing on the chest, apply buttons as well as mount the initial magnet setup as described by Steamboatphan. Once I've painted I will most likely setup some velcro in order to secure the top section. Below you can see where I've placed the snaps as well as the magnets. Here is what the interior looks like at this point... After trying the entire rig, here is where everything sits. Moving along!
-
Alright guys...Today I was B _ _ _ S deep in FO to say the least! My 501st buddy was able to come buy and lend me a hand with marking things off. That being said, Here is what I was able to accomplish: 1. Mark and mount shoulder bells as well as the center chest strap (still unsure as to what I’m going to do here). Below is a button mount method I came up with years ago while working on my Jango. Using a turkey thermometer (it’s Thanks Giving right ; ), I drive the webbing onto the sharp end which facilitates the hole. I then take the button end; place it directly onto the thermometer over the top of the webbing. Once I have it in place, I then bring the webbing up onto the button post. Finally, I remove the entire mechanism (webbing with button), place onto the button mount, squeeze and Viola! 2. Had my mother sew the gaskets together which came out great! 3. Although I neglected to take a pic, I reworked the thigh straps using 2" webbing and velcro. Using E-600 I mounted the velcro onto the straps. I also looped the webbing around the vest section which allows me to move the straps laterally for adjustment. Here is a quick and dirty pic of how it looks without the gaskets.....I need to bring the chest up a bit. Although we have some family stuff to attend to tomorrow, I still plan to get some things done in the evening. Getting closer guys! ; )
-
Jimmiroquai Rogue One Builds
Dynamic1 replied to jimmiroquai's topic in Build Threads Requireing Maintenance
Amazing as always! Sent from my iPhone using Tapatalk -
Thanks Garrett! Sent from my iPhone using Tapatalk
-
Another quick one...Was able to lay down 3 very light coats of white. That being said, and bc Im always confused myself on what exactly "light" is...here we go...... Basically I pull the trigger and hold, walking in a circle around the targeted piece with a back-and-forth/ top-to-bottom lateral movement (of the spray arm), followed by returning to the start position. I repeat this 3 times and for me, this constitutes "3 light coats"...BOOM! Tomorrow I will throw down another coat and see how the color is.
-
Still waiting for my acceptance on their FB group Sent from my iPhone using Tapatalk
-
Hey brothers....Wondering what neck seals you guys prefer?....Any info would be great!
-
Chipping away! Threw on the decals from TB......
-
Thanks so much Uk ...was just reviewing your thread...beautiful! Sent from my iPhone using Tapatalk
-
Thanks buddy!
-
Ok, quick lunch update...went ahead and did a quick sand and primer throughout the shin block seams....Good enough for me! I also cut the seams on the spats and ill smooth those out later as time permits. Im determined to get this thing completed before X-Mas!
-
Made yet, a bit of headway once again. Went ahead and adhered the shin blocks with some epoxy, followed by filling the seams. For the filler I just used the same epoxy loctite "concrete" version, (which holds up to 3000 lbs.) along with a tad bit of spot putty.
-
Here are some pics after the trimming. Although its difficult to tell, much better I think. I also plan on bringing the ab section up about an inch or so.
