

Dynamic1
-
Posts
204 -
Joined
-
Last visited
Content Type
Profiles
Forums
Gallery
Articles
Everything posted by Dynamic1
-
Ok great will do! Yes, with my other builds I have going on I’d rather help someone out; )... Sent from my iPhone using Tapatalk
-
Looking to offload this kit...501St approved... feel free to message [emoji1303] Sent from my iPhone using Tapatalk
-
 TK-12092 Reporting! Thought I already did this but apparently not lol! https://www.501st.com/members/displaymemberdetails.php?userID=23866
 -
Hey Dave, I used a pair of heavy duty scissors.
-
Ok great! I’ll give it a go[emoji1303] thanks Sent from my iPhone using Tapatalk
-
Been a bit, but hought i'd share this photo my buddy was kind enough to do for me!
-
Hey buddy...sorry I just saw this...I will look into doing this. Any suggestions on how I go about this?
-
Hey buddy...it’s a snug fit but I️ didn’t have to trim any...that lip is where I️ have the Velcro [emoji1303] Sent from my iPhone using Tapatalk
-
Hey JAFO! A couple small things that weren't noticeable: 1. A bit of padding on the inside anterior of the shins as it rubbed some of the color right off the boots. I think some foam might prevent this. 2. And not sure how to go about this...the gauntlets need to come up towards the elbows in order to keep them from sliding down onto the thumb... Other than this, the kit held up beautifully and presented with very minimal scuffs etc... Hope this helped Sent from my iPhone using Tapatalk
-
TK-12092 reporting!!! Had my first official troop on may the 4th..... here are a couple pics... Sent from my iPhone using Tapatalk
-
Jim I can't believe you aren't done and painted already!!! [emoji23][emoji23][emoji12].....beautiful as always my friend!!![emoji1306][emoji1303] Sent from my iPhone using Tapatalk
-
I'll confirm when I get home later[emoji1303] Sent from my iPhone using Tapatalk
-
I have to take my final pics....been hectic the past month with travel etc...will do this week and post[emoji1303]...thanks for checking in! Sent from my iPhone using Tapatalk
-
Hey no worries....that's what this is for [emoji1303] Sent from my iPhone using Tapatalk
-
Way ahead of you guys....already fixed [emoji6] Sent from my iPhone using Tapatalk
-
Alright guys...Many thanks to everyone for helping me get to this point! Here are some pics I took for 501st approval (although Fettseven took with his digital). I will send the camera uploads vs these which were taken from my iPhone... And of course, some festive pics for the finale!
-
Alright...30 minutes later and Ive got this beast on for some prelim pics. Only things left are to place the TD and apply the velcro on the biceps as they are a bit low. I also need to fittle with the lid a bit. Let me know if you guys see anything else ...
-
Thanks so much UK!!!!![emoji1303] Sent from my iPhone using Tapatalk
-
Thanks JAFO! Yes it's one of those eye deceiving issues I had to keep playing with..I marked a line with a pencil on the tops just so I can hopefully get a consistent position/ placement each time. Sent from my iPhone using Tapatalk
-
-
Heres another image w/ the thigh spacing....The belt really does make a HUGE difference.
-
Alright....Did an initial suit-up the other day and wasn't quite happy w/ the spacing , Gasket sizing issues etc. That being said, this thing is quite the BEAST to get perfect. Heres what was accomplished: 1. Mom the seamstress to the rescue....The gaskets were just massive and we ended up taking about 1.5"-2" out in a couple sections. This created a nice taper and allowed them to fit nice and snug. AND then....There is the belt...My absolute least favorite part and definately enhances ones ability to problem solve LOL!!! I will share the order I went along w/ anything Id suggest doing different: 1. Sized the belt circumference (nylon only) with the ab, cod and buttplate sections on. 2. I then sized and trimmed the outer rubber layer along w/ the spacer. 3. Using E6000 I adhered the 2 rubber layers together (use 5 min epoxy as I had better success with this). 4. Using a mannequin as well as myself, I marked the box placing w/ tape. 5. Once this was accomplished I cut and placed the Industrial strength sticky back velcro where I wanted. Although I couldn't think of a more appropriate method I am sure there may be a better way? I say this bc once you adhere the velcro in order to confirm placement and spacing, you will then have to carefully move the the velcro and apply 5 min epoxy along w/ the Chicago screws (see Steamboatphan method). It's a bit of a back-and-forth PITA but got the job done ; ). 6. Once everything was to my satisfaction I then mounted the boxes. I would suggest drilling the holes, push the screws through the 2 rubber layers FIRST, then the nylon layer. I can't express this enough as you will have to wriggle push and pry through the rubber layers. You can then drive the nylon layer over and in position followed by drilling the male end into place. I hope all of this makes some sense. I should be getting the gaskets back tomorrow and will then do a final suit-up....Stay tuned
-
Quick update...received my belt spacer from JAFO today! Is it weird that I cannot keep myself from sniffing it? It's perfect! Look forward to getting the belt setup going....thanks buddy Sent from my iPhone using Tapatalk
-
Thanks man!....you set the stage for us[emoji1306][emoji1303] Sent from my iPhone using Tapatalk
-
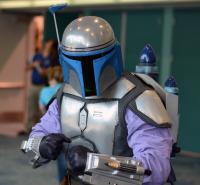
MAN.......I can smell the end! Paint is completely finished...Thank the force. Here are some photos of the velcro chest mount along w/ the magnets that I applied earlier in the thread. I tried to get some inside shots for you guys to get an idea of what this looks like. I have to say it holds up like a MONSTER!!!! You can clearly see me holding it out with one hand...I was actually bouncing, jostling and shaking it and it was not budging. This angle shows the industrial strength velcro I have applied at a slight downward angle. This also allows me to draw the back "arms" in towards midline which sets the chest seams up nicely. And here is an image which brings a tear to my eye ....Decided to have some fun and break out the lid for some glamour shots. onto the belt and locating a neck seal!
