

Xinx
-
Posts
48 -
Joined
-
Last visited
Content Type
Profiles
Forums
Gallery
Articles
Everything posted by Xinx
-
The trigger: To activate all the electronics I used a DIY end-switch as trigger. To fit this into the handle of the blaster I used a Dremel to grind the internal of the handle. As the end-switch also functions as a spring, the trigger will automatically jump back and no additional springs are required. To prevent the trigger to fall out of place I grinded a hook at the end of the trigger as can seen below. By using 4 nails the position of the two parts can exactly be defined. 2 nails are used to position the End-switch. 1 Nail is used as a rotation-point of the trigger and the last one defines the window of operation of the trigger (and prevents the trigger to fall out of place. When everything is in, only 4 small nail tips can be seen.
-
The diameter of the power LED's is exact the same as the inner diameter of the pipe inside the doopydoos blaster,so the LED's can be positioned vertically in the pipe. The wires of the LED-driver are heat resistant but not long, so the LED-driver needs to be positioned close to the LED. The LED-driver also fits in the pipe. To create a custom position between the LED's in the pipe I used a threaded rod (~ 3mm). The diameter of this rod fits the notches of the LED's. Using small 2 nuts I clamped the LED to the rod. To also clamp the LED-driver I glued some ABS to the Diodes (which aren't used anymore) in which I draw a hole. After putting all parts to the rod it looks like a Shaslick :-) The blue wires are the wires to trigger each LED's On/OFF. The black and red are the power supply. I wired them is such way that all LED's are parallel connected, so if one LED-driver fails, the other ones still function. (The second benefit is the fact that this way of wires requires less space). This Shaslick can be slide into the pipe from the back. The front LED perfectly fits the nozzle at the front. The last LED-driver is positioned at the end of the T-tracks. This way there is room for the electronica at the location of the ammoclip (see later on..)
-
First of all the LED's. The MR16 LED-driver contains a PT4115 chip. This chip allows a LED to be dimmed. This used pin is however not connected in the default LED-driver. This way the LED will burn by default. If 0 Volt is applied to this pin the LED will be shut down. If 5 Volt is applied the LED will burn. Each other voltage between 0-5 Volt will dim the LED. As SkyOne already mentioned in his thread, the power supply of this LED-driver needs to be changed. Standard the 2 large pins are used as power-supply and are shielded by Diodes. As the LED-driver needs to be positioned in the Barrel of the blaster these pins needs to be removed. The power-supply can directly be soldered at the printboard so photo below). - Green wire : Dim-function of the PT4115 chip (outside pin of the 3 pins on the left side). -Blue wire : negative voltage (0Volt) -Red wire : positive voltage. As this driver is designed for >8V I used a 9V battery to supply the voltage. The pink and white wires are connected to the LED it self. The LED's I used are the same one as decribed by SkyOne. This is a 3W power RGB-led. As I only use red as color I connected R+ en R-. As I wanted a "walking light" in the barrel I made 5 of these combinations.
-
This year I received my doopydoos box and wanted to make something special with light & sound, but also use this blaster for the approval of Centurion level. So I didn't want any of the modifications been seen at the outside of the blaster. I got my inspiration from the building thread of SkyOne : http://www.whitearmor.net/forum/topic/1 ... r-effects/. My goal was a E-11 blaster with "walking lights" in the barrel, several fire modes and a digital scope (something like Bulldog44 has made : https://www.whitearmor.net/forum/topic/36747-m38-hollow-core-scope-project-2016-bulldog44/ As I already finished this project I will use this thread as a reference, summary and explanation of the critical parts/processes. I hope this project inspires people to create other cool props. When I started this project I didn't know much about Arduino, electrical circuits, working with resin or painting. This was a great project to learn all these things and opened a whole new world for me. My shopping list: Main processor: - Arduino Pro mini 5V 16 Mhz Atmega328 : The main processor - FT232RL FDTI Basic USB : Tool to program the Arduino board by USB. Input: - 10 positions Rotary switch (RM4HAF-10R-V-B) : Switch for different modes - DIY End-switch : The trigger Light: - MR16 with PT4115 chip, DC8-26V : Led drivers - 3W RGB-leds 6-pins : Led's Sound: - WT2000MO2 MP3 module - 3W *2 mini Audio amplifier - 2 Watt speakers (30x20 mm) Digital scope: - 0.66" OLED dispay (64x48) with I2C-protocol. A software-driver can be found at : https://github.com/sparkfun/Micro_OLED_Breakout/tree/V_1.0/Libraries/Arduino Misc. - 10K resistors Almost all parts are available on Aliexpress or Ebay. I think the total price of all components is about 30 euros.
-
Tydirium1 - Armor making from scratch.
Xinx replied to tydirium1's topic in The Foundry - Armor and Prop Making
Looking good. Nice progress. Warming up your molds might help as well. This will slow down the cooling of the plastic and might give you some extra time for the details. -
Request your EIB Certificate here:
Xinx replied to justjoseph63's topic in Request Expert Infantry Status
Pawel Oortwijn 11131 EIB A4 Tony http://www.whitearmor.net/eib/certificates/11131-eib.png -
Supplier of Acrylic Capped ABS sheets
Xinx replied to Xinx's topic in The Foundry - Armor and Prop Making
Hi Paul, Thanks. I have send you a pm. -
Hey, After searching the internet for some days. I hope you guys can help me out. I was looking for acrylic capped ABS sheets (Glossy white) 1 or 2 mm thick The sheet size is approx. 500x300 mm. I have found a lot of ABS sheets, but no acrylic capped ones. I was looking for suppliers of these sheets, but could not found one in the mainland of europe. As I'm not interested in starting a business I don't need a lot of these. Thanks in advance
-
Thank you all for the feedback
-
So an update. After repeatedly grinding and replacing the ABS-pasta, the gap between the kidnay-plate and shim became approx. 2 mm. So I decided to remove the shim and do it all over again. after aligning the 2 edges, the maximum distance between the 2 parts is max. 0.5 mm. After drying I applied my ABS-pasta 2.0 (added some TiO2). The result after removing the excessive amount of ABS-paste with sandingpaper 240 is shown below: I think this will do the trick and now I'm going to start polishing this side. hopefully this will be approved for centurion level.
-
After reviewing the filled and grinded gap together with a centurion TK from the Dutch Garrison (@ScaryGuy : Thanks), he concludes it is still not white enough. I support his conclusion, so back to the drawingtable.... Today I added some pure Titanium-dioxide powder (known as the white pigment in paint) to my ABS-paste. Hopefully the pigment will upgrade the color towards the needed white. To experiment with this new approach I made different concentrations of TiO2 in the ABS-paste. As can be seen below I made a testsamples as my armor gets thinner due to grinding. to be continued....
-
The new batch looks promissing. I used a excess of acetone. The excess looks very white and has a viscosity of water. The viscosity of the sediment is comparable with handsoap. (My old batch was quite different. The Excess of acetone was as clear as water and the viscosity of the sediment was comparable to chewing gum.) After applying the new batch to the gap it looks like below. I noticed some air bubbles beneath the surface, but I can fill these after grinding with the fluid ABS-suspension. So I think I'm back on track.
-
Today I grinded the area so a new layer of ABS-paste can be put on. Besides I made a new batch of ABS-paste - Acetone 99.995% Pro Analyse from a chemical lab - Cleaned ABS - Brown glass jar to present UV-light. Best raw-materials I think So I try it all over.
-
Hi All, After putting shins on my ANH-armor I used ABS-paste to fill the gap between the 2 parts. The ABS-paste was made out of the same material as my armor. After filling the gap and drying, the paste is the same color as my armor. After grinding (using wet grinding-paper 180-400-1000-1200) the filled gap changes to a darker color. Does anyone know how this happens and how I can prevent this ? Thanks,
-
TK-11131 requesting ANH Stunt EIB Status [DA-props] [648]
Xinx replied to Xinx's topic in Request Expert Infantry Status
Edited my last post to add latest pictures -
TK-11131 requesting ANH Stunt EIB Status [DA-props] [648]
Xinx replied to Xinx's topic in Request Expert Infantry Status
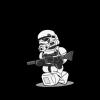
Hereby a photo of my blaster with a D-ring. Did some modifications on the armor. Hopefully the distance between abplate and thight is beter now. Shoulderbells are as close as possible to the white elastic between chest and backplate, but these are pulled outwards as you can see in the image below. Hopefully these images conform the needed requirements for EIB. -
TK-11131 requesting ANH Stunt EIB Status [DA-props] [648]
Xinx replied to Xinx's topic in Request Expert Infantry Status
Thanks. I shall make some improvements on my armor and add the D-ring. -
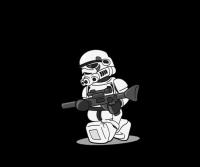
Please consider the attached for EIB status Name: Pawel Oortwijn Legion ID: TK-11131 Forum Name: Xinx Garrison: Dutch Garrison 501st Member Page: http://www.501st.com/members/displaymember.php?userID=22551&costumeID=124 Height: 6'2" Weight: 187 Armor maker: DA-props Helmet maker: DA-props Blaster: Doopy doo's Canvas Belt: Imperial Supply Depot Holster: Own made Hand Plates: DA-props Boots maker: painted Jodhpur Boots Neckseal: Own made Full body front Full body back Arm raised Arm raised Action shot Helmet Neck seal Holster/Belt Internal strapping Abplate Cod/Butt Shoulder Handplates Boots E-11 Blaster Thermal detenator
-
Hi, TK-11131 requesting 501st Access (Dutch Garrison) http://www.501st.com/members/displaymemberdetails.php?userID=22551 Thank you
-
Full body ANH Hero Pepakura Build
Xinx replied to miserone's topic in The Foundry - Armor and Prop Making
I have also the Dungbeetle Armor files. They are more detailed then the Fierfek files. -
TFA viewings. Opinions on the movie? (Spoiler zone)
Xinx replied to PGHtrooper21's topic in Off Topic
It gave me the "orginal" Star wars feeling. Great movie
