


miserone
-
Posts
10 -
Joined
-
Last visited
About miserone

-
Rounding up the last few details for my ANH tk scratch build and I need some help with the measuremenfs of the various waist and knee ammo boxes. Can some kind soul let me have more exact width height and distance measurements on these items? Any help here would be much appreciated Sent from my GT-N7105 using Tapatalk
-
Full body ANH Hero Pepakura Build
miserone replied to miserone's topic in The Foundry - Armor and Prop Making
Mic tips... I make from rice and barley. The helmet as it looks now. -
Full body ANH Hero Pepakura Build
miserone replied to miserone's topic in The Foundry - Armor and Prop Making
One has to wonder (well, me, anyway).... As I've stated before, I'm doing a scratchbuild, and sticking as meticulously as I can to the CRL for the ANH Hero, BUT = How strict are the guys when they evaluate scratchbuilt armor? When you build from pepakura where possible, and body casts when pepakura files cant be scaled exactly right... assembly and construction is different from when you work with a bought kit. I've got all the pieces at some stage of completion - helmet, chestpiece, backplate, shoulderbells, handplates and gloves, biceps, bodysuit (lets just call it that, ok ) forearms, upper legs, lower legs, boots, but none of them come from a kit. Pepakura pieces were measured, folded and found to not fit regardless, only to be replaced by pieces based on DIY casts of my own (non standard shape, apparently ) body. The pieces I have so far are rock-hard and solid, or headed that way, and the method of assembly is decidedly different from what you will do when you suit up with a kit-build. The motto I have been told over and over again "if it looks the part and it fits right" is pretty much what I use as a guide. Lets hope that's good enough. I'll post some pics when I have picked the ones that are forum-worthy.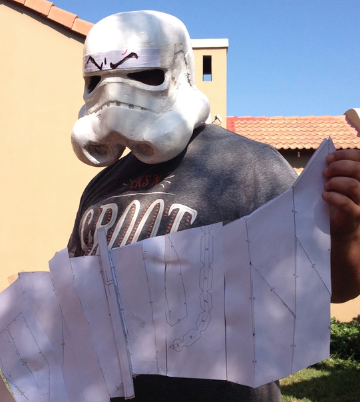
-
Full body ANH Hero Pepakura Build
miserone replied to miserone's topic in The Foundry - Armor and Prop Making
Helmet update -
Full body ANH Hero Pepakura Build
miserone replied to miserone's topic in The Foundry - Armor and Prop Making
The problem with scaling is that unless you scale uniformly on all axis, it will slant your angles. If you do an all axis-scale it might produce something that is now too big in more than one direction. I would consider doing them child size (good description) and then adding shims maybe? Dunno. I had to add pieces to get the thigh to fit. -
Full body ANH Hero Pepakura Build
miserone replied to miserone's topic in The Foundry - Armor and Prop Making
Hi, here is the right thigh on its own, in A4 PDF. If you want letter let me know. stormtrooper_rightthigh_unfolded_by_fierfek_A4.pdf -
Full body ANH Hero Pepakura Build
miserone replied to miserone's topic in The Foundry - Armor and Prop Making
Hi, here are the armor files for ANH https://drive.google.com/open?id=0B45scXHvZDzIMjJaY0RSZGdwSkU They're ok but the O on the O II design is missing and the II are too tall, and the thighs are sized for underfed people with a negative BMI. Also the right thigh (as seen from the front) is not on a printable page, i will attach a printable copy here shortly. -
Hello everyone Short Introduction: I start this thread being nervous and unsure, not quite sure what the response, if any, will be to my approach in my built from scratch work in progress. I started this build before I really became aware of the CRL and the fact that you could get approved, etc.... I just hunted down pepakura files and started. So, rewind back to last month, December 2015 when I started the helmet again, after some fails with this being my first attempt at actually making wearable, accurate armor.... PS: why dont I buy a kit? Price is prohibitive, from where I am in South Africa I wanted to get into physically making these things, AWAY from a computer where I spend too much time as it is. I want that satisfaction of looking at the product and knowing that it is, in its entirety, my own handiwork. I'll post pics of the progress, past present and future here, instead of on my blog. HELMET Starting at the beginning - my helmet build based on Spacecowboy's pep file in its various stages - pics to follow: This was the pep file I used, in case someone wonders what it looks like. Cap roll... Frontal view with cellphone camera fish eye warp as usual at this stage I saw that the cap of the helmet seemed a bit lopsided, with a strange bump on the right, but I read somewhere that this was a common concern with the Spacecowboy pep and that the brow (black strip) made it all better. A bit of resin later brought me to this. Fibreglass and a derived version of Bondo (no such product here in South Africa as far as I can tell), brought me to this (pardon the construction/finishing marks or notes): At this point I was disappointed with the contours of the vent pipe going around the back of the head and also the front of the pipes. They did not, in my opinion, give enough of the distinct TK look. Not ugly in form, but not a TK. They would need more volume to them and droop more. Also the angle of the chin vs that of the nose was off. More work ahead. More pepakura, this was the backplate. At this stage I realized two things: Firstly I will have to custom-size upward on some of these parts. Specifically the thighs, biceps and shoulder bells, and also the shins. Secondly, with that in mind, and the fact that I'm using a thick board of 300gsm or more (the board used for subsequent pieces was 310gsm), precluded the need for pinpoint accuracy on the pepakura in certain places. Currently the following parts are rough pepakura bases waiting for their resin coat and further modelling: Chestplate Backplate Kidneyplate Butt plate Ab plate Left thigh The right thigh has undergone the first resin/fibre coating and is being smoothed over for further detailing. The helmet has had the vents front and around the back remodelled and is awaiting sanding and smoothing. I'm looking to make this stuff sturdy enough so that when it is finished I'm able to do some molds from them - - i dont feel like putting in all this work (yes, there has been blood) and wear the original when the time comes - I want to wear a copy and keep the original on display in my living room! Thank you for reading, I'll post updates

