


ukswrath
-
Posts
14,622 -
Joined
-
Last visited
-
Days Won
180
Content Type
Profiles
Forums
Gallery
Articles
Everything posted by ukswrath
-
Thanks brother, the waist belt soft pouches came with the kit thank goodness.
-
Thanks my friend. No disasters please. Lol
-
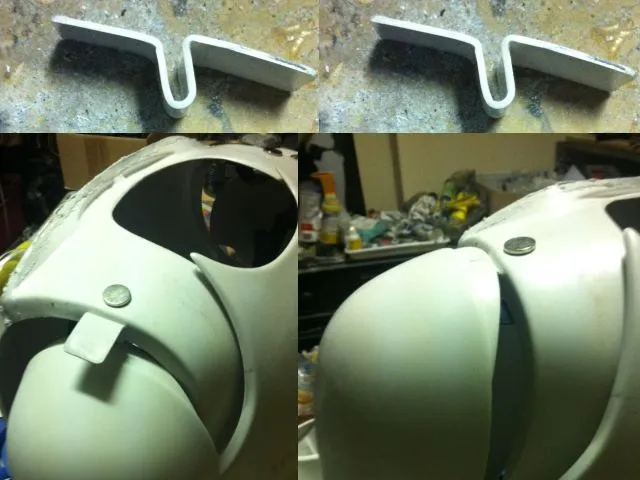
Thermal Detonator cont... Lower mounting. In this brief section I'll demonstrate how to secure the lower half of the TD. Start with measuring and cutting a 1/16" x 2" slit in the lower return edge. Feed 2" velcro (hook side out). Remove backing except for the portion sticking outside the TD. Install foam padding on top ledge. This will help draw TD against the back section of the ab. Protruding hook velcro will connect to loop velcro on posterior. This area is covered by the waist belt and unseen. Finished
-
Accuracy Waist Belt Assembly cont.... (in depth and picture heavy) In this section please note the chicago screw lengths have changed due to the addition of the 1/4" section between the nylon webbing and the floor mat material. Besides the 3/4" chicago screws (x4) used for the center box mounts (mention in the previous section) the right side boxes will require 1/2" chicago screws (x4) and the waist belt connection near the buckle will require 3/8" chicago screws (x2). Continuing on, measure and install high density foam or neophrene. Stack newly sewn nylon and buckle assembly on the floor runner and high density foam. The floor runner material should cover half the buckle while the foam stops at the base of the buckle. Remove the sticky protection from the foam and place on floor runner material. Install center boxes Place center coxes next to each other directly centered with center snap. Measure 3/4" from the outer edge of the center/right box to the first drop box. Measure 1/4" between the two drop boxes. Mark the belt according to the box mounting posts. Using leather punch or other punch holes in nylon. Place nylon on foam/flooring material. Mark and punch holes. Assemble boxes on belt. Test fit. Finish by measuring, punch holes and install Chicago screws at male buckle end of belt. Install functional drop box covers. Check assembly. Additional measurements Installed
-
Accuracy Waist Belt Assembly cont.... (in depth and picture heavy) 4/13/2020 - The rubber base mentioned in the following assembly was found to be inaccurate some time later. We know today it was made of a different material, hard and not rubber. There is a vendor that makes the accurate bases and a few suppliers that sell the 3D print files to make them yourself. Regardless which direction you choose to follow, the fact remains they are black and are contoured to follow the curvature of the belt and armor. In this section the waist belt will be update with screen material. The two center/horizontal boxes will have a rubber base and there is a 1/4" strip of high density foam or neoprene rubber between the nylon webbing and floor runner material. Center boxes cont... Back on page 9 I illustrated how to make the rubber base mounts. Afterwards I realized though the rubber fits inside the upper (front) box, the exterior dimensions are to remain the same dimensions as the front boxes dimensions. Long story short I remade my rubber base mounts to be even more screen accurate. Starting with the base rubber block trace outer diameter then cut out. Creating a step for the box face - Measure roughly 1/4" down from one side of the rubber block. Using belt sander or other remove 1/16" of material off the 1/4" section. The newly removed section will be positioned inside the box face. Regarding the left (grooved) box, grind out bast to fit box. Mounting. Tools and hardware: 11/64" drill bit 1/2" drill bit 3/4" long aluminum Chicago screws (x4) 3/8" flat washer (x4) Mount preparation. Measure and drill 11/64" hole through mount. Follow up 11/64" hole with a 1/2" diameter hole 1/2" deep. Before installing screws contour mount base to the contour on your belt. Install screws. Add E6000 to screw head and cap, let dry. Adding glue to screw help preventing it from spinning when installing. Second order of business. Measure ab diameter. Note: Obviously, depending on your waist size these results may vary. In my case the ab outer diameter measured 39-1/2", this was with the armor completely closed. Measure and cut the belt components. Inner material - 2" nylon belt webbing, 42-1/2" Middle material 2" high density foam, 37" Outer material 2" floor runner material, 40-1/2" Feed 1" of nylon webbing through female buckle and sew \\ Wrap nylon belt around Ab. Place buckle at second box from the left. Mark nylon in relation to ab male snap. Location should be 5/8" from return edge. Punch hole and install female snap with snap facing armor. To be cont.....
-
Ab to Cod connection Starting with cod/belt mounting section of the Ab. The cod will be connected via two pop rivets, three snap and a 2" 1" nylon webbing. The center most snap will be used to secure the front section of the belt (shown later) Measure and mark the locations of the ab to nylon mounting holes. The holes are evenly space between webs approximately 3/4" from the lower return edge. Once marked drill the holes 11/64" Position a 2" x 11" section of nylon webbing at lower return edge and mark through drilled holes. To obtain a more cannon look the cod will be mounted behind the webbing instead of in front as most commonly seen. NOTE: This is not saying my version is correct and everyone elses isn't, just a different perspective. Measure and mark snap holes. Measure and mark snap holes at cod. Drill two 11/64" holes for snaps. Install male snaps. Insert male snap posts from the inside. Install outer snap. Install female snaps for cod. Test fit Mount webbing to armor. Pop rivet the outer holes (webbing on the inside of the armor). Note: Rivet will installed on the outside of the armor. Use a flat washer on the inside of the rivet to maintain mounting strength. Finally, a male snap will be used to secure the center hole. This snap will be used to secure the waist belt. Install snap. Test fit. Finished. Up next, Waist Belt...
-
4
-
Ab to Posterior Connection Using 3" black elastic (technically 2-7/8"), 1" velcro and 4 snap sets I created a bridge between left and right side Ab halves and a flexible connection to the Posterior. Sections consist of the following: Elastic 3" x 6" (x6) 3" x 11-1/2" (x2) 3" x 9" (x1) Velcro Hook - 1" x 9" (x1) Loop - 1 x 9" (x2) Bridge before adding snaps. 1. Assembly. Starting with the left side, assemble and sew items together as shown. Right side Armor side before snaps Body side before snaps Separated Mark lower 2" to indicate lower edge of ab armor. Below this area is where we'll be adding snaps to support the posterior. Using the measures shown mark and drill 11/64" holes. After drilling holes taper for male snap posts. For the record the two center holes will be using male snaps and the outer two will be getting female. Install snaps After installing snaps, test fit. Prepare armor for elastic bridge installation. Outline and apply E6000 glue to armor Install bridge and add weight to hold in place. Good thing I have plenty of paint supplies... lol After dried. Install loop side of velcro to TD lower mount. Install Posterior and check operation.
-
Hey Greg, thanks brother
-
Great idea, no worries for the hijack
-
Have a question for any FO armor owners with their armor built. Last night I assembled my legs to only find out the gaskets are too short. I'm 5'11 ÷. Hope Wyatts gaskets are longer
-
Thanks. Got a lot of work done lost night but today there won't be much progress unfortunately. Try to get some pics out tomorrow.
-
Sorry yes, keep on mind spot filler is only recommend for filling areas 1/8" deep or less.
-
Yes
-
Hosting costs for the year - Please donate!
ukswrath replied to Darth Aloha's topic in Announcements
Uh! I guess I'm too late for this huh, dang TFA, no life! -
haha thanks Michael
-
Hijack away, thank's for the detailed explanation Tim
-
I'm working on the belt and suspension harness as we speak.
-
Thank you
-
Mine are out of shape as well but I'm not about to give them a hot water bath at this point.
-
Chest Finished I know some of these have been shown already, just adding to the group above.
-
Thighs Finished (pic heavy)
-
Biceps finished
-
Shins Finished (pic heavy)
-
Forearms finished (Pic heavy)
