

maxsteele
-
Posts
865 -
Joined
-
Last visited
Content Type
Profiles
Forums
Gallery
Articles
Everything posted by maxsteele
-
 Congrats Jason! I hope to join you soon as well! Sent from my SPH-D710 using Tapatalk
 -
I took an xacto knife and pushed it between the armor and the finishing strip at one end, and slowly cut away the threads of e6000 holding it together. Once I got about an inch of the finishing strip separated from the armor, I slowly pulled the rest of the strip away and it just came right off. So very easy to do. I ended shaving off anywhere from 10 to 30mm of ABS from each bicep. I put the biceps up on my arm where my real biceps are and flexed to check the fit. At full-on flex my muscles were just starting to push against the biceps. That is the right size for the biceps. I'll get the finishing strips cleaned up and glued back down and start with the forearm / bicep / shoulder attachment again.
-
Thanks Ty. I've been trying to talk myself into the delusion that my biceps are the right size. They're not. When I put my arms to my side and my inner bicep piece snugs up to my inner arm, there is a good 1 1/2 - 2 inch gap on the other side between the outer bicep piece and my outer arm. That in turn pushes outward on the shoulder piece, which makes it not sit right. It's all sorts of messed. I pulled the right bicep apart. It took me 5 minutes. All hail the great and powerful e6000! That stuff is awesome. I think I'll even get to re-use the same cover strips.
-
I fit my biceps incorrectly. Probably because I didn't have a clue what I was doing. I should have fit the biceps so the inner piece with the curve fit nicely with my arms pressed down at my sides, and then trim the outer piece to fit around my outer arm. Because of this, when the inner bicep piece fits against the inside of my arm, the outer bicep piece bulges out. That bulge also pushes out my shoulder pieces, and then it's all off. I'm thinking I need to take my biceps apart. I did use some super glue to close a small gap on one of them, but hopefully I can get that apart without much trouble.
-
If I let my biceps free-float, they drop down below my elbows. Also, when that happens, there is actually a gap between the top of my bicep and the bottom of my shoulders. While there may have been some troopers like that, it looks poorly fit on me. I will need to put a strap between the shoulder and the bicep in order to keep them up at a decent height. I understand I don't need the bicep to be hugging my armpit, but I'm going for a middle ground between "as high as it can go on my arm" and "dropping below my elbow". I want to say I'm trying to combine form with function here. I think it'll work and be a nice middle ground.
-
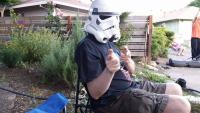
Thanks for the answer Mathias. Here's where I am with the forearm / bicep fitting: This is my right bicep / forearm. I fitted my biceps up closer to my shoulder, as that's the biggest part of the arm in order to get them on. The bicep floats a bit above my elbow, because it hits the bone there and won't come down further. I know with the elastic strap, that will pull the forearm up with it and there won't be a gap. I think I'm ok with the fit of the right bicep and forearm. I need to cut that bottom part where the finishing strip is so it's straight across instead of coming to a point like that. This was one of my first pieces to size and trim, and I see the armor mold needed trimming down at the bottom. _____________________________________________________________________________________________________________________________________________________________________________________________________________ Now, the left side is where I'm having some issues. FIrst, I think the bicep is just too big. I think I need to pull it apart and re-size it. Second, the forearm slips down over my handguard. I'm not sure what to do about this. Re-sizing my forearm would not work because I can just get my hand through the wrist opening now, so I'm not able to make that opening smaller. It's possible if the bicep fits better, that will let the bicep be a little higher on my arm, and when it's connected to my forearm, it will pull the forearm up, which won't let it slip down so far over my handguard. I'll get some tape between the two pieces and pull them on again to see how that changes things. But at the moment, I think I need to take apart my left bicep and size it smaller. Resizing the left forearm just doesn't seem like an option.
-
I'm getting ready tomorrow to start on the strapping system for my shoulders / biceps / forearms. I know that there needs to be a strap from the forearm to the bicep, and the bottom of the bicep should be as close to the top of the forearm as possible to prevent a gap. Questions: 1) Do I use webbing or elastic for the strap from the forearm to the bicep? 2) Is there any issue with just gluing both sides of the strap into the bicep / forearm instead of snaps? I don't really see a need to separate the pieces once they're connected. 3) Is there a strap that runs between the bicep and the shoulder? 3a) If there is a strap, should that be webbing or elastic? 3b) If there is no strap, how do the biceps stay up? I've seen threads about a hook on the bicep which catches the shoulder elastic that goes around the arm, but it seems like that's optional. Would they just otherwise float on my arm and be secured in place because of the strap between the bicep / forearm and my gloves keeping the forearm up? 3c) If there is a strap between the shoulder / bicep, can I just glue both sides of the strap into the shoulder / bicep instead of snaps? 4) What is the purpose of the strap that goes around the inside of the shoulder? Is that just to keep the shoulder plates pulled down onto the shoulder? 5) How tight should the inside shoulder strap around the arm be?
-
It means a lot to me to hear you say that. Thank you for helping to make my helmet look better!
-
My First Armor Build Thread ANH-S CAP Armor.
maxsteele replied to Stormy1992's topic in Build Threads Requireing Maintenance
Is that elastic or webbing for the straps between the biceps and forearms, and the strap that goes on the bottom of the shoulders? -
You are 100% correct. I was waiting until full assembly until I put the white on the screw heads and painted the ear rank bar. Details, details. Thanks Germain for keeping me honest, as always!
-
Done! (Well, I have to put a mesh in behind the frown, add padding so I can wear it, and cut back the screws, but that's hardly anything.) (Also, that's some blue fabric behind my helmet's left ear on the front shot. It looks like tape hanging off it, but it isn't. ) Once again, a very big thanks to everyone that has helped me with this build! I would have a pile of useless ABS if it weren't for everyone who contributed to this thread. Thank you all very much!
-
No stripping necessary! And yes, they look much better. Thank you Steve and Mathias for taking the time to look at my progress and talk me through widening the tears.
-
Well Steve, I'm not going to paint over the grey I already have. The only painting over I'm doing is the new layer of black that I just put in. That up-close pic with the flash looks terrible, but it does not look like that at all in natural light and at a normal viewing distance. I'm going to try painting the grey in and see if it works. If it doesn't, then I'll consider stripping it. It won't take any more effort to strip it a couple of days from now. If I do need to strip it, since it's ABS and not painted HIPS, will hitting it with thinner take the paint off? I don't want to risk using too much thinner and start softening the ABS. That would be my luck. Or would I just scrape off the paint with some type of small instrument? I've never done something like that before.
-
Thanks for sticking with me Mathias. I'll paint to my pencil lines.
-
I have traced with a pencil right down in the valley where it butts up against the wall. That is where I believe I want to put the black up to: (please ignore color difference - this was with my phone's flash so the pencil lines would show up)
-
Gah! That's what I was going to be doing originally! Then Panda was saying that my tears would be too big. Alright, I'll paint them right up to the wall, but not going up the wall. So my black line should rid in that valley all the way around the tear. I can certainly do that. It's what I wanted to do in the first place.
-
Thanks for the near real-time feedback guys. You're all awesome. Here's the left side again, made bigger: As I said, I'll let this dry overnight and then I'll paint in the grey, and modify my stripes. I think I'm good now.
-
Here's the right side. Now I feel like I went too big on the right side. Or do I need to go bigger on the left side? This is tricky. I need to wait for the black to dry before I can paint in the grey. EDIT: Just saw your "Yes", Mathias, on should I go bigger on the left side. That makes me think I went the right size on the right side here. I'll bring the left side out more.
-
Here's a bigger tear on the left side (ignore all the bleeding on my tube stripes. Believe it or not, those look better than what the right side originally looked like) Should I go bigger? That seems plenty big right now.
-
Hrm... Well, better too small than too big, right? Definitely easier to add more black on than to scrape away the black. I'll work on bringing them out.
-
I did go smaller on the tears than I had originally masked off. Pandatrooper was telling me that I masked off too big of an area. I explained that I had it masked so the black would come down to the indent of the tear, into the valley. He said that the black was on the flattest part of the tear ducts, which meant before the valley, and then he posted this image: And so I brought the black lines back to before the dip into the valley on the tear. My black lines are on the flattest part of the tears. Comparing the tear on your image to the tear that Panda posted, his tear is certainly smaller than yours. I feel like if I bring the black lines out further, I'm going to end up making my tears too big. Also, interesting that your helmet pic has 11 tube stripes, and Panda's has 13.
-
My First Armor Build Thread ANH-S CAP Armor.
maxsteele replied to Stormy1992's topic in Build Threads Requireing Maintenance
I got my belt from tkittell: http://www.whitearmor.net/forum/topic/19803-fs-white-canvas-belts/ Nice belt and he puts a piece of plastic in the middle of the canvas to help with strength. I bought a pair of Bass Amsterdam boots, stripped them of the polish, and painted them white. You can see my whole build on the boots here: http://www.whitearmor.net/forum/topic/25062-maxsteeles-bass-amsterdam-tk-conversion/ -
Behold! The power of toothpicks! I didn't take a before shot. But trust me, it was not pretty. Paint everywhere. This pic is a little blurry, but you get the idea. My right side tube stripes are complete! Tonight, I'll paint the left side, let it dry over night, then I'll remove the template and clean up if necessary. Final touch will be the rank stripe on the ears, which I'll free-hand, and then I am done with painting!
-
Yep, I had checked it, and the white was dry to the touch. Unfortunately, once the wet blue hit it, it wasn't dry anymore and started mixing with the blue. I tried some cleanup this morning and I think it will be fine. I'll get the left side painted tonight. Sent from my SPH-D710 using Tapatalk
-
I did the "paint gloss white over the template to seal it first" trick, then waited what I thought would be enough time to start painting the blue. I waited about 1 hour and 45 minutes, and then started painting in the blue. Yeah, that didn't go so well. It seems that an hour and 45 minutes was not enough time for the white to fully dry, and I had horrible coverage with the blue. I've tried to salvage it as best I can by letting the blue dry a bit and then painting it again, but I think I'm going to have a big blue mess when I pull the template back. This was on the right side of the helmet. I'm not going to touch the left side of the helmet until probably tomorrow night. Surely that will be enough time for the white to dry. I have no idea what I'm going to do with the right side if it looks horrible. We'll see what happens when I pull the template off. EDIT: Yeah, it was pretty messy. Fortunately, parts that are dry are cleaning up nicely. I'm just going to let it sit for 16 hours or so and then I'll scrape away the mistakes with a toothpick. Testors paint is really good at doing that.