

maxsteele
-
Posts
865 -
Joined
-
Last visited
Content Type
Profiles
Forums
Gallery
Articles
Everything posted by maxsteele
-
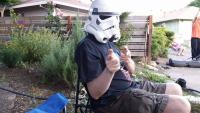
Starting to paint the traps and tears on my helmet, I realized why there are decals that simulate the "hand-painted" look. That's because hand-painting isn't perfect straight lines and blemish-free. I want my lines to be a little off and have some imperfections. That's what makes it hand painted! When there's some wispy bits around the lines, I can always go back later when the paint is dried and clean those up with a toothpick. Otherwise, getting the general shape, size, and position is what it's all about. Here are the side and rear traps painted with the black base coat.
-
No update since January because I've been working on my armor. I started painting today! Here are the tears:
-
Yes, but the difference is - you bend the split rivet prongs so they're flush with their surface. I don't think the cap rivet posts compress that much.
-
One possible concern is the length of the post. The depth at the ab / kidney sides isn't too thick. The posts may be too long on those cap rivets to get a tight fit. The posts on the double cap rivets I have for the thigh ammo pack are 8mm. And that's going through two layers of plastic to hold together. Ab / Kidney sides are only going through one layer. If you're going to use the rivets to hold elastic in place, that may help with the length of the posts.
-
Oh, I did end up trimming the tops of my thighs. I did it in a separate thread: http://www.whitearmor.net/forum/topic/26884-thigh-piece-a-little-pinchy-on-the-inner-part/ However, I would suggest to not consider trimming the tops of your thighs until you are able to wear your ab / kidney / butt plate where you will for close to the final fit, and have a system in place to hold up your thighs on their own. You really can't tell exactly how your thighs are going to hang and fit until you're not holding them up manually. If I had to do it over again, I wouldn't have cut my thigh tops until I had all of this in place first. It's very possible that I may have still cut them, but I didn't see how they would truly fit unassisted before trimming.
-

Mandoman's NE ANH Stunt build
maxsteele replied to mandoman's topic in Build Threads Requireing Maintenance
First, don't shorten the piece with the molded details. From your first pic, you can bring the forearm up higher on your arm. You can also bring down the return edge on the outer part of the forearm, and remove the return edge completely from the inner part. I hadn't taken down that outer return edge yet in this pic, but I made it about half the width that it is here. I had already taken off the return edge on the inside piece. As for tapering, you can certainly do that. Keep the front molded ridges at 7mm / 7mm. The trimming to fit will happen on the other sides, where there isn't any molded parts. That's where you can make it fit to your arm. Just make sure you can still get your hand in and out of the opening at the wrist end. Also, don't size the forearms until you have the return edge at the wrist ends completely removed, and completed the modifications to the return edges at the elbow sides that you want to do. -
Thanks again guys for putting up with my paranoia. Details like the gap between the chest/back shoulder tabs isn't a topic I've seen discussed anywhere on the forums, so when a detail like that looks different than pretty much everyone else's builds, it makes me question if I should continue with how I'm doing it or if I should be modifying. I'll continue with having the tabs touching each other, and I'm going to glue the elastic directly to the back shoulder tabs.
-
Heh, good observation. It also looks like the large majority of his plastic bridges are on and down the front of his shoulder. Ford's is half-and-half. I think I'll keep my tabs the lengths they are. They are not overlapping, but they butt right up against each other.
-
Ah ha! Now that would work. Thanks Jason. I have been looking at lots of other builds and haven't seen anyone that has their chest and back shoulder tabs touching each other. Everyone seems to have anywhere from a 1/2 inch to an inch or more gap between the two. I'm not saying there's something wrong with mine, I just don't have a reference on how the pieces fit on a body when those tabs touch each other to get a good fitting of the chest over the ab and the back touching the top of the kidney. The closest reference pic I've been able to find is this one: This is the closest I've seen. It also certainly looks like his elastic band wraps around the whole back plate shoulder tab, doesn't it? Both Ford and Hamill had a good inch or so gap between the two:
-
If the bend wasn't enough, I could see them sticking up a bit in the back. But as I mentioned, I haven't seen exactly how they sit on my shoulders yet, so I need to do that to see how the bend is. My bigger concern is the Centurion requirement of the elastic band to hold the back part of the plastic shoulder strips down to the back plate. If I don't have any elastic exposed, I don't have anywhere to put the elastic around to hold the shoulder strips down.
-
I cut my lengths of white elastic for the shoulder connections, and installed the two snaps on one end. I'm going to follow the suggestions by Germain and Jonathan to glue down the elastic on the back. I do have a concern with how I'm going to hold down the free-floating shoulder bridges though. I know CRLs aren't written in stone, but it does say for Centurion: The plastic shoulder straps need to be held down in the back via a white elastic band to the white fabric that connects/bridges the chest and back piece I think because I don't have any size to my shoulders or upper chest, the chest and back shoulder tabs touch each other. The elastic is just binding the two together, with no actual elastic exposure. Because of this, there is no white fabric that I can attach this elastic band to. The band would have to wrap around the outside of my back plate shoulder tab, which I don't think would be acceptable at all. In order to reach Centurion, I don't know how I would do this band. Not thinking of Centurion, I'm going to have to have the plastic shoulder straps free-float in the back in order to put on and take off the back and chest plates, unless I use velcro or some other temporary adhesive to hold them down once I have those pieces on. Which brings me to my next topic - do I need to trim back the back / chest shoulder tabs so there is a gap? Are my tabs just too long for my body shape and I need to cut them in order to have exposed elastic that I can attach the elastic band to in order to hold down my plastic shoulder straps? I think if I were to cut any, it would be from my back plate. One step I haven't done yet is to see exactly how the plastic shoulder bridges sit on my back / chest shoulder tabs when they are touching. The point where the tabs touch is on the rear part of my shoulders, and that tiny gap between the two may be back far enough to have the elastic band poke out and hold the shoulder straps down in the right spot. I'll look at that this evening.
-
Mandoman's NE ANH Stunt build
maxsteele replied to mandoman's topic in Build Threads Requireing Maintenance
I trimmed the fronts, taped / used magnets to hold them together on the butt join, then sized in the back and trimmed. After that, I glued the fronts together and did another fitting, found where I could tighten the pieces up more in the back, and trimmed more. I found it was easier to trim the back parts when the pieces weren't glued together in the front because they're not attached to each other and you can flip them around and position them for better trimming. If you do that method, definitely take another test fit for the back joins after gluing the fronts down to make sure the pieces still fit the way you want them. -
Mandoman's NE ANH Stunt build
maxsteele replied to mandoman's topic in Build Threads Requireing Maintenance
There ya go! Now you're making some real progress! Cuts on the chest and the front of the shins look good. I also hit my edges with some 60 grit sandpaper to really sand them smooth. For the cod piece cuts, that was difficult for me to size up properly. I looked at several different builds and different angles to determine exactly how far down they cut their cod. This is where I decided to cut mine at, and it's been good: Here are two side shots so you can see where I came down to: -
Thanks Germain! I forgot about wearing my neckseal when doing the chest / back fitting. I'll do that tonight. It is by no means too late to do the shoulder bridge gluing. I can just pop off the snap plates on the back plate and glue my shoulder elastic directly to the back plate (Horray e6000!). That would also make adjustments easier because I could just un-glue the straps and re-glue them further back or forward on the back plate to make the length longer / shorter. I might just do that if only to have less snaps sitting on my shoulders. Also, going that route I won't need to have the elastic completely doubled the whole length. I'll only double-fold where the snaps fit in, and have a single strip going over my shoulders and glued to the back plate.
-
I'm... not sure. I took the return edge off from the neck on the chest piece. I could have it a little lower. I thought it was supposed to be up against my neck, but I could be mistaken. There certainly is room for me to have it sit a little lower and not be against my neck.
-
Mandoman's NE ANH Stunt build
maxsteele replied to mandoman's topic in Build Threads Requireing Maintenance
The right forearm is 100% oval-shaped. e6000 is very good glue. Here's what I did for my cover strips, and specifically for my forearms: I had similar issues with my forearms. I didn't use an inside cover strip on them. I did use inside strips for the shins and thighs, but still used this method for the outer strips on those pieces: First, I got the cover strip in place after applying glue. Next, I clamped each edge with either spring clamps or c-clamps, depending on how much pressure I needed to put in order to make the edges sit flush. Next, I placed a series of tape strips perpendicular to the strip, first affixing half the tape on one side of the strip, and then cinching down the other half of the tape across the strip and down on the other side to the armor. I did that down the entire length of the strip. Finally, I put my 3/4 inch magnets at regular spacing down the whole length of the strip. For my forearms where I just couldn't get the pressure, I did the c-clamps on the edges and then tape. Then, I tied three pieces of elastic around the forearm at the ends and the middle, and pulled each one really tight and tied them off. Then I put down the magnets. This pic doesn't have the elastic that I tied around, but you get the idea of how I taped it and used the magnets. All my magnets are wrapped with tape to prevent chips and scratches. This pic I'm using the normal spring clamps on the edges, but this was after I had an issue with getting the cover strips to sit down properly. The c-clamps on the edges helped a lot. -
Oh, it doesn't fit over my head at all that close together either. Fortunately, there are snaps on both sides, so I can have one shoulder snapped, then get the back and chest plate situated and snap the other shoulder in place. I've been doubling my elastic, and burning holes for the snaps with a soldering gun. That's seemed to be pretty good reinforcement with my black no-roll elastic. I'm hoping it's just as good with the white elastic I have. I've seen others talking about this and they've said that just doubling the elastic has made it strong enough so it doesn't pop through.
-
Here's the final test fit of my chest and back before I make the lengths of elastic. I used the elastic from my kidney / butt plate to connect the kidney to the back. It looks like they're the proper length and in the right position. From the way the back and chest lay on my body, there is no gap necessary between the shoulder tabs. That means I'm going to have pretty short white elastic for my shoulders. Here are pics showing the fit. If no one sees any issues with them, I'm going to make the white elastic pieces, which are only going to be approximately 2 1/2 inches in length. I hope the snaps don't dig into my shoulders too much. It seems on most builds that people have longer elastic for their shoulders, but not mine. I could also move my snap plates back further from the edges on the chest and back shoulder tabs. That would give me a longer piece of elastic to drape over my shoulders, and have the snaps further apart. Since it's e6000, it's nothing to pry them up and move them further. Thoughts?
-
My First Armor Build Thread ANH-S CAP Armor.
maxsteele replied to Stormy1992's topic in Build Threads Requireing Maintenance
I'm not good enough yet to tell. Sent from my SPH-D710 using Tapatalk -
My First Armor Build Thread ANH-S CAP Armor.
maxsteele replied to Stormy1992's topic in Build Threads Requireing Maintenance
If those tears and traps are hand-painted, that's an amazing job! Looks good! -
New NE build Tampa Fl
maxsteele replied to Pencap510's topic in Build Threads Requireing Maintenance
Aah, no boots yet. Yeah, you can't really do the fitting of the shins until you get your boots. You can absolutely do the 10mm / 10mm cut in the front. But don't cut to fit the back yet, because you have to take into account wrapping around the boots at the bottom. You can also take off the return edge at the bottom of the shins completely. You don't need your boots for that. As for the return on the top of my thighs, I took the return edge completely off on the inside of both thighs, because that's the parts I had to trim down to keep it from rubbing against my cod. I left the return edge on the outer parts, but I trimmed down the return edge to about half of what it was. As for rotating the pack to help with the overlap on the back of the thigh - I'm not sure what you mean. There shouldn't be any overlap in the back of the thighs. All pieces should be butt-joined and then a finishing strip placed to cover up the join. I'm going to post this reply, but I'm going to look back at your pics to see if I can tell what you're referring to. I'll edit this post with more info. EDIT: Yeah, I don't see what you mean by overlap. The way you have the ammo pack wrapped around the bottom of the thigh is the way it should be. There is some extra that you have, just like I do. What I was thinking about doing was finding where I'm going to drill the holes, doing so, and then cutting off the excess after the holes. -
New NE build Tampa Fl
maxsteele replied to Pencap510's topic in Build Threads Requireing Maintenance
From what I've seen so far, I think it looks good, but I can't tell how high you have your thighs because I can't make out where your knees are. Do you have the shins done at a point you can wear them? Then we can see what the space looks like between the bottom of your thighs and the top of your shins. -
Mandoman's NE ANH Stunt build
maxsteele replied to mandoman's topic in Build Threads Requireing Maintenance
Way to go Chris! Just remember to take pics of what you're doing, and post here with them and any questions you have. You're not alone on this build! -
I've looked at a bunch of builds and pack attachment tutorials, and it looks like that is all preference. Some people purposefully line it up so there are 2 rectangles on one side of the thigh and 3 on the other.
-
Here's the fit of the thigh pack around my right thigh. I think I have the placement right: I'll need to study some other build threads to make sure I get this where it should be, and where to drill the holes on the sides. I think I have it tight enough to where I'll be able to put some glue on the inside to keep it from floating up / down once it's fastened into position. I know that the rivets should punch through the molded ridge at the bottom of the thigh. I need to find out how high up on the pack I need to put the hole, and that will determine where I put both holes.
