

Brent
-
Posts
196 -
Joined
-
Last visited
About Brent

-
 Amazing work Andy! I'm looking forward to seeing these soon. I'm going to the filming for The Gamers: Hands of Fate Tomorrow. Unfortunately the cylinders haven't arrived yet . The filming goes for three days, so there's still hope I can get them in time for some of the filming. In typical Star Wars fashion, they may appear and disappear between scenes . I also want to give a real big thanks to Andy for pushing up his timeline to get these ready in time for the filming. He has been incredibly helpful, and I'm hoping I get to use this as an opportunity to show off his work. If I get a chance to be on film I want to show the best FISD can offer, and Andy's cylinders are certainly top notch. Fingers are crossed, I really want to get these in there. I'm watching the mailbox, and I'll post as soon as the set arrives.
 -
The trick is to match the helmet quality to the armor, that's what makes it look so natural
-
Be sure to set the standard in your neighborhood!
-
Now I've added the false bolt. Here is the plastic with a strip of aluminum glued to it. After the paint job:
-
I finally worked up the guts to cut down my nice magazine. I used a 6" cutoff wheel to cut down the main magazine. I then ground down the front and back a millimeter or so with a dremel and bent the edges of the top and bottom slightly out so that the end cap would slide back on. I shortened the spring too, so the magazine should still be functional. The end cap won't easily come off anymore, it's pretty solidly pressed on there.
-
Go slow. Try it in front of a mirror first so you can figure out how you need to bend your legs. I cracked my cod a bit sitting, so don't be too surprised if you need to do some repairs.
-
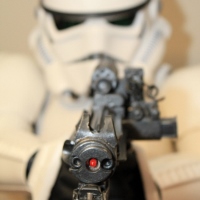
I made a little more progress. I made an L-Bracket for the counter using some additional scope rail material. I put a couple of holes in it that allow me to screw the counter to the bracket. I then J-B welded the bracket to the rail. I also added t-track I got from @Marv. T-track is a bit of a pain to attach since it needs to be cut down and the ends needed to be filed a bit before they fit in the hole. Then I invariably find that It's slightly too long and the track doesn't lie down flat. I figured out that if it fits close, but not completely flat, I can hold it down with leather gloves and apply a little heat to the ends with a heat gun. The track then stays place exactly where you want it. Work still to come: cut down mag, false bolt, cylinders, paint. I have a couple of questions I'm hoping someone can help me with. Was the scope rail painted? When going through screen shots, I seem to see a lot of metal around the rail. I haven't yet found any clear examples of a painted scope rail. I haven't done a very deep search yet, but here are some clips from my initial findings (some of these are the same blaster in a different frame, I wasn't really cataloging my screenshots as I went) All the replicas I've seen have had the rail painted black though. Has this been discussed before, and what have been the conclusions? Was the bolt ever covered by tape? I recently read on parts of Star Wars"The bolt, where it shows through the oval cartridge ejection port on the right side of the gun was then covered with aluminum or chrome tape" This seems to only be confirmed on the "A2" variation, which also has the wires. I haven't been able to spot that one in the movie yet, so the tape may be a similar promo only feature, but it would be very convenient for me of tape was screen accurate. If anyone can point to an example of that in the film I may go that route and it would simplify the work I need to make a false bolt.
-
I think the groove is just the way that the Doopys kit adds on to the Hasbro. The basic Hasbro scope front is pretty bad, so the Doopys mod has you cut it off and cover it with a couple of resin pieces. The Doopys addon comes in two resin parts which are the front detail with the screws and lens, and then that little bridge piece, which is basically an adapter to the Hasbro but give it a bit more of an M38 shape. All-in-all the Doopys kit does a pretty good job of making the Hasbro scope look like an M38 with just a couple easy to attach parts.
-
For EIB, yes. The Hasbro with Doopydoos add-ons is accepted for EIB. There were two basic styles of scope in ANH. What you have on the Hasbro is the same style as the M38 scopes; like the one on the right in this picture. The other style is a bit shorter like the one on the left.
-
You may also want to check with your CPA to see if there is any difference between a function hosted by a charity (Children's Hospital) and a function that benefits a charity (comic book store that makes a donation in your name). It seems like it would be pretty easy to fall in to a grey area so be careful.
-
TK-6726 Requesting ANH Stunt Centurion Status[ATA*][60]
Brent replied to JEDISTAR's topic in Request Centurion Status
There are some great reference pictures for the sniper plate here: http://www.whitearmo...nee-a-new-hope/ The plate just goes down straight against the knee without bending back in. -
ANH E-11 Build: Real Parts
Brent replied to mr_sparkle's topic in Build Threads Requireing Maintenance
If you are looking for cylinders start here: http://www.whitearmor.net/forum/topic/17306-3-central-fuses-on-e11-blaster-cylinders Andy doesn't have a sale thread yet, but he's getting close. -
TK-6726 Requesting ANH Stunt Centurion Status[ATA*][60]
Brent replied to JEDISTAR's topic in Request Centurion Status
Nice job! Try posting the pictures to photobucket and linking them using [img=http://path/to.jpg] -
No. We are a 501c7.
-
If you can't find one you can try making your own. This is from the Best Sterling Templates Ever thread. I got a piece of scrap plastic from a local plastics store and cut out the shape with a dremel. Then I heated the plastic in a stove and formed it with some leather gloves over some wood and bent metal that I cobbled in to the right shape. It's a bit of work, but it's doable.