


andyoda
-
Posts
38 -
Joined
-
Last visited
Content Type
Profiles
Forums
Gallery
Articles
Everything posted by andyoda
-

Vacuum forming a CFO ESB MKII helmet
andyoda replied to sskunky's topic in Build Threads Requireing Maintenance
Great to see the master at work -
Anovos Vs SDS Hero Lid, thoughts?
andyoda replied to welshchris77's topic in Hard Armor (General Discussion)
SDS Hero helmets are a shocker and the decals/stickers are nowhere near close to movie accuracy. Ainsworth can't even get the 3 bumps right on the ears for the Hero helmet instead has the stunt 4 bump ears. Original maker my butt. -
Dougal's ANH Hero Build -- RTMod
andyoda replied to Dougal's topic in Build Threads Requireing Maintenance
Nice work mate. I know what you mean about the journey as I've just finished putting mine together after about 4 years lol and I've decided to do him 2 pack solid paint as my armour is old and didn't have the UV stabilizers in the ABS and started to yellow He's now finished in plastic grey primer and is about to get painted If you need some pointers mate I'm more than happy to help out. -
G'day everyone, I'm about to finally finish my Luke Hero helmet and I'm needing a pair of-as close to movie accurate ears. The helmet (full outfit) is the Follano version and the ears I currently have at the moment have 4 bumps on them. I've modified the left side and it now has 3 bumps but I'd much prefer ones that are already done. If someone has or knows of someone please let me know so I can finish this bad boy. Will add some pics soon
-
RS Props helmet compared to SDS Battle Spec
andyoda replied to BTJepson's topic in Hard Armor (General Discussion)
Mate, your pics have proved just how poorly the SDS helmets are put together and are a waste of good earned cash Love Rob's RS helmets -
If you want a tough, durable matt black finish to the inside of your helmet use a 2-pack matt black. Your local automotive paint shop should have it and once the hardener has set it will be very scratch resistant. I've use truck bed liner paint and rubber paint which are all OK but the 2-pack is just that much better. Before painting the inside of your helmet make sure you use a black, plastic bumper flexible primer as it will give something for the paint to stick to. Good luck with the build mate. Will upload some pics when I've finished my helmet
-
Make sure you use a proper plastic primer so that it can flex whilst your trooping in it. I've started to do mine in 2-pack paint but it's only going to be for a static display and not for costuming. I've done armour in automotive acrylic which is a bit of mucking around but the end results are great. The beauty of acrylic is that it's very forgiving and if you mark or scratch your armour you can always touch it up and feather the paint in. I'd also suggest clear coating the helmet so that the decals/stickers are protected. Goodluck with your armour mate
-
Doopydoos E-11 build, Total amount of expences.
andyoda replied to SorenM's topic in ANH BlasTech E11
Mate, that is a thing of beauty. Well done -
G'day, I've been restoring old and vintage toys for nearly 20 years and colour matching is something I've had to learn in order to complete the restorations. Looking at the two greys the Testors appears to have a touch too much blue where-as the Humbrol looks like it needs a bit more blue. In my opinion and experience if you can get a grey between the two I'd say you'd be getting closer.
-
Another thing Mark and that is he is stating that his are cast from the originals and that he's casting them in black and not painting them, so if the clown know's what he's talking about why did he cast all off the components in black then? That's a rhetorical question of course I'll shoot you an email later mate to show you some of my latest works. Talk later dude.
-
First ever E-11 build Doopy Doos full kit
andyoda replied to Potty Meister's topic in ANH BlasTech E11
Go the Devcon 5 minute 2 part epoxy. It's the best out of all the glues and once set is extremely strong and almost unbreakable!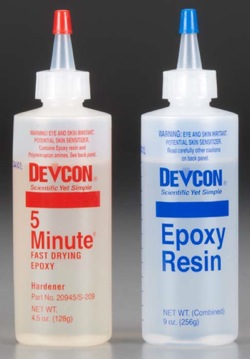
-
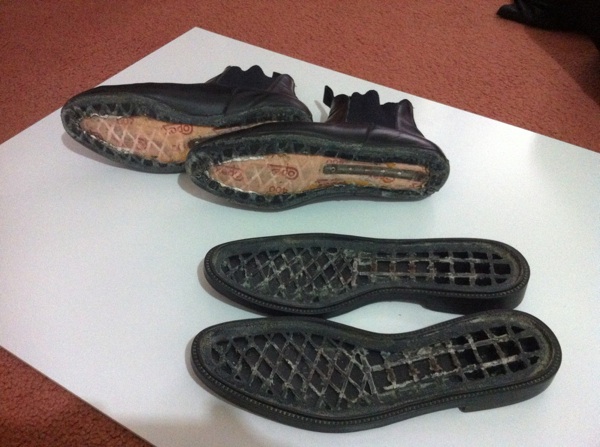
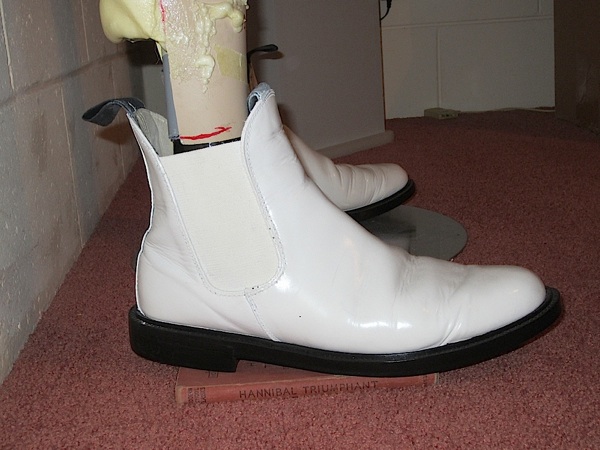
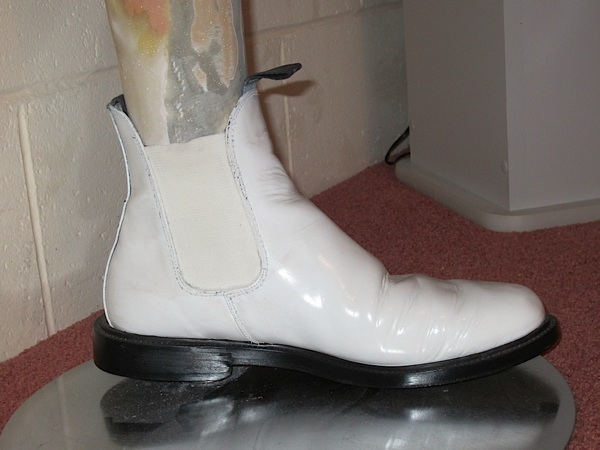
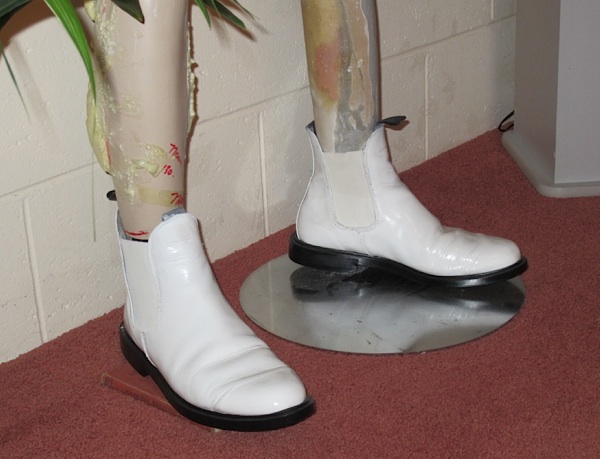
Nice boots and with the seams sorted will look the part. Here's a few pics of my boots that I've done some major work on. I picked these up here in Australia from an OZ eBayer who advertised them as vintage Chelsea boots. They have leather soles which I repainted, I removed the original elastic as it was stuffed and had new white elastic put in. I ended up pulling the soles off so that I could get a nice professional look when painted. The only real gripe I have with them is that the seam under the elastic is on a slight angle. I'm actually thinking about getting a small piece of leather stiched and glueing it on the boot and filling in where the old stitching is and painting over the top. I used Waproo white leather paint in a pressure pack to paint them. The finish is superb and looks like it was original, factory made.
-
There's always 1 out there Mark "unfortunately." Having a set of your hovi tips which are tops I loathe these a......holes Not only is the guy a joke but is also a lie unto himself. It's obvious yours are not a re-cast from the originals and are unique to you and it's sad that this quince is not only copying your art but also selling it I've done some more work on my trooper and will send you some more pics soon mate. Cheers, Andy.
-
Helmet Repair / Armour Upgrade
andyoda replied to Idaho Jones's topic in Hard Armor (General Discussion)
Mate, if you were here in Australia I would be able to restore it for you, doh! There is a way of repairing/restoring it without taking off the decals but would take someone who has the expertise and skills. ------------ -
ANH Stunt "HDPE" Prototype Helmet Showoff.
andyoda replied to RS Prop Masters's topic in Build Threads Requireing Maintenance
Mate, you just keep on getting better. I've been following your topics and love what you have done. Just wondering if you will be selling any armour components? I've a Follano outfit with hero lid and I wouldn't mind changing the leg armour. Is my GF outfit (see link below) the ROTJ armour with hero helmet? I'm in the process of building a museum static display and would like some of your opinions Cheers, Andy. http://s1184.photobucket.com/albums/z321/andyoda/?action=view¤t=GFHeroStormtrooper1-1.jpg -
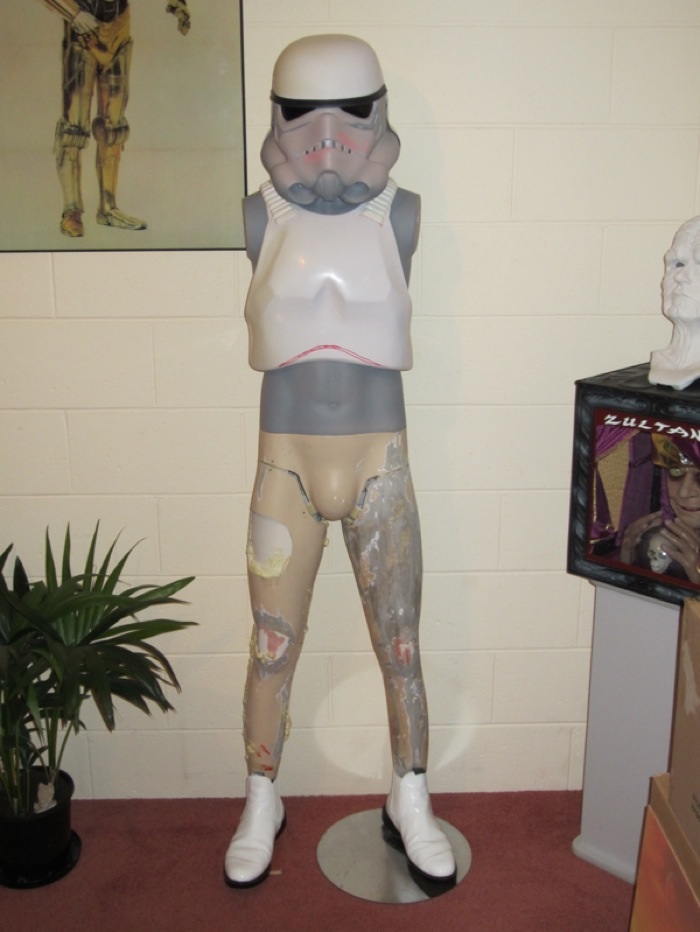
I've a GF Follano Hero lid and armour and after some mods it is quite a handsome helmet. Although mine's in prime at the moment it is pretty darn close to movie specs now. I've modified the the teeth and got rid of the bump under the right eye and have fixed the right ear piece which didn't sit too well. The ears had 4 bumps instead of 3 so have started to modify them as well. Will upload some pics later so stay tuned.
-
Not being rude to the seller but go for the TK boots as they are magic and are as close as to the movie as one will get. He has just finished a new batch and I've bought another pair and you won't be disappointed.
-
Magic boots mate. I've got the original TKBOOTS and although made well, have the rather pointy toe and I much prefer the squarer version. I've also had a couple pairs of the famous "Caboots" and once again made well but didn't fit the bill. I've placed my order for the new version as a little Christmas present for my Stormtrooper who's been a good boy.
-
Er, thank you very much. Elvis has just left the building. I can't believe that people would waste their money on disco boots???
-
Hi Erik, what you've shown and described in all my years of airbrushing and spray painting is called paint burn. This is usually caused by using the wrong type of paints and/or primers which react with each other. What you need to do is rub back the new paint until you're happy with the surface finish and use Prepsol which is a cleaner to clean off wax, grease, oil from finger prints etc. Once you've done this I suggest you spray a clear plastic primer on your armour and rub back with 1200 wet n dry and repeat this process for about 4 coats. Once you've done this I would then use a white primer suitable for 2-pack as it goes on magic and can handle any type of paints. I always rub back any piece with 1200 wet n dry followed by 1500 as surface prep is very important prior to paint. I'm in the process of painting my armour in 2-pack enamel and it has taken me a very log time just to do the helmet but the results will be worth it. I hope this helps and good luck mate.
-
POLL: What glue have you tried, what actually works
andyoda replied to Daetrin's topic in Assembly, Mods, and Painting
I've used a great product called IPS Weld-on #16 acrylic solvent cement. It works magic on ABS and styrene but not sure about hips tough as I've never used this plastic, doh! The only thing is that it melts/welds the ABS together so make sure you have everything lined up properly as it's almost impossible to pull apart once dried.
