

zsavk
-
Posts
360 -
Joined
-
Last visited
Content Type
Profiles
Forums
Gallery
Articles
Everything posted by zsavk
-
looks fantastic Michael. Ill post up pics of my arm strapping tonight when I get home.
-
If you can avoid using a heatgun do it. Trust me lol. But if you have to make sure you take your time and be aware of where the hot air is bouncing to. Or what is behind what your heating. I was so busy trying to soften a particular spot on my greave that I didnt notice the heat was hitting another spot and melting the plastic until it was too late. maybe put something inside the greave to absorb heat from your work and protect the rest of the armor. A damp towel or even a plumbers flame proof soulder mat.
-
HDTheater's TK build[*AP]
zsavk replied to hdtheater's topic in Build Threads Requireing Maintenance
Great work Eric! And I love the R2. Thats my dream to one day build a droid. -
Ive been working on the strapping alot lately. Really taking most of my inspiration from Stukatroopers 2008 AP build. As well as doing tons of research here on the boards. Heres some photo updates. http://i17.photobucket.com/albums/b71/Savk/TK%20ANH/100_0839.jpg http://i17.photobucket.com/albums/b71/Savk/TK%20ANH/100_0840.jpg http://i17.photobucket.com/albums/b71/Savk/TK%20ANH/100_0841.jpg The only place I used E6000 was on the shoulder straps to the chest. It really fills the gaps up well. http://i17.photobucket.com/albums/b71/Savk/TK%20ANH/100_0844.jpg I need to take some more pics. As Ive pretty much got the whole strapping system finished now. Just need a belt to finish things up more or less
-
Coming along great! I had the same issues trying to close the armor up. I used Zap a Gap CA+ glue on every joint. And in addition I added Plastic weld to all inside and hidden joints. (It melts the plastic so can distort places you dont want to distort) I found e6000 had to cure for at least 24 hours before daring to touch or move anything. And the CA+ glue really seemed strongest, quickest and never broke even with all the pressure needed to close up the pieces. The only down side was that you literally have 10 seconds before it sets and you better hope everything is lined up lol.
-
Great stuff guys! Thanks again for all your hard work
-
Wow! Thanks everyone. Once again I owe you all a drink! Appreciate the awesome replies.
-
What is it your painting? I had alot of trouble getting Rustoleum stuff here in canada. They actually discontinued alot of their stuff here for some reason. Sounds like your looking for an off white? Going RotJ?
-
Thanks Pat you rock! And congrats on EIB
-
Can anyone tell me if the ANH stunt TKs had a visible snap on the underside of the crotch cup? Ive seen some mention of this as being screen accurate. Basically should I use a snap plate glued to the inside or just snap iot through without?
-
Alrighty replacement shin ordered! Onward!!! I did some work on the biceps this weekend. Got them both done with finishing strips. Using 15mm for the arms. I had to trim off about 11mm from each half of the overlap. I put backing strips on first. Using Zap a Gap CA+ glue. I clamped them all up good and even though the glue dries in seconds I left it for a good 30 minutes while I cut some outer finishing strips. I also used plastic weld on the inside afterwards to really seal it up good. In addition to using the directions that came with the T/MC kit Im also following Stukatroopa's AP build for more tips and ideas. The next day I returned and sealed up both sides with outer finishing strips. I left them clamped and magnetized until I return. Probably hit up the bracers tommorow.
-
thanks for the added details guys. Very interesting stuff! THere is so much history and background to it all.
-
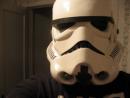
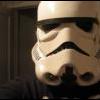
Hmm your a bit off unless I wasnt sold what I thought I bought The one on the left is a T/MC ANH helm. Its almost identical to my AP. The one on the right is a signed TE RotJ. They are very different. My camera angle maybe is not the best to show a comparison. Rob
-
Ok Ill send Tray a request. Hopefully he can get me something. Thanks for checking Terry.
-
Form the backs to fit closer at the velcro lap. (Which I did perfectly) Unfortunately I didn't notice the heat hitting other areas
-
-
Heres the disaster! Its not too too bad. Probably not noticable by the average onlooker. But I know its there Inside cover strip warped bad when I tried to reheat to fix the two bubbles.
-
Thanks Terry. Ill post up a pic or two tonight after work.
-
Well I managed to get the backs formed up nice and tight. But in doing so I did not notice the front of the shins melting My left shin now has a couple bad craters in it. Ive tried reheating it to push them back down but it just seems to make things worse. Anyone want a job? lol Ive either got to ship this shin to someone who knows how to fix it (Id gladly pay) Or Im going to have to order up a replacement. Any takers? I can post up a picture of the damage if needed.
-
Thanks Ok I started assembling the shins today by trimming the lap on the front down for butt joining. Going with 20mm wide cover strips in back and front. First thing I did was reduce the size of the laps down to 11mm/11mm then glued and clamped the back piece in first. I left it long on the inside so I could trim it exact after its together. Then I secured the other half to the backer butt to butt leaving a 24mm flat +/- a mm or 2. I let that set for a few minutes before putting the outer cover strip on which was measured to fit perfect and had the corners nipped on a 45 degree already. Heres a pic with them on and sniper plate riveted on. They fit perfectly and will need minimal padding just to keep them from rotating I think. I lapped the back and used velcro to secure. Its not a perfect closure but Im not sure how to make it close better. Anyone have a better method for closing the backs? Should I try heating up the shins to better round the back to fit more snug?
-
ya I just bought a 2 piece black sport underarmor. The two piece is nice for making washroom breaks that much more easier.
-
Cool Idea! I opted to velcro it in there along with some padding tonight: I also glued on the ab button plates and painted the buttons. The Kit came with stencils for this and they worked great. So here is the completed T/MC helmet beside my RotJ TE just for comparison. I cant believe how different they are when you see them side by side. The ANH style is so wide compared to the RotJ. Hoping to get a good amount of time on sanding everything this week. Then Ill start trimming the armor laps down for butt joining.
-
Quick question. Is Mesh behind the frown EIB Acceptable?
-
Thanks Tom! Ya I raised it once already lol. Had the RotJ furrowed brow going on I wil definetely trim another 1/4 inch off the cap and raise it up. Appreciate the comments and help.
-
For the hovi mesh do I friction fit them in the ends or secure them with some glue or something? Update: Ok I jammed them in and then used some CA glue to secure them. I was able to finish up alot of the Helmet. Just have the ear bumps and some extra coats and touch ups left to do I think. Oh and some padding on the inside. Let me know what you guys think. Im hoping to go ANH EIB Stunt with this. I followed TK4510s helmet assembly tutorial pretty much 100% so I didnt think archiving my progress would help anyone Thank you Mike.