

Jancelot
-
Posts
242 -
Joined
-
Last visited
Content Type
Profiles
Forums
Gallery
Articles
Everything posted by Jancelot
-
I initially did this on my AP set as I like to lift as well. Had to swallow my pride and take them out, though. You can see the process I used in the three posts below. The first one starts on the 4th image down. Post 1 Post 2 Post 3
-
Minutemans ANH Stunt Build [AM]
Jancelot replied to Minuteman's topic in Build Threads Requireing Maintenance
Viel Glück! -
Quixotic5891's ANH Stunt Build ATA
Jancelot replied to Quixotic5891's topic in Build Threads Requireing Maintenance
Your build is looking great so far! I trimmed my thighs a bit too much as well. They still fit but I plan on going back to add a bit of spacing. I'll keep an eye out to see how you go about it. Carry on! -
I'm a Bay Area transplant of 5 years now, but it feels like home. I was mostly out of commission the past couple days fighting off the flu. But I managed to squeeze in most of the updates. As soon as the undersuit arrives I believe I'll be ready for EIB submission. knee ammo belt is taped on one side (rivet popped) front torso overlaps ab at times (shorten elastic straps?) gap between back and kidney is too large (shorten elastic straps?) white elastic is missing on shoulder straps ditch that undersuit top, the sharpie over the logo just stands out too much on the back of your neck (this one is on the way so not updated in the pics below) tighten the butt to cod strapping, the cod is a little "happy" side gaps can be decreased about 5-10mm TD canister - embiggen the gap in the metal strips as it doesn't fit snug on top of the belt left shin sniper plate sides need to be shaped and glued loosen strapping between chest and back so they both come down more (update white straps) the right thigh is sagging (lock in thigh lengths) shoulder straps - reshape
-
Thanks for the pointers, Charles. I believe I've addressed all of them. An Eastbay under suit is on the way over the Bay Bridge to me. Working on the rest today. So close...
-
Cool, I'm going to have at it with the heat gun. In the meantime I did a trial fit and my biggest concern is with the torso. The front pops over the ab section and the gap between the back and kidney is rather large. My notes: front torso overlaps ab at times (shorten elastic straps?) gap between back and kidney is too large (shorten elastic straps?) side gaps can be decreased about 5-10mm the right thigh is sagging knee ammo belt is taped on one side (rivet popped) helmet is missing the s-trim left shin is lacking velcro in the back; sniper plate sides need to be shaped and glued bicep straps need to be tweaked white elastic is missing on shoulder straps (also need to re-shape at least the left one a bit) possible trim bottom of shins as gap is small (and regular walking is very difficult) TD canister - embiggen the gap in the metal strips as it doesn't fit snug on top of the belt Thoughts?
-
Results of the lifter shim with a 5mm spacing. I have not applied any heat at this point, nor are the sides glued down. My replacement knee plate arrived pre-trimmed so I didn't have the option of leaving a mm of plastic or so on the front-bottom lip. The sides line up much better and the front side edges will conform with a bit of heat. I'm feeling as though this is sort of 6 vs. a half-dozen here.
-
R5SB's ANH Stunt Build WIP (TM)
Jancelot replied to R5SB's topic in Build Threads Requireing Maintenance
Impressive! Your results are looking great. -
Yeah, you're right. The gap came out to 7-8mm and I was looking for 4-5mm. I'll hit the lifter with some more heat and sand paper
-
Hmm, I did use that method. Perhaps my can was wonky. I'll hit it up with some sand paper to smooth it out and shape it a bit more. Here is the initial result of the sniper plate lift. I'm just holding the sides down with my hand and haven't used the heat gun, either.
-
TI-9327's ANH Build[*TE2]
Jancelot replied to ti9327's topic in Build Threads Requireing Maintenance
Looking good! The lighting made the belt look gray at first. -
Ok, forgot about the knee ammo belt. I was about to hammer down the cap rivets and wanted to double-check my placement. I used the paint can method to round the corners. Thoughts?
-
SIMpixels 2mm TM ANH Stunt Build
Jancelot replied to SIMpixels's topic in Build Threads Requireing Maintenance
Looking good and congrats! Only a full year faster then my build. -
Thank you all for the kudos and encouragement! I can't believe it's over a year since I started this project. I'm basically externally complete at this point and just waiting for the final elements to dry. I'm certain they'll be some internal padding and adjustments, but submission will be coming shortly. And none too soon as the wife is due any day now. I want to send out retro thanks to chookaboom for the pics he sent of his AP sniper plate as well. On that note I had an idea to adjust the angle of the sniper plate to line up a bit better. I bent an ABS strip over at a slight angle which I'm gluing at the bottom of where the plate will sit on the leg. This piece will slightly push the bottom out about 5mm and the angle up. No one really sees from the below the knee (except crawling toddlers and my dog and they can't talk ), but the sides and top are much more visible. I'll have results of this attempt in a couple days.
-
Ok, thanks and thanks, Mathias! Gluing them on now. I glued the center of the sniper plate in a position that lined up the best for both sides and then went to work with the heat gun. How does this look for alignment? If it's good I'll hit it up with a nice slathering of E-6000. I also finished up the thermal detonator tank:
-
Okay, thanks for the tips! I'm starting on the knee now and will update on success/fail. In the meantime I followed SIMpixels' excellent guide on creating bicep hooks. Are these acceptable for Centurion?
-
ATA anh stunt helmet...finally started!
Jancelot replied to coffintanker's topic in Build Threads Requireing Maintenance
Looks great! -
After 3 cups of coffee I had a full-on "duh" realization of my problem with the sniper plate. The vertical alignment of the front ridge doesn't match up on both sides of my shin. So when I place the plate snug on each side it is askew. However, the back alignment is off just as much but swapped. I'm afraid if I pull apart the shin and attempt to match up the front, the back will be completely out of whack. Perhaps I'm just missing a workable solution here so I'm submitting the photos below to the collective FISD brain. Note: I double-checked that the pieces marked "Left Outer" and "Right Inner" are in the correct place. The other two are copies on the AP kit so placement should not have mattered.
-
Interesting. I'm actually on my second plate as I chopped the first one down too much trying to get it to fit. I'll just go with the brute force approach and hope it will be acceptable.
-
Thanks for the tip! I'll give that a go after the rest is complete. And thanks for pointing out the drop box. Now it's making my eye twitch. Forgot I hadn't added the glue yet so I'll revise to *almost* complete.
-
Clamps' Stunt Build Thread [AP]
Jancelot replied to Clamps's topic in Build Threads Requireing Maintenance
I've found them indispensable as Glen mentioned. The middle of long cover strips like the thighs and shins are a great example. -
Finally back to my suit after preparing for TK1. Trying to satisfy to the revised Centurion requirements. Sniper plate on this kit is proving to be the most difficult part. It just doesn't fit very well. I'll probably just glue it on for EIB while I figure out how to mount it to correct alignment. I picked up some screen accurate rivets from seantrooper. Filling the old holes is up next. Also finished the belt, have the accurate rivets for the right knee belt.
-
Big thanks Chookaboom! The pics were definitely helpful. Gluing the 40mm side shims: Made a mistake with the split rivets on the ab piece. I failed to look at enough pictures and literally applied the "spread evenly" CRL requirement. The correct placement is to put the top and bottom "close" to the edge and then place the middle one in between them. So now I have extra holes that I will need to fill with some acetone+ABS mixture. Not a huge problem, but certainly annoying. I also had used the "2 inch washer and fasteners" kit from Trooperbay. Turns out the heads on these brads are closer to 13mm instead of the required 8mm so "very close in accuracy" doesn't work for Centurion here. The split rivet kit they offer is a much better choice, IMHO. I have the them ordered so I can comply with the (still be to voted on) upcoming Centurion changes. In the process of redoing the placement of my drop boxes to also comply with the forthcoming update to the Centurion requirements. Pretty simple fix but I need to grab some more white elastic. Below is a shot of the current state: Lastly, initial painting of the ab buttons is complete. I want to make another pass for touch up and round out the shapes a little better:
-
Ok, thanks all. I'll spend some time with the heat gun. I think I'll just try to bring the sides in a bit and then liberally slap on the E-6000.
-
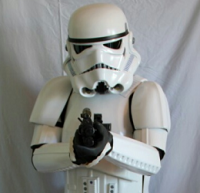
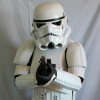
The sniper plate doesn't seem to conform very closely with the top of the shins. Is this normal? As it is I only have glue on the front shim holding it on. It doesn't give me a feeling of confidence or sturdiness. Shots of my thigh straps. I went simple for my first shot at it. I like using a leather belt as it holds up much better for me than the webbing belt. Brads and a small bit of glue holding the ammo belt on the right thigh: Finally a few shots of my arms.