pandatrooper
-
Posts
2,730 -
Joined
-
Last visited
-
Days Won
1
Content Type
Profiles
Forums
Gallery
Articles
Everything posted by pandatrooper
-
Hi Brandon. Sorry to sidetrack, but if you're interested in joining the 501st Legion, please make sure to register on your local garrison. You are in Victoria, which means you would be a member of the same squad I am in, the Outer Rim Squad within the Badlands garrison. You will probably meet a few fellow local members on the Island there. They just recently held an event at a charity toy show / food drive, and they are also planning to be attending Sidney Sparkles parade. Again, you should sign up on your local garrison forum for more info. Anyways, welcome aboard! Make sure to read those getting started links above, and hopefully you can troop in Vancouver some day.
-
That’s Cushman Paintball. They’ve been around for a while, they are not new. They make vac formed “shells†of weapons for paintball, etc. and branched out into other vac form weapons for reenactment, etc. They happen to make some of the SW based weapons because they were based on old WWII weapons. Most of the feedback on them has been: - Lightweight weapon, good for trooping - Looks good from 20 feet away, but not up close - very soft vac form pulls - poor trimming / seams - bad service - bad communication
-

how to attach a sniper knee for Sandtrooper
pandatrooper replied to Quebectrooper's topic in Off Topic
Here's a way to make one from scratch. The mounting is pretty much how most people mount them (shims, angle it outwards to prevent catching on bottom of thigh) -
Pandatrooper's TD completed!
pandatrooper replied to pandatrooper's topic in Build Threads Requireing Maintenance
Thanks guys, glad everyone likes it! I’m only 5 foot 8 inches tall, so the helmet looks a little big on me anyways (as far as I know, ATA is one of the smallest if not the smallest). It's the padding too (see below). Thanks Paul, glad you noticed that detail! I think I've stared and studied those tube stripes so much, I have them memorized by now. Thanks Mark. I just threw some padding in there and yes – it’s sitting a bit too tall. I’m waiting for some better fitting padding to arrive. Good eye and critique as always! Thanks! Here's the link to the tutorials if you want to know how it was done. http://forum.whitearmor.net/index.php?showtopic=12695 -
how to attach a sniper knee for Sandtrooper
pandatrooper replied to Quebectrooper's topic in Off Topic
Most people rivet a backing to the shin, then glue the plate onto the backing via layers of plastic / shims between the plate and backing. Here's how I did mine. It's rock solid. http://forum.mepd.net/index.php?showtopic=6775&view=findpost&p=83101 -
Transporting armor
pandatrooper replied to Bill.I.Am's topic in Boots, Soft Parts, and other Accessories
Hey Bill. I think there's a few different threads discussing the same topic. Might be some good info here --------- -
Pandatrooper's TD completed!
pandatrooper replied to pandatrooper's topic in Build Threads Requireing Maintenance
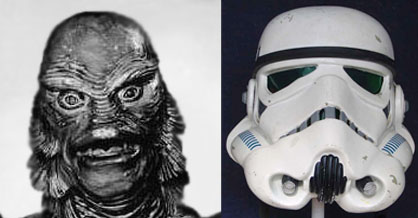
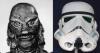
I replicated the tube stripes on the helmet by taking screenshots into Photoshop, and re-warping / filtering the image, then re-drawing it. Printed them out to scale, then cut them out of sign vinyl and airbrushed them. Here's a comparison of the screen used helmet and the replica. Comparison of the original "Stop that Ship!" helmet from Starwarshelmets.com to the replica. -
I've finally completed my replica "Stop that ship!" trooper / TD, and it was Legion approved yesterday. Still waiting for MEPD Deployment approval. My goal was to make a "dirtier" version of the original "Stop that Ship!" trooper in ANH. I didn't want to paint the armor or helmet yellow (like it looks "today" on StarWarshelmets.com), more like "what would this trooper have really looked like on the set of the film shoot in Tunisia?" My AM TK is great as an idealized Trooper, but I wanted this build to be a lot more accurate in as many ways as possible. I came up with a unique way to replicate the oil / dirt / sand weathering, and tried to replicate most of the dirt patterns on the helmet, chest and ab plate. Along with that came a screen accurate backpack build, and a scratch built T-21 blaster. Armor: ATA TD version (sniper knee plate, no ab button plate, 3 vertical ab buttons, no armor shoulder straps) Inner shoulder straps: white elastic Helmet lens: green welders visor Helmet details: hand painted Mic tips: “Keith†Hovi mic tips Neckseal: custom sewn Belt: custom sewn MP40 pouches: Modified with screen accurate flaps and snaps Boots: TK boots Undersuit: Under Armor Pauldron: custom sewn Backpack: custom frame, Crashmann seed trays and small parts, Radio Shack tool box, Gordonator cistern, customized radio faceplate w/ Crashmann knobs, Tupperware radar dish T-21 Blaster: scratch built. Includes ribbing for barrel, 2 replica WWII Enfield slings, custom sight cover at base of ribbing Weathering: Liquitex / Golden acrylics
-
Where to order snaps (press studs)?
pandatrooper replied to TomBangkok's topic in Boots, Soft Parts, and other Accessories
You should be able to strap everything with elastic. Its more flexible than webbing. -
Do a search on the fisd for VT armor, its been reviewed many times now.
-
Hope you get better soon Chuck! BTW: I'm not really seeing the resemblance in this pic...
-
Pandatrooper's AM build thread[*AM]
pandatrooper replied to pandatrooper's topic in Build Threads Requireing Maintenance
No problem guys. That's what "Troopers helping Troopers" is all about. Remember, this is just one way to assemble a kit. There's other methods too, like the screen accurate wire hangers, elastic, etc. It just depends on your intended use and how accurate you want it to be. Review the different construction methods, then pick the one that best suits your skills, needs and budget. Good luck with your builds! -
Armor for the virtually challenged
pandatrooper replied to Skater's topic in Hard Armor (General Discussion)
I believe TM makes a kids version too. -
TK-2959 Requesting ANH Stunt EIB.[137][TM]
pandatrooper replied to Locitus's topic in Request Expert Infantry Status
Very nice work! Great job! -
TK Medica AM build[*AM]
pandatrooper replied to TK Medic's topic in Build Threads Requireing Maintenance
I would try and use the narrowest cover strip possible on the front, and have a much wider shim at the back of the thighs. Eg; most people use 20mm up front, but maybe try a 30mm strip withe the front ridge lines just outside of that, then in the back of uou need something big like a 70mm cover strip, then thats fine. The front will look closer to screen accurate than the back. Theres no guideline for EIB stating that cover strips need to be a certain width. You could even do overlap with no strip and it would pass, but butt join seams and a cover strip look better. Also, please taper the thighs so that they are narrower / more close fitting around the knee. A lot of people make the thighs fitted at the top, and the area around the knee has this giant diameter thigh swinging loosely. Tailor them to fit! Hope that helps! -
Pandatrooper's AM build thread[*AM]
pandatrooper replied to pandatrooper's topic in Build Threads Requireing Maintenance
No problem! -
Pandatrooper's AM build thread[*AM]
pandatrooper replied to pandatrooper's topic in Build Threads Requireing Maintenance
The forearms are attached to the biceps with black elastic as you mentioned. Theres a snap plate at the bottom of the bicep. The other end is attached with industrial velcro on the inside if the forearm and velcro sewn to the end of the strap. I like doing it this way because i can dial in the length until its just perfect. The velcro at the end is about 2.5" long and has never failed. -
Pandatrooper's AM build thread[*AM]
pandatrooper replied to pandatrooper's topic in Build Threads Requireing Maintenance
-
Google "knee pad insert" and you will find them. They are commonly used in work pants / coveralls, and military pants -----------
-
Nice job on the ears! The brow is a little low if you're going for ANH stunt. You can either rotate the cap back, or trim it slightly more.
-
Many people cut the green lens material into a strip, bend it into a half circle, and use the ear bolts to secure it in place. Jason, just a tip going forward: instead of asking multiple questions in 1 thread topic, either start a new topic - or better yet, do a search first. There are several topics discussing attaching lenses, along with all the various helmet build threads you might want to review before you start your build. -------- Also, here's an index of all the tutorials created in one place --------- make sure to check the tips and How to sections, along with the FISD Academy. I hope that helps.
-
My ANH ATA Build[*ATA]
pandatrooper replied to TK-4088's topic in Build Threads Requireing Maintenance
Most of the armor that is based off original molds (TE, TE2, AP, ATA, etc.) use those ROTJ tour suit molds / forming bucks. Take a look at your pictures again, you have them backwards (look at the notches in the biceps). Cover strips are "generally" considered to be 15mm for the arms, 20mm for the thighs and shins, and 25mm for the shin backs. -
Pandatrooper's AM build thread[*AM]
pandatrooper replied to pandatrooper's topic in Build Threads Requireing Maintenance
Hi MightyTank. The best way is to lay the plastic on a flat work surface. Then use a steel or aluminum ruler (not plastic) and draw a pencil line where you want the strip to be. As a general guide, arm strips are about 15mm wide, and thighs and shins are 20mm wide, and the backs of the shins are 25mm. After you have drawn the pencil line, lay the ruler down and line it up with the pencil line. Then use a SHARP Exacto blade / box cutter, and do a light score using the ruler as a guide. Just do one light pass. Now do a second pass with a little more pressure. Do at least 3-4 passes with the knife. Then simply bend the plastic along the seam and it will snap. Sand the edges and you're done! BTW: here's a helpful thigh assembly build thread if you need step by step instructions. http://whitearmor.net/forum/index.php?showtopic=11563&pid=145956&st=0entry145956 -
Have you tried googling "RT mod"?
-
My ANH ATA Build[*ATA]
pandatrooper replied to TK-4088's topic in Build Threads Requireing Maintenance
Hey Alkesh, please take this as constructive criticism. For the most part, the construction is OK. Your thermal detonator looks a bit long (is the pipe 7.5" long?). I think you have the left and right arm assemblies mixed up left to right. Just swap the entire arm to the other side. Also, the cover strips on the arms are a bit too wide. The helmet paint work could be improved. You can salvage the lower vents by using grey paint to "cut in" on top of the wonky black lines, this will tighten them up. You can clean up the outer black outline by touching up the outsides with white. Use a smaller brush! A round number 1 or 0 brush works great for the details. I think you need to redo the blue cheek tube stripes. You either need to remove them and repaint them using a stencil, or as Quebectrooper mentioned get some tube stripe decals. There is a certain level of quality we should maintain here. If all if this is too much work, I would sand those details down and repaint the helmet and use all decals for the details. The frown is fine. Good luck!