
Leaderboard


Popular Content
Showing content with the highest reputation on 08/21/2024 in all areas
-
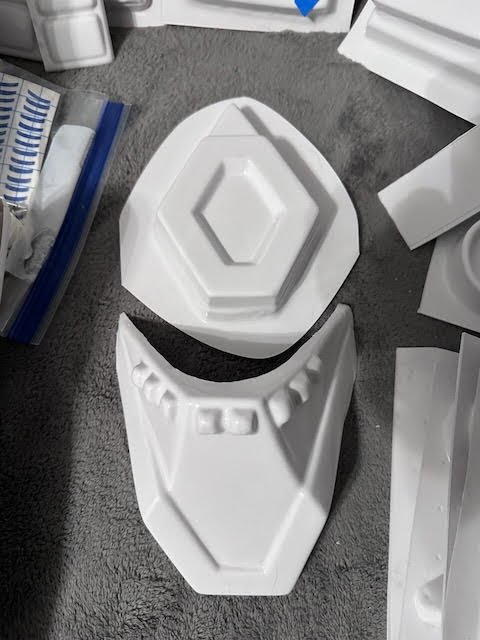
A little late on the start for this build thread. Got my big brown box from WTF on August 7th! Quickly got it unpacked. Did a lot of reading on here and watched a pile of videos and nervously did some light trimming to get used to the tools. Eventually trimmed a little more to get used to trimming down before final fitting. Hopefully pairing all the right parts. Got a little confused on these pieces, one is clearly a knee plate: After some expert guidance from Michael Rose and a hands on look at his kit, I start final trimming for the front strips to go on. Then I dived into the deep end of the pool and got the E6000 under the front strips and committed to clamps, with the knowledge I could redo them by using the right glue, with a lot of patience for it to dry. Many of the videos I watched, like the RS Props were all about the CA glue. Tonight should mark 24 hours of patiences, then I can move on to figuring out the perfect. Will be a few days of sizing with tape, making sure they fit comfortably on under suits that can accommodate 4 seasons. Still flipping back and 4th on where I can leave returns for added effect, versus comfort and hopes of getting into the 501st. Still way nervous on starting the helmet. I did pick up some Plastic Dip (black) spray to coat the inside, heard it was best to do before assembly. Any feedback is appreciated. Any other locals to Metro-Detroit that want to have mini build parties, let me know. My goal is mid September for the next St. Baldrick's Event.1 point
-
You need to align the top ridges and trim the bottoms of the shins to match Wearing boots will also make a difference so don't do a final trim until you can try with boots. Gallery sections can be a great help while building https://www.whitearmor.net/forum/gallery/category/24-anh-tk-reference/ If in doubt you can also check out the build areas, Expert Infantry or Centurion as these are built to the higher levels of accuracy. Many titles have the makers name in them ie: TK-91213 Requesting ANH Stunt EIB Status (WTF) (1075)1 point
-
Looks like you got the photos figured out. Looking like an awesome start can't wait to see this all come together. You're gonna know more than you ever thought you would about stromtroopers by the time you're done with this1 point
-
I did something similar using motherboard mounting screws like you have in your PC. It was really tricky with the curve of the lens but after cutting them out I used Sugru to install the jackscrews. Once dried I used a small hand drill to line up and make holes in the lenses for the screws. You can see I still messed up a bit but in the end I'm really happy with the results and I can take them out if needed. Motherboard screws used: SGTKJSJS M.2 SSD screw Mounting Screws Kit for Asus Motherboards1 point
-
Thank you, lots of great stuff in that link.1 point
-
Need to use the "direct link" option or link with the file extension ie: .jpg, .png, .gif. If on computer you can right click on the image, select copy and past directly into your post Great thread for the first timer, lots of links to help with your build1 point
-
Google apps images won't show in the forum, many of us use a free image host Imgur, here's a great tutorial We also try to use E6000 glue, this is in case you make a mistake or need go resize any pieces, CA glue is pretty permanent. FYI Top knee TD Sandtrooper Bottom knee TK Stormtrooper
 1 point
 -
I use Chicago screws embedded in milliput (epoxy putty) for the lenses and electrical tape for the frown screen. Both have held up for 7 years. But tbh nobody will ever see the inside of your helmet so there's probably lots of different methods.1 point
-
You will find with some pressure they should easily come off. If you have any ABS plastic left over you could add a stiffener pieces under the shoulder strap, either heat with a heat gun or on a tray in the oven, then form to the shape of the shoulder, this extra piece helps to prevent cracks. Just remember to rough up both pieces with coarse sandpaper before gluing1 point
-
Well, carefully Over the years what worked best for me. E6000 or CA glued. E6000 - take an old butter knife slide it between the two plastics, then pry and slide. Avoid damaging surface areas visible to the eye once finished. CA is a bit more difficult. Though I still use a butter knife, if I quickly tap it with a small hammer, parallel between the two plastics. Most of the time the cover will just snap off however, be mindful not to tear the plastic. Take your time Hope this helps1 point

