Leaderboard


Popular Content
Showing content with the highest reputation on 07/28/2024 in Posts
-
Thanks for the help I was able to get the cover strips to 20mm .2 points
-
Currently working on this comparison. After posting the photos, I’m gonna go back in and adjust angles to give them their best chance at comparison to the real deal. One that seems to stand out is PewPewCrafts. I was under the impression that because he outputs so much so quickly that it wouldn’t be the most accurate, I seem to be wrong. Lining up these photos has shown me that his work is incredibly close, but missing some final polish. Especially on this current photo, it’s uncanny how close it is. After sitting with these comparisons, I’m confident that I may be able to tweak PPC’s model and improve it. I’ve done some remodeling that I will post about soon once the new parts are printed.2 points
-
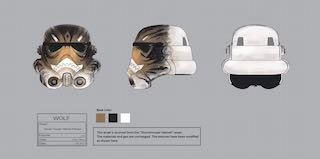
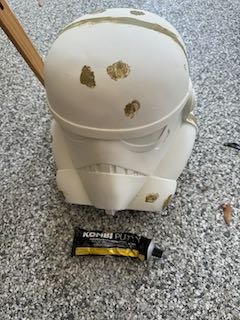
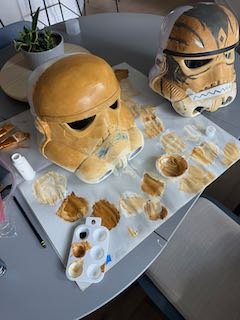
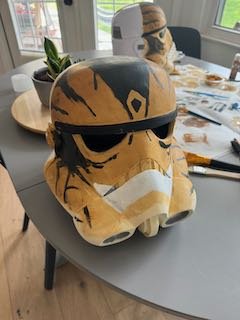
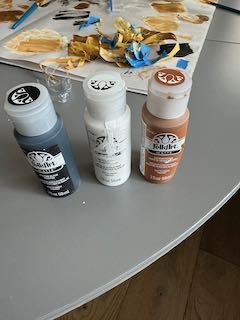
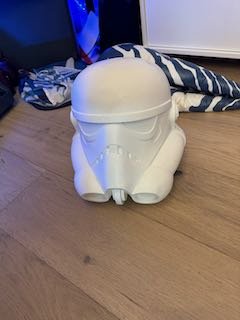
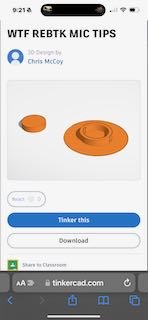
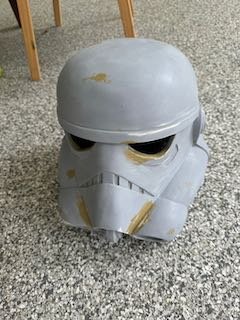
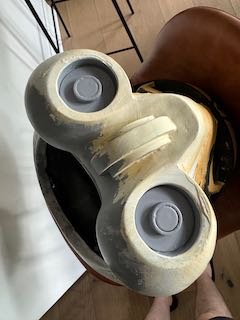
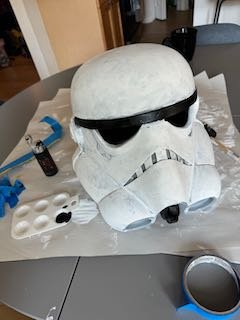
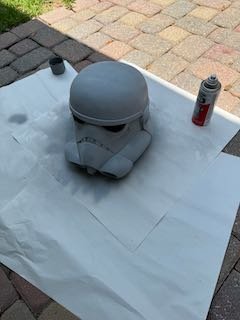
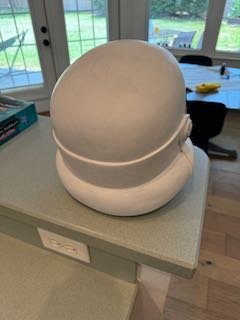
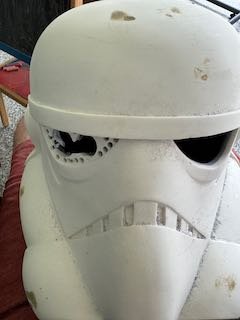
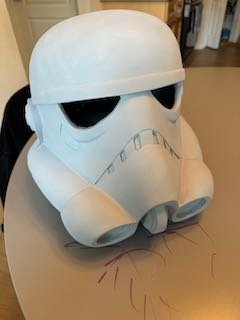
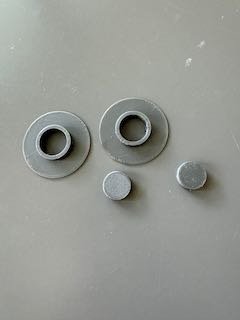
Even though this is unconventional, other members of the forum requested I place a work in progress thread here. Greetings everyone, I am working on a particular Rebels TK helmet seen in the Season Episode 2 episode "The Call." In similar style to Ezra's more famous scout trooper version, Kanan's TK is painted by Sabine to resemble an angry Loth Cat. I originally did this with a black series Mandalorian Inferno Trooper Black Series Helmet. I wanted to recreate this with a proper screen accurate version. The goal is to try to get it approved as a formal accessory with the Rebel Legion (I am already an approved Season 1 Kanan). I am following the 501st CRL as closely as possible. I started with a resin rebels TK helmet from Walt's Trooper Factory. I spent some time with filler primer and bondo spot putty cleaning up the helmet. I then used cheap brush on acrylic craft paint with some sanding and steel wool buffing to get a smooth gray finish. I let some of the filler primer poke through to approximate the subtle grey weathering. I focused mostly on the back since the front will be painted like the Loth Cat. After I was happy with that I started to work on the Loth Cat. There is a really good reference photo from some original asset sketches. I taped off the forehead black strip and I taped off what would end up as the Loth Cat "Smile"I only used raw sienna paint mixed with pure titanium white and pure black. It starts with an ombre from white to dark all with different mixes of the raw sienna with white. I then painted on the blackmarks which are black mixed with a little bit of the sienna paint. I pulled off the tape then started working on the Mic tips. Ideally I would have added the mic tips first but I had to 3d print them. I couldn't find an stl for the mic tips so I made my own with TinkerCad. I painted them with Filler primary and glued them in place. I made them with big circles attached so that they would be easier to place and center. Here is the file I made : WTF REBTK MIC TIPS.stl Next steps are to do some touch ups (painting the mic tips, the underside, etc), paint on the "smile," dry brush on some darker paint in a few places, add the lenses, work in a little padding so the helmet will sit still, and perhaps working in a small fan. I will update the thread.

 1 point
 -
Apologies. I must have missed that line when reading the CRL. Then a new bucket is on the list!1 point
-
Some great build threads for those of a slightly lower stature, which may be of help https://www.whitearmor.net/forum/topic/38416-crickets-rs-stunt-build-for-the-vertically-challenged/ https://www.whitearmor.net/forum/topic/38842-fragarocks-rs-stunt-build-not-to-scale/ https://www.whitearmor.net/forum/topic/42868-sha-shas-wtf-anh-stunt-build-complete/1 point
-
Thank you for this link. I have been wanting to also start the trimming on the torso bits, but have been hesitant. This is going to be a really big help. Thanks!1 point
-
I think rather than trying to extract data from an inaudible, ancient movie clip, why not re-record it either yourself or with a voice actor? It's not like it's James Earl Jones speaking, it's some random actor (unless someone knows differently, no shade on their abilities. ). I have spent a fair amount of time trying out AI voice dubbing, voice cloning and have limited success getting repeatable or consistent voice clips back. Assuming you can provide it enough data for a voice clone, you can get something usable, but it just doesn't quite sound real to me. I guess give it a few months/years and it'll be better.1 point
-
https://www.dropbox.com/scl/fo/m6faygxscvqx6yxpyllw0/ACjCopOYxvfS2TsC9fk_7pE?rlkey=cdqnzg09thkvxvckmw2chcayb&st=zoxq3xsw&dl=01 point
-
My son edited these clips into separate MP3's if anybody wants to use them. https://www.dropbox.com/scl/fo/m6faygxscvqx6yxpyllw0/ACjCopOYxvfS2TsC9fk_7pE?rlkey=cdqnzg09thkvxvckmw2chcayb&st=ymort533&dl=01 point
-
Great idea , thanks !1 point
-
Updated @Blackadder @SoFlogan @Havokk @Thibs Need your profile links @Alex a. @Jomu107441 point
-
I've updated the little reference guide that I put together a while back to include Testors paint as well as Humbrol. I've also included the 'revised' view of ab button colours so that you can "pays yer money and takes choice" http://forum.whitearmor.net/public/style_emoticons/#EMO_DIR#/smile.gif Armour_and_Helmet_Humbrol_Paint_Colours__Revised_.pdf Hope this helps1 point
-
Hi i posted this on the UKG over the weekend and thought i would share with everyone here too. Here?s a quick guide to making a canvas belt for your storm trooper armour as an upgrade to something more movie accurate. This took me about two hours this morning to make this including stopping to take pictures, so it is not a long job. Ingredients; Tee Kay armour belt Heavy duty canvas 60 inch wide is best for this 3 meters of 3 inch wide elastic 2 inch wide velcro Camping snaps or rivets A piece of plastic 2/12 x 8 inch Scissors and a sewing machine and white cotton Method; Ok first thing to do is measure around your waist to see how long the belt is going to be. I made mine 1 ? meters in length and cut off the extra at the ends when I was finishing the belt. This gave me an overlap of about 12 inches which is plenty. Cut 2 strips of the 3 inch wide elastic to the required length and sew the two pieces together down the sides using the big zig-zag stitch leaving the ends open for now. I only sewed the sides once as you will go over these edges several times by the time you sew the rest of the belt together. Then put the armour belt in the middle of the elastic belt and measure and mark the outside with a pencil. Sew down the belt along these lines using a straight stich, this is for the plastic insert added later on to support the holster. On mine this was about 20 inches in from the end of the elastic. Then cut two strips of the canvas the same length but slightly wider than the elastic, you will cut this extra off after stitching the two parts together. Using the zig-zag stitch again sew the canvas to the elastic down the sides, I?ve sewn each side twice to give it extra support. Then cut off the excess canvas nice and close to the elastic and sew this side as well. Remember to leave the ends open as you sew the canvas to the elastic. Repeat this again on the other side of the belt. You should now have something that looks like this. Next using the piece of plastic were going to make an insert to support the weight of the holster to stop the canvas being pulled down or collapsing. Measure the distance between the two loops that usually go over the belt, im guessing all holsters will be different in size. My piece is 8 inches long and to fit inside the elastic 2 ? inch wide. Round off the edges so it doesn?t snag the belt and simply slide inside the middle of the two elastic pieces and push all the way in until it stops. Remember you sewed the straight lines in earlier to keep it in place. Now its time to trim the belt to size. I cut just a couple of inches off each side so that there is about eight inches of overlap that will secure the belt at the back. Sew up the ends and now its time to ad the Velcro.1 point
-
This was exactly what I was looking for, thank you! I'm sure I'm not the only person who noticed that the Testors grey is #11381 point
-
I could only find 2 inch wide Velcro at my local haberdashery and I bought the self adhesive kind, although I did sew around the edges so it was more secure. I put the soft part of the Velcro on the right side and the ruff part on the left side (as you wear the belt) which goes on top so that if any of the Velcro shows nothing gets stuck to it. As I had to use 2 inch Velcro when I stuck the thin and thick parts on the belt I offset them against the opposite hook and loop so that the velcro wont be pulled off when I undo the belt. Sew around the edges and there you are, all done. I used poppers to attach everything to the belt including the armour belt, holster and drop boxes to make storage easier and the thermal detonator will be held on using money clips. Finshed and ready for duty.......... end of transmission1 point