Leaderboard


Popular Content
Showing content with the highest reputation on 08/11/2017 in Posts
-
UPDATE: work in progress is finished and this is the result, I think you will like them: Hello, I am making shoes under request for hard to find sizes over 6 years, I think I am ready to jump to the TK boots stage, I wanted to make a soft, genuine leather and cheap option, I readed the CRL and I think my design complies with the requeriments. I am sure will work with the basic level and may be to the other levels, thats why I am posting here to hear the authorized opinions about. In the specs we have: - Rubber Soles - Genuine Leather - White elastic webbing (not black painted) - No seams in the toe - No buckles - No belts or straps - Talon reinforced - SIZES from 3.5 US (35 eu) to 15 US (50 eu) - COST: 60 usd plus shipping We are based in Ecuador (Southamerica) and we can send via Standard or Express Mail Service Thanks for look Gio P.S.: This are test pics of the first test boot, bear with me about the poor quality pics.1 point
-
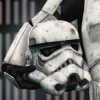
I spent the week finishing up all of the small details on the armor. I used leftover material from the inner coverstrips to make reinforcing strips for the shoulder straps. Attached the sniper plate to the left shin. I glued the center first, clamped it in place, and then glued the sides. Helmet is finally finished. I installed the new lens from TrooperBay (much clearer and darker than the Anovos supplied one), trimmed reinstalled the frown mesh, installed padding, and mounted the fans (from Henry's Helmet Fans), battery, and wireless mic. The wiring is hidden with some plastic wire wrap I picked up at Harbor Freight. Glued elastic into the shoulder bells. For the thermal detonator I started by installing the end caps (lightly sanded the edges of the tube and heated the caps with a hair dryer). I then centered the panel and glued. I then mounted the metal clips, replacing the Anovos screws with #6 slotted pan-head machine screws (taken from an electrical outlet cover from Home Depot and painted black)--the first photo shows a comparison of the screws (Anovos on the right, replacements on the left). The Anovos drop boxes came unassembled. I started by mounting the elastic loop to attach the drop boxes to the belt (used E-6000 and clamped), and then glued the front and back pieces together (taped instead of clamped). I stared the week feeling like I was only 50% finished, but I'm probably closer to 90% ! I began installing snap "plates" using the BillHag charts. I installed as many plates as I could, but eventually ran out of magnets and clamps. I already had the snap plates prepared (this was done while I was waiting on the armor to be delivered). The double plates are mounted in 2" strips of nylon, with 1" spacing between centers of the snaps, and the single plates are 1" pieces of nylon with the snap centered (I bought a cheap soldering iron to make the holes in the nylon). Edges of the cut nylon were sealed with a lighter to prevent fraying. Snaps are from Tandy (Line 24), and were installed with rubber washers for a better fit with the nylon "plates" (I tested plates with and without the rubber washers, and the washers added a noticeable amount of strength to the setting--no worry of the snaps pulling out of the nylon). Washers can be found on Amazon (https://www.amazon.com/gp/product/B00L1IZF28/ref=oh_aui_detailpage_o00_s00?ie=UTF8&psc=1). I've gotten a lot of comments on how organized everything is, and figured I should share my methods. I am not an organized person, and I knew with how much is involved with this build, I needed to do something to stay on track. The solution -- TRELLO! I've included some screenshots, but basically you can create visual lists and organize everything (To-Do, In Progress, Completed, etc) and move items around as you work on them. Even better, you can create checklists within the individual items. I used the checklists to copy and paste the CRL requirements for each item. I could then check stuff off as I completed it, look through the checklists when I wasn't sure what to do next, and I would have the list up anytime I was working on a piece. The software can take a little getting used to, but it's free and useful for other things as well (I've used it for both work and personal projects). This weekend I hope to finish installing the last of the snap plates, and begin sewing the elastic for the actual strapping (and setting more snaps). I have already marked the locations of the Centurion-level hardware required on the Ab, Cod, and kidneys, so I hope to install all of those hardware pieces as well.1 point
-
Thanks for the help tonight!!! I really appreciate it! THANK YOU!!! I will post some more pictures shortly, to keep my build going.1 point
-
I met Mike tonight and we had an impromptu armor party. We got his arm pieces all trimmed down and ready to glue... I gave him some tips about trimming and using Lexan scissors... at the end of the night, I wanted to show him the light at the end of the tunnel, so we made him into a blue tape trim trooper!1 point
-
With this 2-part pistol grip, the rotary switch can be installed so easy - compared to the full resin pieces. Would be nice to have more blaster kits using this. Great progress Mike. And your folding stock looks very good. All resin? It does not seem to be supported like the one from DoopyDoo's, so any worries about breaking the thin resin walls?1 point
-
Hey Diego! Don't panic! I cut off the bottom chest return (plus a little more) on purpose, and I rebuilt it without any issues. You'll only need a centimeter or so for that new return, so all is not lost. Here's where I outlined what I did to rebuild my return. Hope it helps you!1 point
-
Germain, yep, that's exactly what my son did with the box! Taking a break from making cover strips, I decided that the next easiest thing for this short TK to build would be some shins. Actually, any arm or leg part will do at this point. I don't intend on fitting them to me right now, just assembling them. Make sense? I grabbed all four shin pieces and gave them a good once-over. The WTF shins are different from the RS Props shins, so I had to figure out what part went with what part. In the pic below, you can see how the left half is longer than the right half. In the next pic, you can see how the halves are roughly the same length. They fit together end-to-end nicely, and the other halves do the same. Now that the correct halves have been identified, let's cut! The fronts of all limb pieces should be assembled first because their size is constant no matter what size you are. For the shins, I'll be using a 20mm cover strip to cover the butt joint. I don't want the cover strip to completely cover the side ridges, though. I decided to measure 12mm from the narrowest part of the raised center ridge of the shin. This should leave 2mm on each side of the cover strip at the narrowest part of the front ridge of the shin. Then I clamped a ruler to the shin and made sure that the ruler was straight. I scored a bunch of times along the ruler with an exacto knife to make my straight cut. Then snap! I did this with both halves. Here you can see how straight my cuts turned out. Much better than my very first pair of shins! Since I like to add my inner cover strips first, I taped the butt joint together from the outside. This not only keeps the seam straight and tight together, but it also keeps the e6000 from making a mess on the outside. You can see how well it all fits together in there. Liberal application of e6000 to the inner cover strip (made from scrap ABS) and let it sit out for a few minutes before application. It makes the glue a little more tacky and less prone to oozing around in there. Add lots of magnets to both sides and let it cure. With my last build, I fit each part to my body as I assembled each piece. Not this time. This round, I'll be assembling inner cover strips on the fixed front seams on all the limb parts before diving into the fitting part of the build. The WTF armor is smaller than my RS armor, so it'll be interesting to see how much (or how little!) needs to be removed and reshaped. Oh, and I've already decided that I will be installing magnets on these shins as closures as well. The magnet method I used in my other TK works perfectly, and I've not had any issues whatsoever while trooping with them coming apart or anything. They're more work to install, but, man... totally worth it.1 point
-
Trimming begins today. Ugh. I forgot how much trimming needs to be done. That kind of thing is easy to forget about once you finish your first kit. Seems like a really long time ago that I was doing this. So, let's get to it. Yep. Untrimmed chest. I'll be removing the bottom return entirely (yay- one less return to rebuild!) for this build since I'm going for a Luke look. And this is my challenge piece. The kidney/butt all-in-one. I want to keep a return on the top of the butt plate. I'm not concerned about the bottom of the kidney because I'll be trimming about an inch or so off of that to shorten it for my size. So I really had to think about how to dissect these. My solution was to cut a bit above the ridge between the two parts. This would leave some extra ABS on the butt plate where I can create a new return using my handy-dandy heat gun, wood jiggy-ma-jig, and wood stir-stick-flattening-thingy. It's all very scientific, you know. Which leaves my butt plate edge looking like this: Once I heat that edge, I'll simply fold it over, flatten it out, and voila... new return. Shouldn't be too bad. And since I haven't trimmed this kit to my size yet, I thought a comparison should be in order. The untrimmed WTF is on the left in the first photo, and on the right in the second photo. My RS Props kit is next to it so you can see how much I had to modify things. And I'm stopping there for today because my hand hurts from all the trimming. And I've only just started.1 point
-
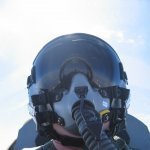
Helmet is together. Sanded more down on the ears for a better fit. I got the lens installed and it's ready for paint My little buddy loves it! Sent from my iPhone using Tapatalk1 point
-
Picked up a set of 6 8" film canon extruded rubber T-Track off the custom saber shop for $20, they were a little on the softer side so pre-installation they received a coat of matte clear coat to stiffen them up a tad, and they come with adhesive already on the underside so installation was a breeze minus the measuring, which was nice because I didn't have to boil any water or burn the life out of my finger tips. I'll give them the rest of the night to cure and shape with the help of an elastic rainbow then do some fine gluing in the morning. Sight rail is in the works for tomorrow after class. Depressing since the sight rail will be the last of the building process until funds are available to pick up a real M38 and counter1 point