Plasticarmyman88
-
Posts
43 -
Joined
-
Last visited
Content Type
Profiles
Forums
Gallery
Articles
Everything posted by Plasticarmyman88
-
So after a very long hiatus on the boards; I’ve returned. I picked up a 3D printed shoretrooper helmet kit off Etsy for relatively short coin and it finally arrived the other day. This place has been nothing but helpful and encouraging for past builds so it was almost instinctive to log back in and post. I’ll attach pics of the bucket after unboxing. https://postimg.cc/gallery/vHXxWVM
-

Deac L2A3 Sterling Restoration
Plasticarmyman88 replied to Plasticarmyman88's topic in Build Threads Requireing Maintenance
Ps Scope Rail by Aaron! It's the puuuurrrrrrrttttiiiieeeesssttttt!!!!!! -
Deac L2A3 Sterling Restoration
Plasticarmyman88 replied to Plasticarmyman88's topic in Build Threads Requireing Maintenance
Finished..........for now. E-11 next to my finished NE ANH Stunt bucket: Various angles: -
Another DD Resin E-11 Kit
Plasticarmyman88 replied to Plasticarmyman88's topic in Build Threads Requireing Maintenance
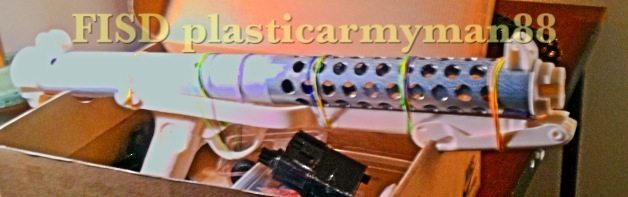
UPDATE 6/7 Finished all of the base layer aging and weathering for the receiver tube. Decided to shoot for the moon and hopefully recreate the most accurate mock aged "surecoat wrinkle finish" FISD has seen to date. Weathering will most likely be on the heavier side considering my de-ac sterling weighs as much as an infant and I'll need a not-so-heavy but just as aesthetically pleasing E-11. Plus I'm planning a TD build and yea, pretty sure patrols in the dune sea would beat the s**t out of anything. Anyway, here's some progress pics! Profile shot: Charging handle channel: Top view: Bayonette lug flat area/barrel vents: -
Deac L2A3 Sterling Restoration
Plasticarmyman88 replied to Plasticarmyman88's topic in Build Threads Requireing Maintenance
Update 6/4 Scored an authentic M77c off ebay for $50/shipped, stripped it down and cleaned it up. I have some quick steel curing as we speak while I run errands to fill in the ring gap. Still waiting on Aaron's rail to arrive hopefully today when I get home so check back soon! -
Another DD Resin E-11 Kit
Plasticarmyman88 replied to Plasticarmyman88's topic in Build Threads Requireing Maintenance
Getting back to work on the DD E-11 now that I'm waiting on a fancy new scope rail counter combo to arrive from the fabrication master Aaron, so I figured I'd update while I'm waiting on paint to dry. I really wanted to get a realistic deep looking metal finish as the base coat before the flat black painting would begin. Picked up more Rustoleum flat antique nickel & soft iron spray paint and 500 & 1000 grit wet sandpaper. First, I went back and sanded out all of the silver textured base layer I experimented with in my previous post, then layed down 2 coats of the antique nickel sealed with a coat of matte clear after every coat of nickel. Did the same for the soft iron as well. After fully curing, I spent what felt like an eternity wet sanding the higher areas, and this is what I ended up with! Barell vents Bayonette lug flat area Magazine well Sight rail hole Charging handle channel Check back later! More on the way! -
Deac L2A3 Sterling Restoration
Plasticarmyman88 replied to Plasticarmyman88's topic in Build Threads Requireing Maintenance
Finished the T-Track! -
I know how you feel! If you were to walk into my apartment, and look around (thanks to modern tasteful decor and flair provided by the misses) you would never think it would be a place where someone would spend hours with small delicate jewelry files working with surgical precision on a piece of ABS plastic or resin to duplicate objects or helmets from an entirely fictional universe. One time when the other half had a group of all female friends over for drinks and girly things (not at all a sexist comment) one of them thought the door to my office was the door to the guest bathroom, and as I was on my way out the door I heard "man he's got a lot of halloween stuff in there doesn't he?" Needless to say I made my exit like I was trying out for a Delta Force operator position.
-
Deac L2A3 Sterling Restoration
Plasticarmyman88 replied to Plasticarmyman88's topic in Build Threads Requireing Maintenance
It felt very similar to say a wiper blade but a little on the stiffer side and after the coat of matte clear there was still enough give to make cutting and installing not too challenging but flexibility was drastically reduced post matte clear coat. Plus they have the bevel on the inside of them so there was no battle when mating the surfaces unlike resin ones that don't have the rounded bevel so when gluing they fit like a dream unlike flat non rounded ones. -
Deac L2A3 Sterling Restoration
Plasticarmyman88 replied to Plasticarmyman88's topic in Build Threads Requireing Maintenance
Picked up a set of 6 8" film canon extruded rubber T-Track off the custom saber shop for $20, they were a little on the softer side so pre-installation they received a coat of matte clear coat to stiffen them up a tad, and they come with adhesive already on the underside so installation was a breeze minus the measuring, which was nice because I didn't have to boil any water or burn the life out of my finger tips. I'll give them the rest of the night to cure and shape with the help of an elastic rainbow then do some fine gluing in the morning. Sight rail is in the works for tomorrow after class. Depressing since the sight rail will be the last of the building process until funds are available to pick up a real M38 and counter -
Oh how I wish I had access to such tools and resources!! Why aren't you my neighbor Aaron?!
-
Deac L2A3 Sterling Restoration
Plasticarmyman88 replied to Plasticarmyman88's topic in Build Threads Requireing Maintenance
All I could get in today thanks to another afternoon New England monsoon :/ -
Deac L2A3 Sterling Restoration
Plasticarmyman88 replied to Plasticarmyman88's topic in Build Threads Requireing Maintenance
The work continues...... My make shift spray painting laboratory Filler primer is my best friend After priming and wet sanding Masking off the parts of the receiver that weren't going to get "texture" So im attempting to replicate the "wrinkle finish" texture. Found this at Home Depot, it's Rustoleum multi-color texture Close up of the cap and it's "texture" First coat of "texture" on receiver, folding stock, and end cap. Close up First pass of flat black Still have some work to do paint wise, so stay tuned guys! -
Authentic M53 Parts Kits!
Plasticarmyman88 replied to Plasticarmyman88's topic in Build Threads Requireing Maintenance
**CORRECTION**: MG34.....my bad -
Authentic M53 Parts Kits!
Plasticarmyman88 replied to Plasticarmyman88's topic in Build Threads Requireing Maintenance
I was thinking considering during the deactivation process by the ATF the weapons receiver must be torch cut in several places to weaken the structural integrity enough that re welding the receiver and firing the weapon would cause the receiver to become inoperable, and one of the cuts on these kits is placed before the front trunion that connects the barrel to the receiver, and being a "machine gun" means that it fires from the open bolt position requiring accurate and precise head spacing to prevent jams, misfires, stoppages etc. So, you could simply disregard the heat shield that comes with the parts kit, download a free DLT-19 barrel template and punch out the holes on a piece of PVC. Upon further research, the other pieces of the M53 kit are a 1:1 match with the MG32 used to for DLT-19s, so with some PVC pipe and time, you could harvest all of the cosmetically accurate parts off the MG53 kit to make a DLT-19. Plus the receiver being torch cut would mean a bit of elbow grease would be needed to reconstruct the receiver to get the MG back together rearward of the barrel. Just good for thought...... -
Hey Guys! So while browsing the internet I came across this parts kits offered by APEX Gun Parts. Its an M53 Yugoslavian version of the German MG's. I actually got a chance to play with one of these while I was deployed in Afghanistan. The local militia had several of them retro-fitted to motorcycles so of course being a Star Wars fan I had to ask to hold it. I wont lie, its a beast and surely not for trooping, but considering I payed about $75 less for my demilled sterling, this is alot more gun for the price tag and im actually really surprised at how low the price is for how much gun you get. This kit would easily assemble into a gorgeous DLT-19 with a but of finesse and PVC, or provide lots of the parts needed to cast for a pipe/resin DLT-19 kit! Just figured I'd share my discovery with the rest of you guys and ive attached a pic as well as the link. https://www.apexgunparts.com/product_info.php/cPath/70/products_id/2172
-
So I finally got some time to actual work on my L2A3 deac kit from UniqueCanes that I bought a while back. This was how I recieved it. (pic from previous post) Thankfully the folding stock saw none of the horrible BATF torch cutting. So after realizing I had two options as far as restoration, one option being the purchase of a steel receiver tube with a bonded template and mating the parts from my kit with the pipe, but I didnt want to lose the bayonet lug flat area, and I remember seeing a thread on here from a bit ago where a Wiselite Sterling was used to cast for parts, but the Wiselite Sterlings were built on bonded template pipes, and had no bayonet lug flat area, so that option was a no go. After trying multiple approaches, I ended up sliding the bolt into the 3 pieces that touched in which the bolt was housed, and it worked splendidly! The bolt is Loctite 2 part epoxy'ed into the reciever housing, and look! A military acceptance insignia, guess it must have seen some war time!? After coming down off of my 3 piece assembly high, i realized that the front and rear portions were not dependent on anything internally to mate them correctly. I tried a few things, but I took a piece of 1.25" PVC pipe and heated it so i could manipulate it, and placed it while heated into the receiver and clamped it to gain the shape and dimension of the inner receiver diameter. After that, the PVC coupler got a very very very light coat of WD40 so it wouldnt bond to the metal inside the receiver when i epoxy'ed it. I used JB Weld SteelStick to fill in the gaps of missing metal as a result of the torch cutting. The front segment of the receiver with all of the vent holes was harder because the torch cutting had removed so much of the metal. I basically repeated the steps from patching the rear, but this PVC coupler would stay in place and be drilled, not that big of a deal considering the T-Track should cover up most of it. I was looking at alot of the Deac Sterling build threads on here and noticed that when the receiver is reassembled, its done so with less than valiant effort, resulting in a droopy looking receiver that seems to bend down on the ends. Had to double check So pardon the Bondo mess, I used the Glazing Spot Putty to refine all of the small pin holes from the QuickSteel Folding stock sanded/primed. End cap sanded/primed.
-
Another DD Resin E-11 Kit
Plasticarmyman88 replied to Plasticarmyman88's topic in Build Threads Requireing Maintenance
Touché sir! I almost made that mistake once! Didn't pant the gluing surfaces -
Another DD Resin E-11 Kit
Plasticarmyman88 replied to Plasticarmyman88's topic in Build Threads Requireing Maintenance
Thanks! I grew up watching my brother assemble master level gundam models so I'm kinda treating it like a statue or sculpture where each piece is fitted, but then painted individually and detailed, then assembled. -
Finally got time and enough stuff cleared out to start a new project. Now I can finally start working on it, here we go! Started first on the main receiver tube/body, as I am going for a lot of nit-picky detail, not neccissarily cannon, but things like realistic textures, details, and coloring. The ejection port had kind of a wonky shadow that needed cleaning Solved that real quick with some cheap pewter jewelry files from the local craft store. After working out small surface flaws with 550 grit, and smoothing out the rougher parts with 800 grit it got a couple coats of body filler primer Primer completed, wet sanded with 1000 grit and 1500 grit sand paper GAAHHHH ugly resin gapsssssss!!!! Break out the milliput! So this is where I'm going out on a limb, masking for experimental paint idea I found this Martha Stuart metallic paint at Home Depot, the color is called thunder cloud, and cheap .99 cent sponge craft brushes So my experimental idea was to use a gun metal/steel colored paint with little to no shine, and build up layers of textured paint to mimic the porous surface of steel, and help create the base for the infamous "sterling wrinkle finish" Close up of some of the detail made by layering the sponged paint ontop of each other Full coating Indoor lighting after 2 coats of matte clear to dull down the reflectiveness Conducted an experiment with a spare doopys bolt face, layered the steel, then sprayed a quick coat of black then went over it with steel wool, thoughts?
-
Affordable E11's Are Now Reality!
Plasticarmyman88 replied to Plasticarmyman88's topic in General Weapons Discussion
Hey guys! So I got to snap a couple quick picks of the 1.25" EMT metal pipe receiver I made with the BBC templates that I made for a friend who's doing a doopys pipe kit. It's just a test fit in the pics, any input?
-
Affordable E11's Are Now Reality!
Plasticarmyman88 replied to Plasticarmyman88's topic in General Weapons Discussion
**UPDATE** So, after the start of a new semester at school, a random, strange, and painful case of acute splenomegaly, and the birth of a new niece, I finally have time to update you guys on my development of a cheaper domestic E11. After purchasing my original L2A3 sterling, I've stared, researched, thrown pieces, broke numerous files, and rigorously compared parts side by side, and reached a newer more accurate possibility. I decided to plunge myself into the realm of pipe building for the last month and after lots of measuring and re-measuring I think I'm finally on to something! I printed out the classic BBC template for pipe building on 1.25" PVC/conduit pipe, but when comparing the pipes diameter with my real sterling receiver, I noticed that the pipe is marginally a bit on the wider side, appearing a bit too big appearance wise. After aimlessly wandering the aisles at my local Home Depot with a part of my sterling receiver in pocket, I stumbled upon EMT 1.25" aluminum specialty purpose metal piping. Sadly, it's only sold in 10" FT lengths, so I looked like a novice pole vaulter as I crossed half of the busy Home Depot store, and had an associate cut it into 18" inch lengths. After lugging it all into my apartment and taped the templates onto the pipe, I noticed the 1.25" PVC templates were too big, and started scratching my head. I tweaked the template on Adobe and cut about .050 off the template in the region where the folding stock lays against the receiver, and began drilling. After the test run, and finding out that my 17.1 volt lithium cordless drill only runs for about 8 minutes on the highest setting when drilling through pipe, I was greatly surprised to see the EMT pipe is about a 95% match when compared side by side to my authentic receiver. Granted the pipe is a bit on the heavier side (about 1.5lbs for the 18" inch length) I feel this could possibly combat the stigma of "omg this blaster is so light and plastic better treat it like a baby" type feelings when handled. I've yet to start piecing things like the bolt and spring inside of the pipe, but I'm fairly confident it should be a hassle or a simple sand and fix. Considering 10"ft of pipe and a $4 stepped but would produce about 5 full metal and more accurate looking receivers for a pipe build, I'll be posting pics of the project tonight after my last class. Vern!!!!! Input please, and was wondering if you did any digging on my sterling serial #'s yet? If this intrigues anyone else as much as it does me, please comment with any suggestions or questions! -
Newly available E-11 dicussion area.
Plasticarmyman88 replied to captsafe66's topic in General Weapons Discussion
The scope and counter was actually a lender from a friends private collection, so im trying to get ahold of him to gain access to it again. My other questions was what material are the T-racks made of? Like a specific manufacturer and part name or number? The ones i made were simple sculpts of screen trim of the correct dimensions on a flat plane into my clay. Since I have an authentic sterling I might as well get authentic T-racks on it right? -
Newly available E-11 dicussion area.
Plasticarmyman88 replied to captsafe66's topic in General Weapons Discussion
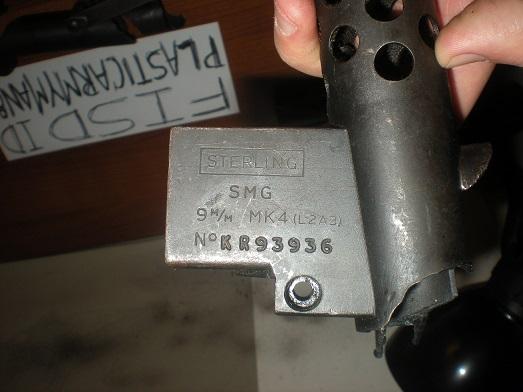
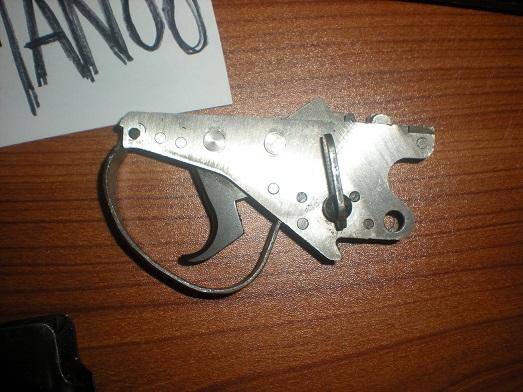
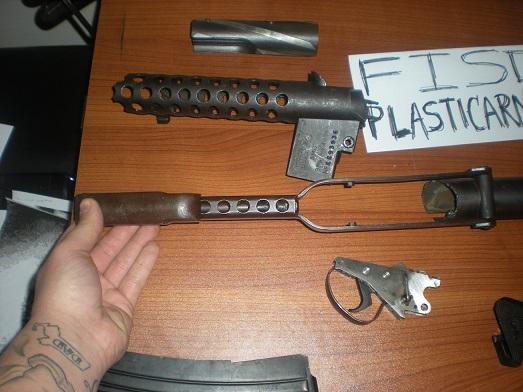
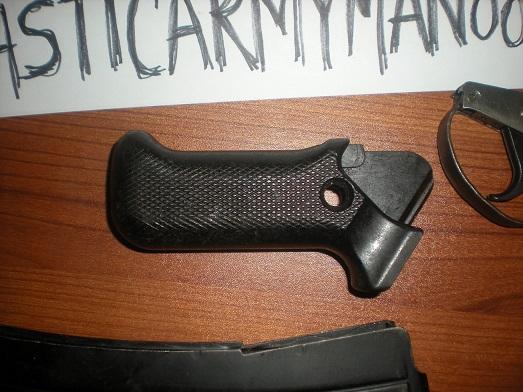
Hey guys! So after a storage mistake on my part my first set of molds were damaged beyond use. But this didnt stop me in my quest to build a cheaper E-11 kit for you guys. After a chance encounter with an old friend right outside of a Harbor Freight, he gave me a lead on some de-milled sterling kits. Immediately my brain questioned the affordability of the kits and almost phased it out as a possibility, but my curiosity got the better of me. I got in contact with the seller and after a few days of cat and mouse via email, the seller informed me he was also a veteran and sold me one of his kits at a deep discount. The sterling is going to need some work to get it back to original condition, but nothing I didnt already know or already have in my tool box. Im posting pictures of the kit as I received it this morning along with my FISD user name so you guys know its mine. These pictures are just upon my opening the kit, and ill continually update as the Sterling gets pieces back together so stay tuned guys. the complete kit magazine well with serial No. fire control group folding stock assembly grip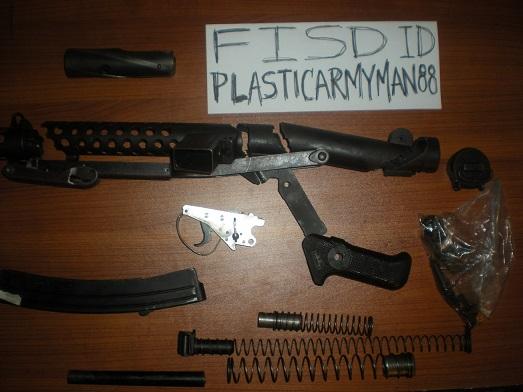
-
Affordable E11's Are Now Reality!
Plasticarmyman88 replied to Plasticarmyman88's topic in General Weapons Discussion
Hey guys sorry about the delay on photos. As I'm getting closer to finals (especially with 2 art classes that require painted/drawn pieces) I've found myself busier than a one legged man in an an impolite person kicking contest, but after Tuesday and all the pre-final reviewing and note taking lectures, ill finally have them posted and with high res images! So hang in there, although I'm half scared to death about the inevitable critiques!