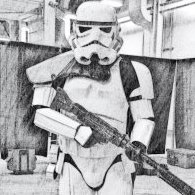
BigBadaBoom Posted August 26, 2012 Report Share Posted August 26, 2012 (edited) Here are the final pics of my scratch-made MiniMag PTL Missile Launcher for my HWT. Enjoy! If you have any questions of comments, please feel free to leave one. Edited September 2, 2012 by BigBadaBoom Quote Link to comment Share on other sites More sharing options...
gmrhodes13[Staff] Posted August 26, 2012 Report Share Posted August 26, 2012 Your link will only work if everyone registers to that website Quote Link to comment Share on other sites More sharing options...
BigBadaBoom Posted August 26, 2012 Author Report Share Posted August 26, 2012 (edited) Your link will only work if everyone registers to that website Oops! Sorry! I'll work on getting it all over. Didn't realize Edited August 26, 2012 by BigBadaBoom Quote Link to comment Share on other sites More sharing options...
BigBadaBoom Posted August 26, 2012 Author Report Share Posted August 26, 2012 (edited) Well I am going to begin my MiniMag launcher so that it is ready for when I get my ATA armor so I can get my HWT status ASAP. I will post progress updates on this thread and keep everyone as well-informed as I can. Heading to Menards to get my supplies. I am basing my model off of the two different threads on the FISD forums. One is a thread of a few very good-looking launchers by dashrazor, and another by ketariniii. http://www.whitearmor.net/forum/index.php?showtopic=13885 http://www.whitearmor.net/forum/index.php?showtopic=14672 I will use some variation to "make it mine" of course, but it'll most likely be little doo-dads here and there on the launcher tube, such as a hook mount system to attach it to the backpack so I don't have to carry it all the time, and also an AR-15 style handle for trooping. Still not 100% sure exactly which supplies I will use for what, but I will improvise per the usual. My shopping list includes: -36-38 inch PVC think walled drain pipe 2 4''x 2' thick gravity drain PVC pipes -Spare wood pieces (not construction lumber) 1/2'' thick boards -PVC junction pieces (preferably an octagon shape for rear end of launcher) -Black vacuum hose -Spare plastic -translucent red plastic for sight (might just use a red reflective circlular driveway marker) -Handle bar for carrying AR-15 Handle -Metal hooks 2 S-hooks to be applied later to link up with backpack -Lots of screws -Silver Primer -Flat Black spray paint -PVC cement This list is subject to A LOT of change depending on what I can find. I will update it as I go along to help anyone else who may be considering making a launcher for themselves. Electronics installation will be my very last step, if I do them at all. I never was a very good electrician. Edited August 26, 2012 by BigBadaBoom Quote Link to comment Share on other sites More sharing options...
BigBadaBoom Posted August 26, 2012 Author Report Share Posted August 26, 2012 (edited) Well I can't get everything I posted to come over to this side but I'll post some important pics of the construction. Right now the launcher weighs in at 7lbs. I have a lot of detailing work to get done on it before I can start spray painting such as cutting vents and finishing the butt cap and shoulder rest, as well as installing the AR15 carrying handle for trooping and the split electical cable coil to the housing assembly. Later, I will add a working trigger, but right now the handle serves its purpose well. Edited August 26, 2012 by BigBadaBoom Quote Link to comment Share on other sites More sharing options...
BigBadaBoom Posted August 27, 2012 Author Report Share Posted August 27, 2012 Some of the progress I made today. Looking to begin priming tomorrow, then spray painting. I know it's not that pretty yet, but it's only the first one I've ever built and did almost all of it by memory and using whatever materials I could find. Quote Link to comment Share on other sites More sharing options...
BigBadaBoom Posted August 27, 2012 Author Report Share Posted August 27, 2012 Got the first coat of primer on and waiting for it to dry. Waiting for paint to dry so that I can begin with the flat black. Humid air today isn't helping the process any. Quote Link to comment Share on other sites More sharing options...
Darth Hilarious Posted August 28, 2012 Report Share Posted August 28, 2012 Coming along nicely! Quote Link to comment Share on other sites More sharing options...
BigBadaBoom Posted August 28, 2012 Author Report Share Posted August 28, 2012 Day 5 of building. Got my coat of black paint on it and just letting it dry today. When it dries I am going to attach the cable coil to the housing assembly and then I have to find a clear blue lens for the sight and some metallic blue hobby paint for the panel next to the sight. Thinking of maybe stenciling an imperial cog logo on the outside (right) side of the box to add a little more star warsy-ness. Final touch will be to cut off extra strips of duct tape hanging around and some light weathering with high-grain sand paper to show a little more silver along the rest of the body. ~98% done! Quote Link to comment Share on other sites More sharing options...
BigBadaBoom Posted August 28, 2012 Author Report Share Posted August 28, 2012 I am also going to wrap the hand grip with some leather baseball bat grip tape. Quote Link to comment Share on other sites More sharing options...
BigBadaBoom Posted August 28, 2012 Author Report Share Posted August 28, 2012 Quote Link to comment Share on other sites More sharing options...
BigBadaBoom Posted August 29, 2012 Author Report Share Posted August 29, 2012 Anyone know of any good "explosion" or "rocket" sound chips and trigger system that I could put in this? Also I've been thinking about eventually putting in a couple bright green spotlights to flash through each end of the barrel when I fire. I just don't know anything about wiring something like that or electronic setup. Quote Link to comment Share on other sites More sharing options...
Daetrin[Admin] Posted August 29, 2012 Report Share Posted August 29, 2012 Wow, this is looking really good. I'm not an electronics guy, but perhaps you can canabalize something from a toy blaster? Quote Link to comment Share on other sites More sharing options...
BigBadaBoom Posted August 29, 2012 Author Report Share Posted August 29, 2012 I'll try to look for something loud enough. I'm sure I'll have to have some help from locals to get a decent power supply in there as well as some green strobe lights. But I may never convert it fully. I've also found that I need to put a rhombus piece on the right and left sides. Gotta get some metallic blue paint. I also want to put a triangle piece lateral and posterior to the sight support to be more accurate to screen caps. There is also a handle to add for my own convenience. Since ive come to the conclusion that I can't ever put this thing on a pack because of its weight. Thank you so much for the encouraging input. This project has been my obsession over the past 5 days. Quote Link to comment Share on other sites More sharing options...
BigBadaBoom Posted September 1, 2012 Author Report Share Posted September 1, 2012 Putting finishing touches on the launcher. Used some tennis racket leather tape to wrap the handle, placed my targeting lens, and am spraypainting my side panels with metallic blue touch-up paint. Quote Link to comment Share on other sites More sharing options...
BigBadaBoom Posted September 2, 2012 Author Report Share Posted September 2, 2012 Put the finishing touches on tonight, and here it is! My final pics are in the first post! Quote Link to comment Share on other sites More sharing options...
BigBadaBoom Posted September 2, 2012 Author Report Share Posted September 2, 2012 When I find some, I am going to light a white smoke bomb and put it in the barrel of the launcher to stain the vents with exhaust. Quote Link to comment Share on other sites More sharing options...
BigBadaBoom Posted January 7, 2013 Author Report Share Posted January 7, 2013 Decided this week to get back to work on my Minimag. I am thinking of coating it with some fiberglass to smooth out the edges and areas with visible tape. It should help in defining those corners on the end of the barrel. I am also going to try to install an old camera flash with a green coat of paint over the lens to create a light when I fire as well as installing a small fire extinguisher to blast some exhaust out when fired. Before it is done, I want to replace the sight with a more sturdy one that is retractable from the body of the launcher so that I can attach a rifle sling to it to make it easier to carry while trooping. I will update as progress is made. Quote Link to comment Share on other sites More sharing options...
gmrhodes13[Staff] Posted January 7, 2013 Report Share Posted January 7, 2013 Great to see you back, been waiting to see this finished, I have one on my to build list lol Quote Link to comment Share on other sites More sharing options...

Recommended Posts
Join the conversation
You can post now and register later. If you have an account, sign in now to post with your account.