Locitus[Admin] Posted July 28, 2011 Report Posted July 28, 2011 (edited) Good start! A second layer is definitely recommended. Keep in mind though that any second coat will have a colour difference from the first coat, so you can't really do "spot touchups", you'll need to paint all of it in once you start in an area. But it's worth it. Btw, more pics! Edited July 28, 2011 by Locitus Quote
1mpulseS0D Posted July 28, 2011 Author Report Posted July 28, 2011 Yeah, i thought so too. Of course i will paint the whole area when i do it As of right now, my fingers are hurting quite much after all cutting and snapping etc. but all i got left to cut out now is a calf, a forearm, a bicep, a thigh, the sniper plate, shoulder straps, the buttons for the ab plate and the belt and last but not least the thigh pouch. I will probably do it tonight, if my fingers have settled down by then Quote
1mpulseS0D Posted July 28, 2011 Author Report Posted July 28, 2011 One quick question, is any strapping system allowed for centurion? Quote
Locitus[Admin] Posted July 28, 2011 Report Posted July 28, 2011 Yes. I recommend snaps and elastic for this kit. Quote
1mpulseS0D Posted July 28, 2011 Author Report Posted July 28, 2011 Ok, thanks! I'll go with that From pictures I've seen i think snap+elastic is easier than the accurate ANH strapping. Quote
Locitus[Admin] Posted July 28, 2011 Report Posted July 28, 2011 It partially is. Both have pros and cons. But your AP is too stiff to be a good candidate for the original strapping, and is missing some return edges you'd need to create yourself. The screws could make the armour crack because of it's stiffness. Quote
1mpulseS0D Posted July 28, 2011 Author Report Posted July 28, 2011 Ok, but either way i would go snaps and elastic Quote
Locitus[Admin] Posted July 28, 2011 Report Posted July 28, 2011 I use snaps and elastic on mine and it works really well. I've never had anything come loose by accident. Quote
TK- boy Posted July 28, 2011 Report Posted July 28, 2011 I agree with Locitus. Looking good Alex! Quote
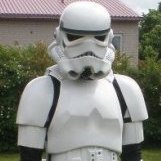
1mpulseS0D Posted July 28, 2011 Author Report Posted July 28, 2011 Now the second layer of paint is on. Looks much better now! I think I'm ready to start painting all the black things on the helmet now. Is it enough to use a hairdryer when bending plastic? Because i don't own a heat gun. Pictures of second layer of paint, all around the helmet. Quote
Locitus[Admin] Posted July 28, 2011 Report Posted July 28, 2011 Looking good! What is it you need to re-shape with a heat-gun/blow dryer? I guess it would be okey to use one, but it might take a long time to get the plastic up to temperature. Quote
1mpulseS0D Posted July 28, 2011 Author Report Posted July 28, 2011 It's the plastic belt, the shoulder straps and the thigh boxes, i heard that they had a tendency to snap of, but that might just have been extreme cases with bad pulls or something. I just want to be on the safe side. Quote
Locitus[Admin] Posted July 28, 2011 Report Posted July 28, 2011 The belt around your waist can be pop-riveted to your cnavas belt (use washers!) like the originals were, and it'll flex with the belt. No need to heat bend it (I did - big mistake). same with the thigh boxes. You should need to heat bend those either. Only the shoulder bridges need that. If you glue them in the front and keep them free floating in the back it's unlikely that they will break off. Quote
1mpulseS0D Posted July 28, 2011 Author Report Posted July 28, 2011 Ok, so i shouldn't have to heat bend any of the parts? I will glue the shoulder bridges to the front and then i would use some thin elastic to hold them down to the back, that would be pretty accurate? Quote
RedSpecial[TK] Posted July 28, 2011 Report Posted July 28, 2011 Your build is coming along nicely, looking forward to seeing how those hand painted details turn out Quote
1mpulseS0D Posted July 29, 2011 Author Report Posted July 29, 2011 (edited) Has anyone ever managed to break their Lexan Scissor whilst cutting in plastic? I just did I managed though to cut out everything so I'm done with the cutting, but still. The scissor just broke, weird! Pictures coming soon! Edited July 29, 2011 by 1mpulseS0D Quote
RedSpecial[TK] Posted July 29, 2011 Report Posted July 29, 2011 I did that aswell, they snapped right at the handle Quote
Locitus[Admin] Posted July 29, 2011 Report Posted July 29, 2011 Odd. Hasn't happened to me yet. Good thing they aren't expensive. Quote
1mpulseS0D Posted July 29, 2011 Author Report Posted July 29, 2011 To gain centurion status, do you have to handpaint the tubestripes? Quote
Locitus[Admin] Posted July 29, 2011 Report Posted July 29, 2011 No, but they need to have a hand painted look to them. TK-4510 aka trooperbay.com has them as decals, or stencils if you want to paint them anyway. Quote
1mpulseS0D Posted July 29, 2011 Author Report Posted July 29, 2011 (edited) So the ones i got with the kit won't do it? Too bad Then I'll add it to the shopping cart of TK4510. Need a neckseal and S-shaped rubber for the helmet anyways EDIT: Now i changed my mind, I'll go with painting the tubestripes, found Arnold "sixxgun13"s' tutorial on how to paint tubestripes. Edited July 29, 2011 by 1mpulseS0D Quote
1mpulseS0D Posted July 29, 2011 Author Report Posted July 29, 2011 And as promised here comes some pictures! Probably one more black layer tomorrow! Quote
Locitus[Admin] Posted July 29, 2011 Report Posted July 29, 2011 Yeah, you have your tears and traps a little to small. You could make them a little bigger. But looking good so far! Quote

Recommended Posts
Join the conversation
You can post now and register later. If you have an account, sign in now to post with your account.