Anduril Posted March 12, 2010 Report Share Posted March 12, 2010 A nice big box from the UK arrived this morning so I thought it time to start my build thread. I'd ordered a set of TM ANH armour with Hero Helmet, this will be my first armour build so let me know if I'm making any rookie mistakes, even though I've been living on these forums the past few months getting as much research into my brain as possible. Anyway, onto the armour pics: I'll start with the "What's in the Box" pictures which seem to be all the craze here recently . Unopened: ...and....OPENED! Packed very well so no worries about it being damaged while being transported across the face of the planet: I was thinking about teasing you all and leaving it there but I'm feeling nice....well impatient and just wanting to show of the epic armour that is TM so here it is: Now I just have to put it together so watch this space and I'll keep you all updated with my progress as I go along. Enjoy Quote Link to comment Share on other sites More sharing options...
tkrestonva[TK] Posted March 12, 2010 Report Share Posted March 12, 2010 Congrats! Quote Link to comment Share on other sites More sharing options...
JohnBlackk Posted March 12, 2010 Report Share Posted March 12, 2010 Getting the big box is always exciting. Good luck with build, I'll be back to check out your progress. Quote Link to comment Share on other sites More sharing options...
C HERM Posted March 12, 2010 Report Share Posted March 12, 2010 ^ i like small boxes, but regardless i too am in the midst of my first build and love to see what other people are doing. SUBSCRIBED. Quote Link to comment Share on other sites More sharing options...
Darth_Finger Posted March 12, 2010 Report Share Posted March 12, 2010 Looking foward to seeing the helmet build. Hero helmets are very interesting. Quote Link to comment Share on other sites More sharing options...
Obievon[501st] Posted March 19, 2010 Report Share Posted March 19, 2010 Anymore progress on this. I would love to see what you've been up to. I've been trying to get a hold of TM for a little while. Hope he will PM me back soon. Love the TM man! Keep us posted. Quote Link to comment Share on other sites More sharing options...
Rolf[501st] Posted March 21, 2010 Report Share Posted March 21, 2010 (edited) Congrats. The TM is in the top class, when you go for the best of the best. Enjoy your assemble of him. (i got a TD TM my self, but i´m pretty sure i will go for a TK TM soon too) Cheers Edited March 21, 2010 by TD-252 Quote Link to comment Share on other sites More sharing options...
Anduril Posted March 22, 2010 Author Report Share Posted March 22, 2010 Thanks everyone I havn't had a lot of time to work on it over the past week because I've been so busy with other things. So far I've just trimmed some of the smaller parts such as ab buttons, drop boxes and knee plate to get used to what I'm doing before moving on to the bigger pieces. I should have a a fair bit of free time over the next week or so so I'm hoping to get heaps done then. Oh and also my "Totally Killer Boots" from tkboots.com arrived yesterday too so I can't wait to wear those with my armour. Quote Link to comment Share on other sites More sharing options...
SW1 Posted March 22, 2010 Report Share Posted March 22, 2010 Thanks everyone I havn't had a lot of time to work on it over the past week because I've been so busy with other things. So far I've just trimmed some of the smaller parts such as ab buttons, drop boxes and knee plate to get used to what I'm doing before moving on to the bigger pieces. I should have a a fair bit of free time over the next week or so so I'm hoping to get heaps done then. Oh and also my "Totally Killer Boots" from tkboots.com arrived yesterday too so I can't wait to wear those with my armour. Hi Zac , nice to see you have your TM armour welcome to the TM band of brothers, i dont know if you have been following my TM build its the best build i have done what i meen is every part seems to be mm perfect, oh yes i will say one thing Zac dont rush it take your time and always measure more and cut onece , if you get stuck on anything pm me i will gladly help, happy TM BUILDING TROOPER. Quote Link to comment Share on other sites More sharing options...
Anduril Posted March 27, 2010 Author Report Share Posted March 27, 2010 Hi Zac , nice to see you have your TM armour welcome to the TM band of brothers, i dont know if you have been following my TM build its the best build i have done what i meen is every part seems to be mm perfect, oh yes i will say one thing Zac dont rush it take your time and always measure more and cut onece , if you get stuck on anything pm me i will gladly help, happy TM BUILDING TROOPER. I've seen your build too and it's looking great. I've finally got some progress here to show you all. Most of the armour is now trimmed with a bottle of unopened E6000 just waiting to be used but I'm still doing a little adjusting and test fitting using a handy roll of masking tape I've painted the inside of the helmet black and trimmed most of it with just a little bit of trimming left to do around the neck area. Here's a pic of what I've done on the bucket so far, let me know if there is anything that could use some work that I may have missed or if I've completely messed something up and have not yet realised it It's not atttached together yet just slid into each bit to see how it all sits together. I'm making sure everything's right before I take a rivet gun to it! I have one question for whoever can answer in regards to trimming the main Thermal Detonator "middle" piece or whatever it is called. I just want to know the measurements of where to trim that piece, like how many mm each side of the detailing? I thought I read about it somewhere a while ago but havn't located it again yet... Thanks, and so far so good! Quote Link to comment Share on other sites More sharing options...
TKTrev[TK] Posted March 27, 2010 Report Share Posted March 27, 2010 I think it looks great! Did you paint the inside before or after you trimmed out the eyes etc? I'm debating that one... Hopefully I'll be working on a hero TM too soon. Just finishing up an AP at the moment, but I'll be watching this space carefully! Quote Link to comment Share on other sites More sharing options...
Anduril Posted March 30, 2010 Author Report Share Posted March 30, 2010 OK, time for some more progress photos since I've started assembling the armour! Chest and back done, biceps and forearms assembled, just need to be strapped together. Also Ab buttons painted and glued on to Ab plate: Showing my Chest and Back setup: I think it looks great! Did you paint the inside before or after you trimmed out the eyes etc? I'm debating that one... Hopefully I'll be working on a hero TM too soon. Just finishing up an AP at the moment, but I'll be watching this space carefully! Yeah I painted the Helmet interior before doing any trimming so it saved me some extra masking. TM armour is super awesome so good luck when you get your hands on some, and good luck with your AP Quote Link to comment Share on other sites More sharing options...
89Batman[TK] Posted March 30, 2010 Report Share Posted March 30, 2010 Wow looking good- there is nothing like a set of TM!!! I never ever get tired of looking at TM armour and watching the builds. Quote Link to comment Share on other sites More sharing options...
Turrican Posted March 31, 2010 Report Share Posted March 31, 2010 I love the herolook,too. Looking forward to this build! Quote Link to comment Share on other sites More sharing options...
Anduril Posted April 27, 2010 Author Report Share Posted April 27, 2010 Been a while so I thought I'd post up some pics of where my armour is currently at. Arms and all upper body bits pretty much done, just need to shim the sides between the ab and kidney plates with some plastic to cover up the few centemeters of gap there: Leg parts done for the most part, just need a little bit more trimming so that I can actually bend my legs and add the boxes on the right thigh. Front part of the belt is done, I just need to make the soft parts: Will also be going for EIB (Plus I always want to get my costumes as accurate as I possily can) so rivets already added on the left sides of the Ab and Kidney: Added the snap to the right side of the Ab Plate: Snaps added to the bottom of the Butt Plate too as seen on Han's armour: The Helmet is getting there. Right ear needs fixing up, some paint work needs touching up like the vocoder and teeth, still need to put grey in the tears and traps and rubber trim added around the bottom. Oh and tube stripes need to be painted on too: I have flat lenses just taped into the helmet at the moment too but I want to get some bubbles organised and might make them interchangable if I find the bubble lenses hard to see/troop in. So if anyone has any suggestions feel free to chime in Quote Link to comment Share on other sites More sharing options...
Anduril Posted September 3, 2010 Author Report Share Posted September 3, 2010 Ok...been quite a while between updates...distractions everywhere but I'm finally back on the project hoping to get it done and approved soon Over the last week or so I've re-fitted the ears on my helmet (they fit so much nicer now ) painted nearly all of the details on it apart from the tube stripes which are taped and marked out. I also adjusted some of the strapping so it fits better. Anyway here's where I'm at: I still need to tweak a few bits and finish putting the belt and blaster together but It's all slowly coming together Quote Link to comment Share on other sites More sharing options...
Darksaber212[TK] Posted September 3, 2010 Report Share Posted September 3, 2010 Looking good! Quote Link to comment Share on other sites More sharing options...
Anduril Posted September 26, 2010 Author Report Share Posted September 26, 2010 I've done some more work on my kit over the past couple of weeks. I have got the belt all together plus thermal detonator as you can see here (Sorry about the horrible quality pics): Front: Back: Work has been started on the blaster (Doopy Doos pipe build). Drilled all the holes in my aluminium pipe, I just need to cut the ejection port and cocking piece out. Some of the resin pieces have been cleaned up, the folding stock pieces put together, gap filled and sanded smooth plus holes part drilled on the underside where the hollowed out parts were on the originals. Here's a snap of it all after the long drilling session: Today I finally painted the tubestripes on my helmet pretty much finishing it off (I just need to add a little more padding inside to stop it wobbling around some more and putting fans in it). Done with 13 stripes on the left and 11 on the right, Han style . Here it is: Also, here's how i've set up my chestplate to hold my amp while trooping (Idea courtesy of the guys here on FISD ): I'm just painting over the exposed rivets on my armour pieces white then I'm almost done with just the blaster to go! So close now! Quote Link to comment Share on other sites More sharing options...
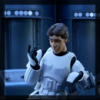
Anduril Posted October 19, 2010 Author Report Share Posted October 19, 2010 It's about time I got back here. Well as of last week I have been approved into the 501st as TK 9226. Here's my application pics I'd sent in but want to have a nice photoshoot in the near future to show it all off that much more: I tested it out at Armageddon Expo this past weekend as well which is what I was aiming to have this completed by. Apart from a few minor adjustments I need to do it held up great over the 5 and a bit hours I was in it for. Quote Link to comment Share on other sites More sharing options...

Recommended Posts
Join the conversation
You can post now and register later. If you have an account, sign in now to post with your account.