Search the Community
Showing results for 'cover strips'.
-
Haha Thanks! I totally goofed! I got it right now I think. I need to keep that in mind so I don’t make any mistakes when I’m putting the back cover strips on.
-
Thanks! I’ll make to sure to remember that! I trimmed the shins more and cleans some of it up for now so I should be ready to add the cover strips soon!
-
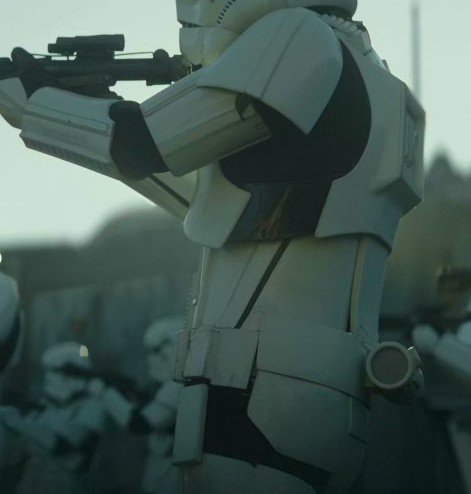
 Artillery Trooper CRL First Draft The Rogue One CRL was used as the base considering it is the same armour, so level 2 and 3 also easily apply. Helmet Traps (trapezoids on dome of helmet) and tears (area beneath the corners of eye lenses) are gray. Rear traps and tears have engraved vertical black lines. Lenses can be flat material, green in color, sufficiently dark enough to obscure the costumer's eyes. The “ear” bars are gray or painted gray, with the largest bar oval cutout painted black. Frown is painted gray and does not leave the teeth area. The space between the 8 teeth is hollow and backed with Black or Dark grey wire screen mesh. Tube stripes are medium blue, numbering 12 per side. The stipes are straight, not curved like ANH. Vocoder (vertically ribbed chin detail) is painted black. Aerators/Hovi mix tips (cylinders on either side of the vocoder) have a black exterior and silver in color screen mesh. Tears and traps may not be hand-painted. Tube stripes are recessed, and the recessed section painted blue or backed by blue mesh. Special unit details in yellow shall be present. The yellow detail will start from the back of the dome, continue over the head, down the face plate and ends underneath the chin area at the neck seal. Helmet and details/paint should be lightly scuffed,(battle worn), but not weathered like a Sandtrooper (TD) Note: The helmet is accurate in detail and proportion to official references. Many commercially available helmets or those considered disproportionate in size or shape are ineligible. The Black Series helmet is approvable if modified to meet the level 1 CRLs. OPTIONAL Level two certification (if applicable): Lenses have a very slight curve and are convex in style. Flat lenses and ANH style bubble lenses are not permissible. Rank bar area on ear must be of the correct RO style and pattern, no ANH style ear bumps allowed. Head opening has black trim running all along the edge. Brow trim should be positioned 1/4" above the eyes. Ear screws must not have a visible slot mark and be flush to the ear. Any gap between the ears and helmet will only appear to be a seam, not any bigger. Correct 'Hovi mic' aerator tips. Chin section has a well defined seam from the angles of the mouth. OPTIONAL Level three certification (if applicable): The Tube stripes are completely hollowed out with a blue section underneath. Vocoder is tubular in nature with 7 vertical tubes. A visible gap must be present between the Vocoder and the helmet. The inside of each tear will be a raised area that is grey, with 8 engraved black lines, hand painted lines like ANH are not permitted. The frown shall be recessed to the proper depth, unlike standard ANH. The inside of each rear trap will be a raised area that is grey, with 13 engraved black vertical lines, hand painted lines like ANH are not permitted. The inside of each side trap will be a raised area that is grey. There is a small bump in the right eye socket (when worn) under the lens as an intended flaw to pay tribute to the original trilogy designers. Neck Seal Black with horizontal ribs, fitted to the wearer, and extending from the base of the neck to conceal the entire neck. Under Suit Black non-textured material, either one-piece or two-piece construction with no visible zippers or logos/designs. OPTIONAL Level two certification (if applicable): Top, where visible shall be fully ribbed with all horizontal ribbing on the arms, chest, and back. The centre of chest and back may be mesh as long as it is covered by armor. Pants shall be black non-textured material and have horizontal ribbing at the knees only. Knee gaskets are allowed as long as they correctly match top ribbing material, spacing and color. The hip section shall not have ribs. OPTIONAL Level three certification (if applicable): All ribbing on knees, arms, chest, and back must be stitched between each rib in detail and proportion to official references. The armpit area shall have the correct hexagonal mesh detail. Shoulder Armor One on each shoulder. The shoulders are considered effectively symmetrical; they may be worn interchangeably on the left and right shoulders and may have a black elastic strap that wraps around the inside of the bicep. Special unit details in yellow shall be present along the outside edge. Shoulder bells/Special unit details should be lightly scuffed,(battle worn), but not weathered like a Sandtrooper (TD) OPTIONAL Level two certification (if applicable): OPTIONAL Level three certification (if applicable): There is no swoop on the shoulder bell raised area. There is no elastic strap that wraps around the inside of the bicep. Shoulder Strap They may be affixed with Velcro or adhesive. OPTIONAL Level two certification (if applicable): OPTIONAL Level three certification (if applicable): These shall be inserted behind the chest tabs and into slots of the backplate. Upper Arm Armour Both biceps are symmetrical and interchangeable. The front strip is beveled and approximately 1/8" thick that does not extend beyond the bicep, and has a smaller cover strip layered thereon. Special unit details in yellow shall be present in the form of one vertical stripe, running the length of the bicep. The stripe covers the front cover strip top and sides. Bicep/Special unit details should be lightly scuffed,(battle worn), but not weathered like a Sandtrooper (TD) . OPTIONAL Level two certification (if applicable): OPTIONAL Level three certification (if applicable): Cover strips will cover both the front and back joints. Biceps are loosely held closed in the back with elastic, shock cord (bungee cord) or white Velcro and are designed to remain flexible. Forearm Armor The front strip is beveled and approximately 1/8" thick that does not extend beyond the bicep, and has a smaller cover strip layered thereon. Special unit details in yellow shall be present in the form of two vertical stripes, running the length of the forearm. One on the front (cover strip area top and sides of strip), the other on the outside raised section containing the 12 indents. This stripe is only on the top surface, not on the sides of the raised area. Forearm/Special unit details should be lightly scuffed,(battle worn), but not weathered like a Sandtrooper (TD). OPTIONAL Level two certification (if applicable): OPTIONAL Level three certification (if applicable): Forearms are loosely held closed in the back with elastic, shock cord (bungee cord) or white Velcro and are designed to remain flexible. Cover strips will cover both the top and bottom joints. Hand Plates Roughly pentagonal in shape, the hand plates are mounted securely over the back of the glove. As an alternative to plastic, these may be made out of latex or latex-like material. Special unit details in yellow shall be present in the form of vertical stripe that runs down the center ridge of each hand plate. It continues approximately 3/4 of the way onto the wrist end section of the plate, finishing with a foot like shape as per visual references. Hand plate/Special unit details should be lightly scuffed,(battle worn), but not weathered like a Sandtrooper (TD) OPTIONAL Level two certification (if applicable): Hand guards shall be made of plastic. OPTIONAL Level three certification (if applicable): Hand guards should follow the correct RO shape, ANH hand guards are not acceptable. A small indent in the front of the hand plate shall be present. Gloves Black in color, made of either rubber, Nomex, leather, or leather-like material, with no visible straps or logos/designs. The fingers are enclosed, non-textured. OPTIONAL Level two certification (if applicable): Gloves shall not be made of rubber. OPTIONAL Level three certification (if applicable): The base material of the gloves will be a black synthetic material similar to Lycra, Spandex, Elastane, or Nylon. Palms of gloves shall be shiny black fabric or leather or leather-like material. On the index finger shall be a stitched piece of fabric made from the same material as the hand's underside that while stitched to the finger has one cutout towards the end of the finger that reveals the netted material underneath. Gloves shall have the correct leather pattern along the fingers/palm. Back Armor Back plate contains an "O II" design. There are raised trapezoids at the top of the backplate section beneath which the shoulder straps insert. The backplate continues past these trapezoids towards the top of the shoulder OPTIONAL Level two certification (if applicable): Top of box wall has a trapezoidal indentation. There is a roughly 8mm circular indent near the right top corner of the backplate. OPTIONAL Level three certification (if applicable): Bottom of backplate is curved and extends past abdominal back cover plate. The O cog shall have 16 spines. The 11 bars have 5 horizontal evenly spaced raised bars on the bottom of the face. There is a rectangular tab protruding from the bottom of each of the two raised trapezoids at the top of the backplate. Chest Armor Chest plate overlaps the abdominal plate. There are raised trapezoids at the top of the shoulder section beneath which the straps insert. Special unit markings shall be present in yellow on the front. The yellow detail starts a few inches from the top/center, then flares out and runs along the bottom edge. Chest/special unit details should be lightly scuffed,(battle worn), but not weathered like a Sandtrooper (TD). OPTIONAL Level two certification (if applicable): The chest and back sides shall be connected by black extensions pieces. OPTIONAL Level three certification (if applicable): Top pectoral out lines swoop correctly outward. Bottom of ribcage flares correctly outward. Abdomen Armor The abdominal armor consists of a one-piece corset design with a vertical opening centred on the back. The back opening is covered by a rectangular cover plate that is worn under the back armor. There are 3 vertical ribs centered on the front of the abdomen and two (one left and one right) ribs further spaced to each side of the center. There are two (one left and one right) angled (approximately 70 degrees) ribs on each side of the abdominal armor. There are two (one left and one right) angled (approximately 70 degrees) recessed ribs on each side of the abdominal armor behind the raised angled ribs that are black. Any side shims added are to be added to the white areas of the armor. The center front detail consists of a raised rectangular panel. On the right half of the panel, there is a vertical column of 4 buttons approximately 7/16” (11mm) in diameter. The bottom button is blue while the other three are grey. On the left half of the panel, there is a vertical column of raised evenly spaced horizontal gear teeth with a recessed trapezoid at the top of the column. The rectangular inside bottom of the trapezoid is black. The left front detail consists of a raised rectangular panel with an angled top. There is a vertical column of 4 buttons approximately 7/16” (11mm) in diameter. The bottom button is blue while the other three are grey. The right front detail consists of a primary raised rectangular panel with an additional secondary raised rectangular panel covering the top 1/3 of the primary panel. There is a column of three thin horizontal evenly spaced raised lines across the top ½ of the secondary panel. The abdominal armor is accurate in detail and proportion to official references. OPTIONAL Level two certification (if applicable): The cod armor is separate from the abdominal armour. The right front detail panel is centered between the two outer vertical right ribs. The left front detail panel is centered between the two outer vertical left ribs. OPTIONAL Level three certification (if applicable): The abdomen armor has two horizontal recessed rectangles centred above the center front detail panel and on each side of the center rib. All 8 Button details are recessed and bordered with a thin edge, only the recessed portion is painted. The center front panel column of raised gear teeth has only 9 teeth. There is a recessed edge (approximately 1/8” 3mm wide) along all four sides around the face of the center front panel The right front detail panel is centered between the two outer vertical right ribs. The left front detail panel is centered between the two outer vertical left ribs. There is a recessed edge (approximately 1/8” 3mm wide) along the sides and top around the face of the left front detail pane The abdominal armor back cover plate has two protruding tabs along the bottom that rest inside the back hard belt. Cod Armor The cod armor consists of a body shape formed triangular plate with a raised center rib and raised lower portion and is accurate in detail and proportion to official references OPTIONAL Level two certification (if applicable): The cod shall be a separate piece from the abdominal plate. Kidney Armor The kidney armor is separated in the back and covered by a rectangular plate. The rectangular plate is separate from the posterior armor. Posterior Armor The posterior armor shall be a separate piece from the abdominal armor Belt The Ammunition belt consists of a hard belt made of the same or similar material as the armor in two separate parts front and back (with overlap). The back belt overlaps the front belt on the sides. There are 6 ammunition boxes mounted to the belt. There are 2 (one left and one right) drop boxes suspended by black webbing approximately 2" (50mm) wide. Drop boxes must be accurate in detail and proportion to official references. The ammunition belt is accurate in detail and proportion to official references. OPTIONAL Level two certification (if applicable): The only detail visible on the front belt is the mounted ammunition boxes unlike the squares present on ANH belts. The top edge of the front belt has protruding teeth that nest inside gaps between the ribs and detail panels of the abdominal armor. The two center ammunition boxes are thinner than the other mounted ammunition boxes. The second and fifth mounted ammunition boxes are slightly wider than the two center ammunition boxes. The two outermost ammunition boxes are almost square. The two drop boxes are rectangular and as wide as the mounted square boxes. OPTIONAL Level three certification (if applicable): The ammo boxes across the front are all made separately from the main belt and are secured to it The two drop boxes hang no more than 1” 25mm below the front belt and the black strap is visible. The second and fifth mounted ammunition boxes have trapezoid detail on the top of each ammunition box. The front belt protrudes past all mounted ammunition boxes above and below by approximately 1/8”-1/4” 3-6mm. All ammunition boxes have slightly bevelled edges on the face of each box. Thermal Detonator The thermal detonator consists of a grey tube approximately 3” 76mm in diameter and 8” 203mm long approximately. There are two white endcaps and a white control panel. The white control panel has a horizontal row of white rectangles along the bottom of the control panel and a grey “D” shaped recessed on the left side of the horizontal row. There is an oval greeble that protrudes from the control near the top right side. The thermal detonator is mounted to the rear hard belt and there are no visible screws or clips and is accurate in detail and proportion to official references. Thermal Detonator is only worn in absence of the munitions pack. OPTIONAL Level two certification (if applicable): The thermal detonator mount should be fully enclosed with solid walls on all four sides. The center of both end caps is gray. OPTIONAL Level three certification (if applicable): The control panel bottom detail is a raised panel with 7 raised rectangles, all are evenly spaced except the right most rectangle. There is a panel line approximately ¼” 6mm from the edge around the control panel. There is a panel line approximately 1/8” 3mm from the edge of each endcap. The inside edge of both endcaps is bevelled. The oval greeble consists of an oval tube protrusion with the top edge slightly extending past the tube wall thickness and is visually similar to the Deathtrooper chin greeble. Thigh Armor The thigh armor is mirrored for each leg and not interchangeable. The cover strips are bevelled and approximately 1/8" thick that does not extend beyond the thigh and has a smaller cover strip layered thereon. The top edge of the thigh armor is unadorned, and the bottom edge has a raised detail that fallows the bottom edge contour. The small ammo belt consists of 5 evenly spaced rectangle ammunition boxes and is installed on the bottom of the right thigh, there are no visible screws or rivets. The special unit markings shall be present in yellow along the top of the thigh, the markings shall continue approximately 2 inches further down the front cover strip as per references. Thighs/Special unit details should be lightly scuffed,(battle worn), but not weathered like a Sandtrooper (TD). OPTIONAL Level two certification (if applicable): Thighs are loosely held closed in the back with elastic, shock cord (bungee cord) or white Velcro and are designed to remain flexible. Cover strips will cover both the front and rear joints OPTIONAL Level three certification (if applicable): The bottom outside edges of the small ammunition belt are angled at approximately 45 degrees. Thigh armor is suspended by a black strap approximately 1” 25mm in width with a plastic side release buckle that is covered by black webbing or elastic that runs down the side seam of the leg. Lower Leg Armor The greaves are mirrored for each leg and are not interchangeable. The top edge of the greaves has a raised detail that follows the top edge contour. The bottom edge of the greaves flairs out to cover the top of the ankle and boots. The cover strips are bevelled and approximately 1/8" thick that does not extend beyond the greave and has a smaller cover strip layered thereon. Greaves are loosely held closed in the back with elastic, shock cord (bungee cord) or white Velcro and are designed to remain flexible. Cover strips will cover both the front and rear joints. The trapezoid knee plate (sniper knee plate) is affixed to the top of the left greave and there are no visible screws or rivets. Sniper knee plate must be aligned with the vertical cover strip and the top raised edge detail on the greave and is accurate in detail and proportion to official reference The base of the center trapezoid on the sniper plate is painted yellow. Special unit markings shall be present in yellow around the bottom of both greaves as per official references. Greave/Special unit details should be lightly scuffed,(battle worn), but not weathered like a Sandtrooper (TD). OPTIONAL Level two certification (if applicable): The sniper knee plate has raised detail that fallows the top edge contour. The sniper knee plate has 3 trapezoidal lugs on each side and 2 on the center bottom edge (totaling 8) of the knee plate. Boots Boots are above ankle height and the same style as the First Order TK. Chelsea type boots in the style of OT TK are not acceptable. Boots are all white and made of leather or leather-like material Flat black soles without a heel. Patent leather or high gloss is not permitted. Boots are lightly scuff and weathered. OPTIONAL Level two certification (if applicable): There is no seam present on the front of the boot. The wearer's inner side of the boots have zippers and no side elastic. Munitions Pack Pack must be accurate in colour and details styled after the munitions pack as seen in The Mandalorian season 2, and official reference images. Pack must be lightly scuffed and weathered. Pauldron UPDATED Although the Artillery Trooper is clad in Rogue One armor, the Pauldron that denote rank or mission specialization are an ANH style in construction. *A Yellow ornament made of leather plastic or leather-like material, worn over the right shoulder. The Yellow is specific to Rogue One/remnant as seen in The Mandalorian. *The colored panel is divided into three sections by color matched stitching to conform to the wearers shoulder and has black piping around the outside edge. *The remainder of the Pauldron is black and divided by black stitching into 10 segments. *The neck closure is black, it is mounted on top with two silver rivets and has two silver snaps visible. *There is a black elastic strap that runs from back to front and is worn under the bicep to hold the Pauldron in place. The strap is conned to the Pauldron on top by two black snaps inlayed in black “D” shaped leather or leather-like ends. *The underside of the Pauldron is white or black regardless of top color and is divided with white or black stitching into 3 segments. The entire outside edge is finished with black piping and the underside of the neck closure is black.||}} Merr-Sonn Munitions 201 telescopic mortar. *Launcher can be scratch-built, or 3D printed. *As with all 3D printed accessories, it can not contain visible print lines and must be sanded smooth for a more realistic appearance. *The Mortar shall match official reference and include A control panel shall be present on the left side of the mortar attached to the center section where the Bi pod also mounts as per references. *The mortar and details/paint should be lightly scuffed,(battle worn),similar to that of a blaster.
 -
AM lot of it will depend on how thick your arms are... on the front there should be at least a small amount of the raised ridge under the cover strips. The rear can also have as much as you need, but some troopers need to remove all the raised ridge in the back completely. Here are some pics from WTF builds showing the rear and forearm tops that may help. Note that it's fine to have some return edge on the tops (some people like the way it makes the armor look thicker) but in fact there was little to none on most troopers seen in ANH.
-
I have a question on trimming parts for cover strips and fitting. With the WTF kit, there are the raised sections for the cover strips (Blue areas). Do I trim these to fit for cover strips, and use only the Yellow area to trim for fitting?

-
If it's along cover strips you can use scrap plastic, when it gets dull just cut a little off, thumb for less stubborn areas and sometimes a slightly wet rag can help.
-
Gotcha! Will do! Should I do a test suit up with tape before I add the remainder of the cover strips on to gauge how everything will fit together?
-
Before I redo the front cover strips on the thighs I had a quick question, I noticed for the back of the thighs some people seem to trim out more and get rid of the top curve on the back for more comfort. In the RS video they didn’t trim this part to be more flat so I left it as is when glueing the cover strips. Would you recommend I trim the back more to fit better and help with mobility or should I leave it as is for this kit? Thanks!
-
You could, if you need to add larger cover strips they would normally go on the back, since the public normally see you from the front. The only issue you would then have is the lower ridge, you may need to add a section there and fill with ABS paste. Some have even had to add extra material to the sides of the thighs to give them extra width
-
I also ran into a similar issue with the left thigh as well. After letting the left thigh dry for longer I realized the thigh wasn’t flush like I thought I had placed it when glueing. I think it may have to do with the way I’m placing the clamps at the end of the cover strip that may be leading it to separate a bit when I’m putting clamps/magnets on. Maybe this is something that would be easier if I put the inner cover strips on first.
-
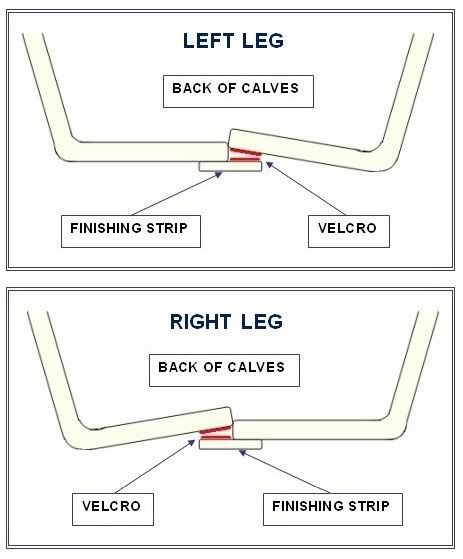
They should shut completely and you should wear them with your boots as they can make a big difference. Some who can't completely shut add slightly larger cover strips. Also depends if you are using the hook elastic or velcro. Cricket used magnets to keep them closed Hook/elastic Velcro Magnets On some occasions some heat is needed to help the shin lay flat, many use a hot water bath as it's easier to control.
-
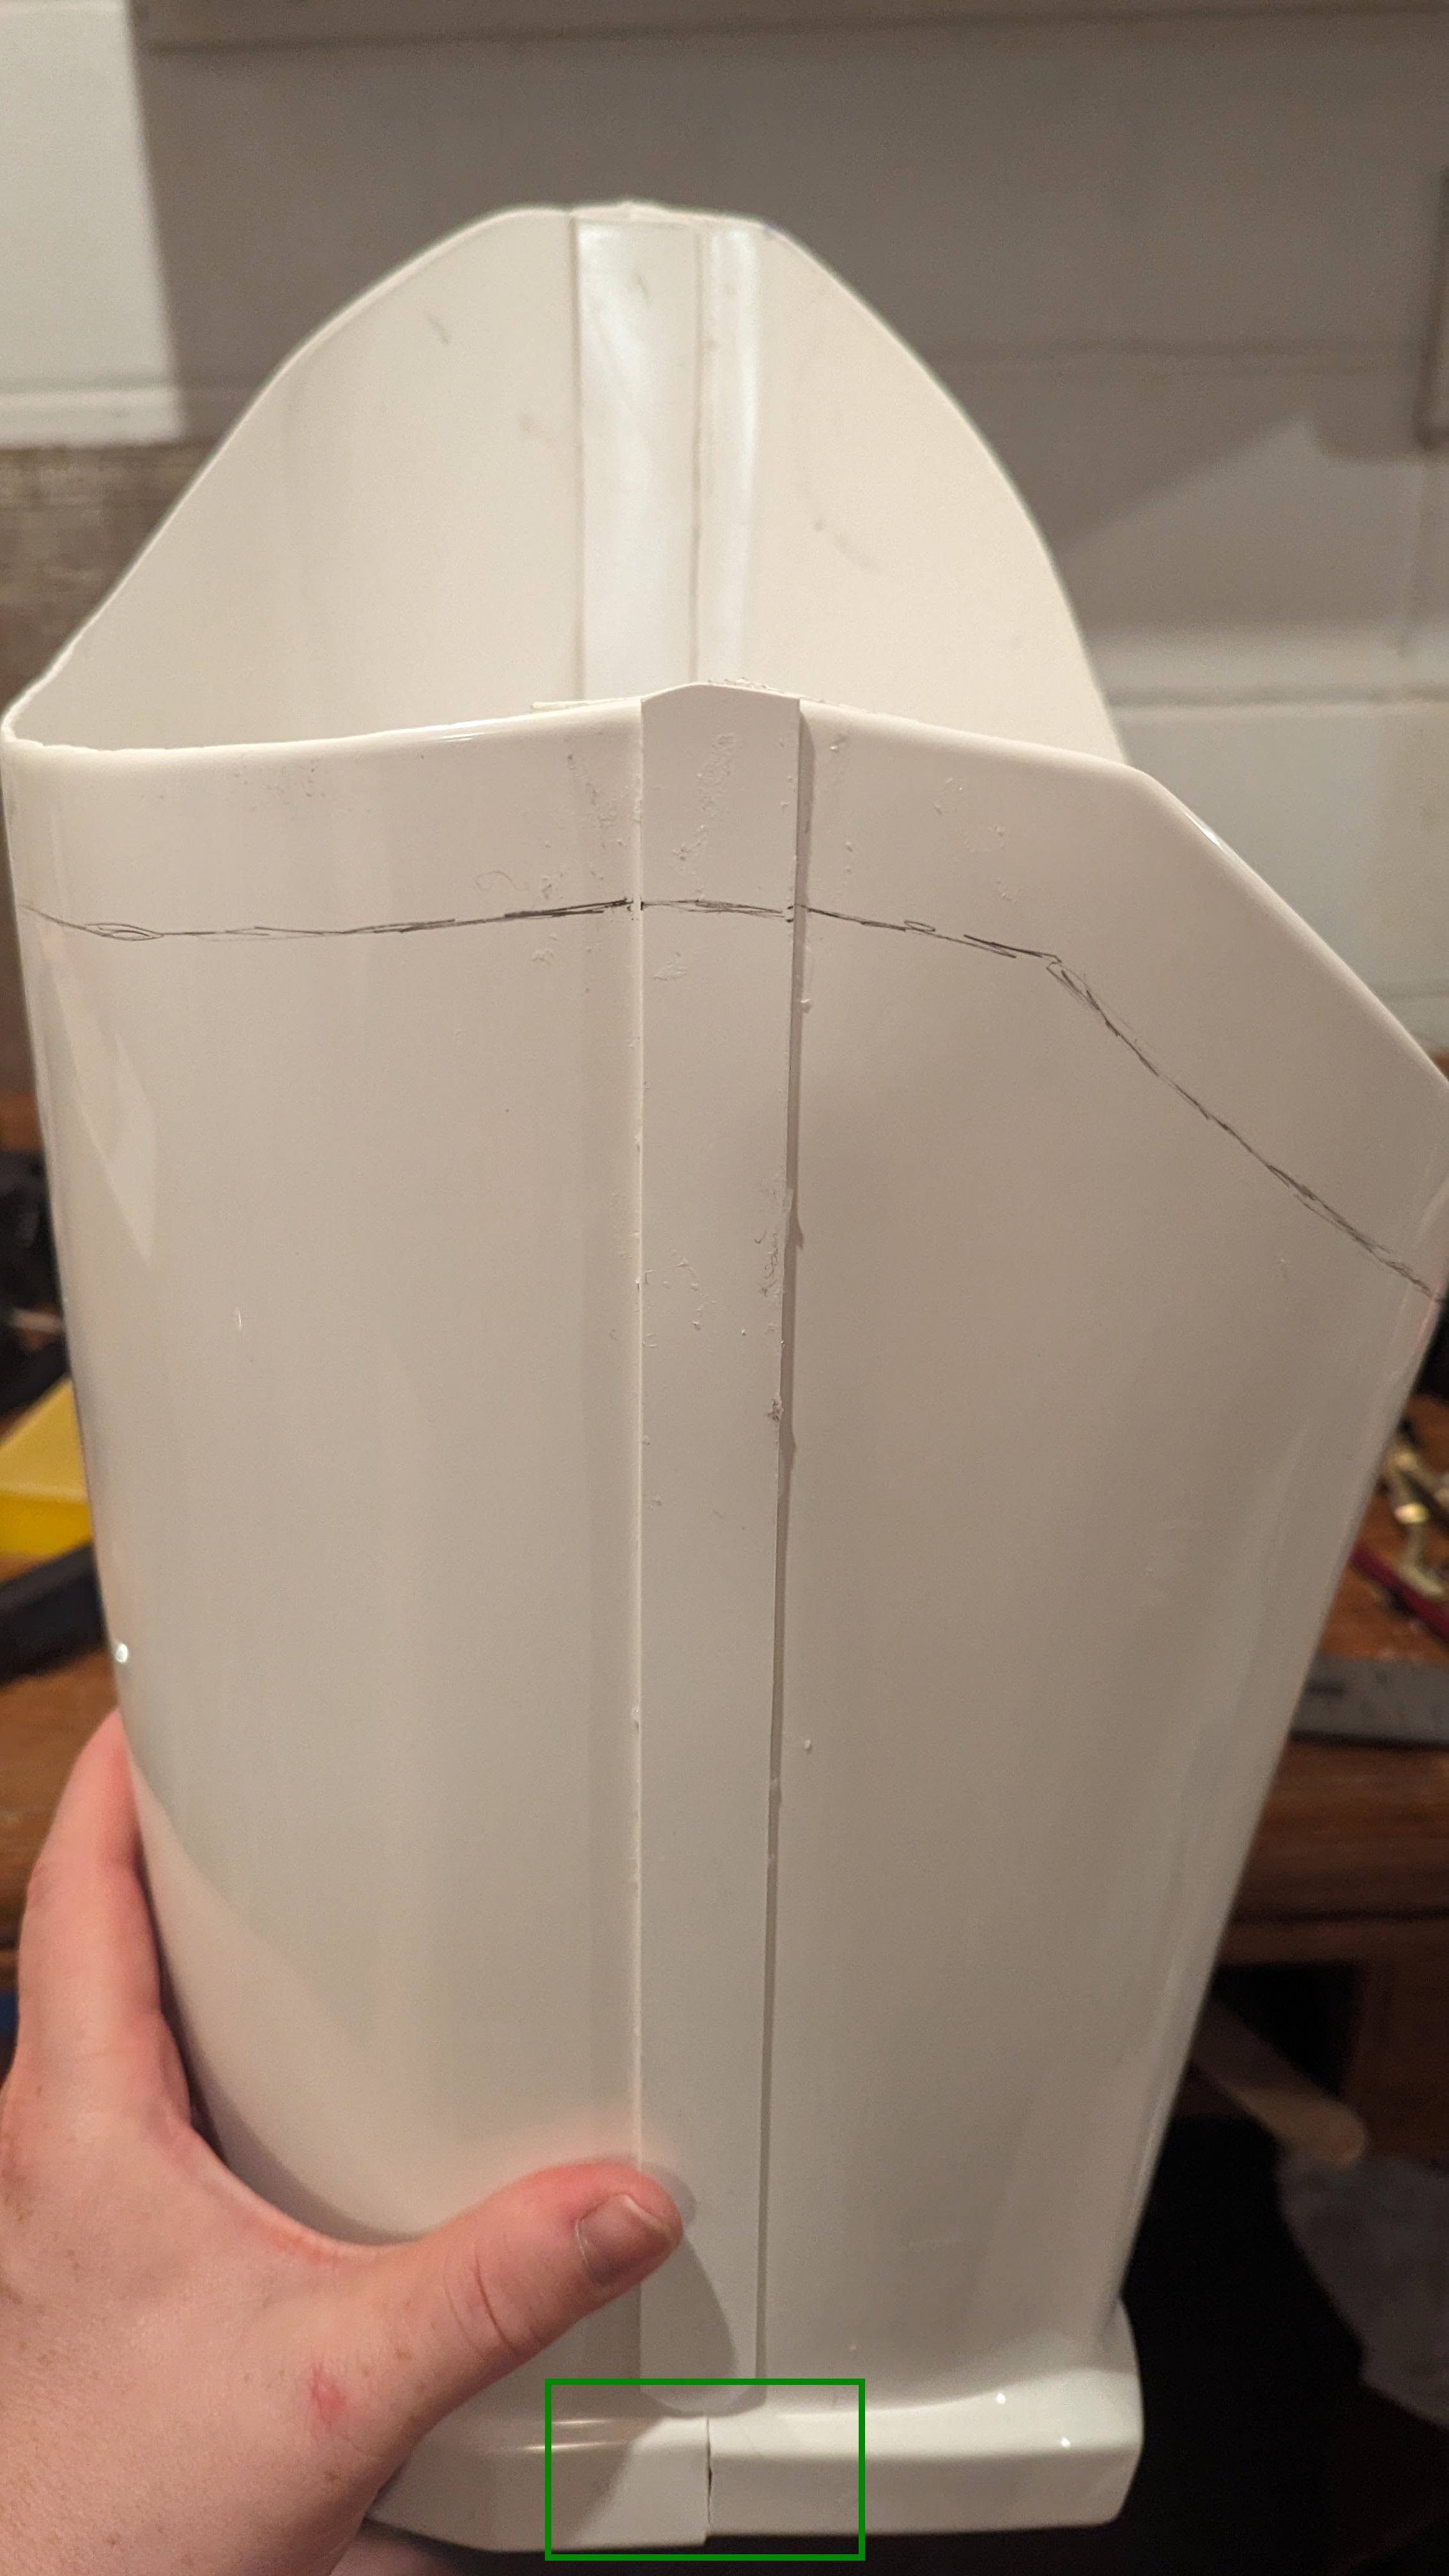
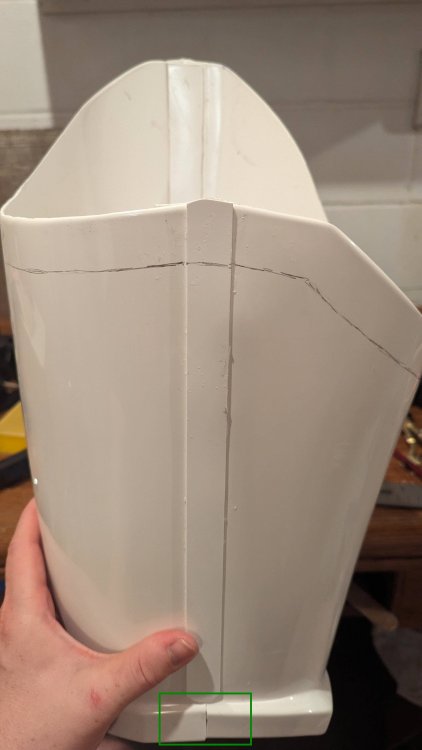
Outside cover strips for the thighs are about done drying. I must have shifted one of the cover strips to the side a little because it seems a bit off center. Does this look fine or should I try to glue it on again? I also noticed after trimming the shins that the bottom of one of the shin sides seems to be longer than the other. Should I just trim the longer one down to fit the other before glueing? Thanks!
-
Awesome tip! I’ll make sure to try that out! I can definitely see how sanding the edges at a flat angle will help a lot. I snagged a bunch more magnets too so I should be also to glue the inside cover strips pretty quick. Thanks!
-
While the glue on the forearm cover strips is drying I decided to try to tackle the stain issue I had on the biceps and begin the right thigh. I did a high grit light sand on the stains (1500 grit) and had no luck. I may try a lower grit and see if that works. I also started the right thigh and did the initial trimming. Any tips for lining up the bottom of the back of the thigh where the cover strip won’t cover? Also I trimmed the return edges to the point that the RS Propmasters build video recommends for now, but eventually how much of the return edges should I trim off on the thighs? Thanks for all the help!
-
Awesome! Will do! Also thanks for the tip on glueing the inside cover strips first. Just tried that and it seems to be looking a lot easier to do the outer cover strips already!
-
Awesome! I’ll make sure to keep gluing the cover strips!
-
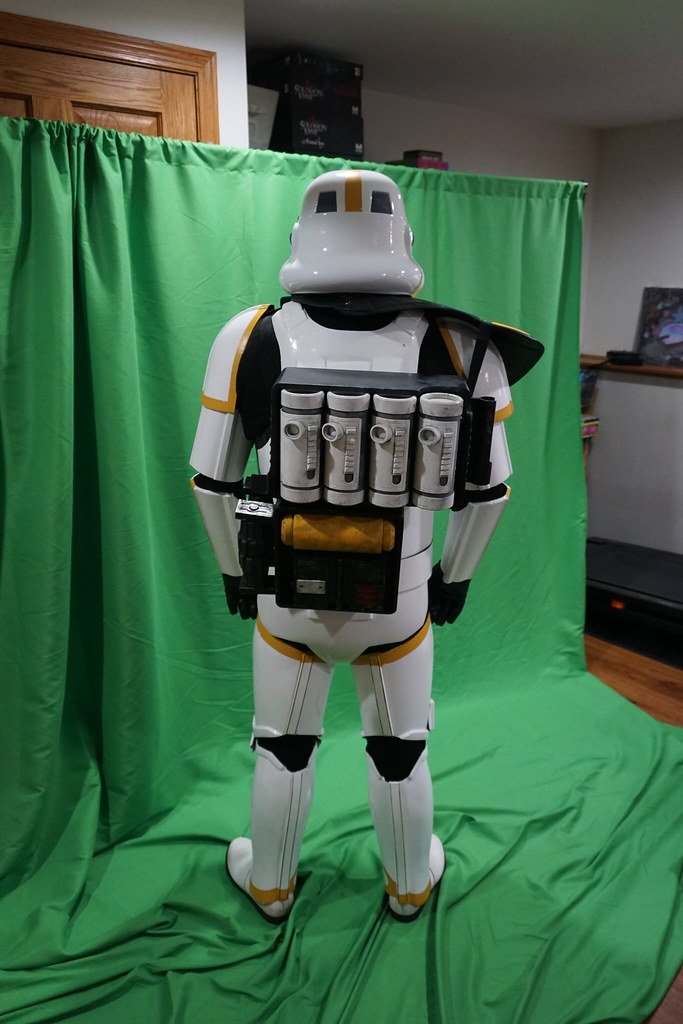
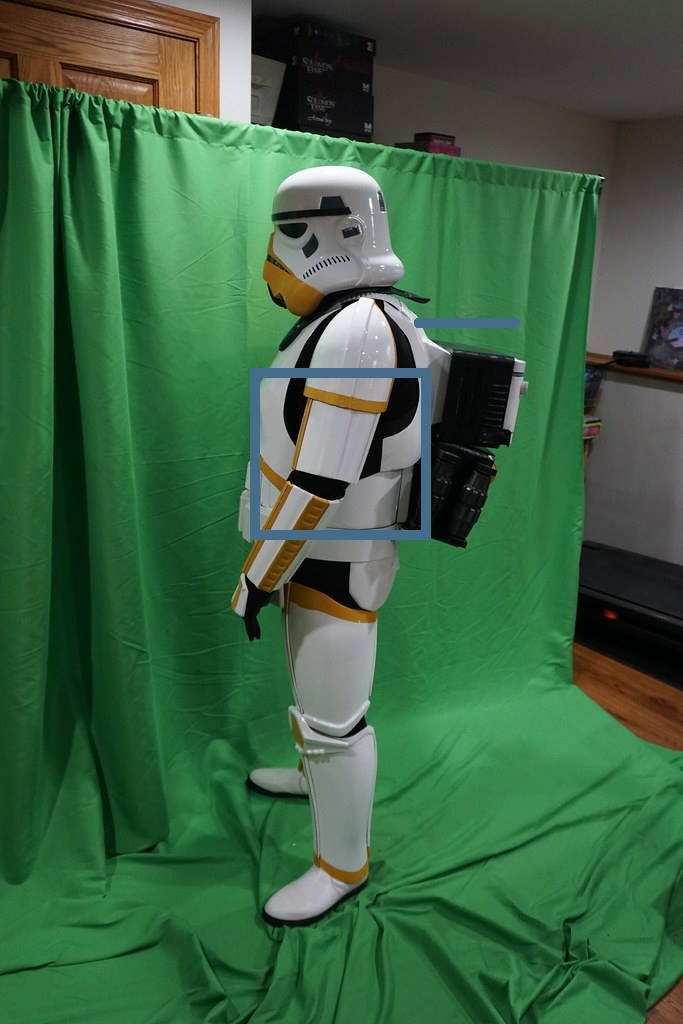
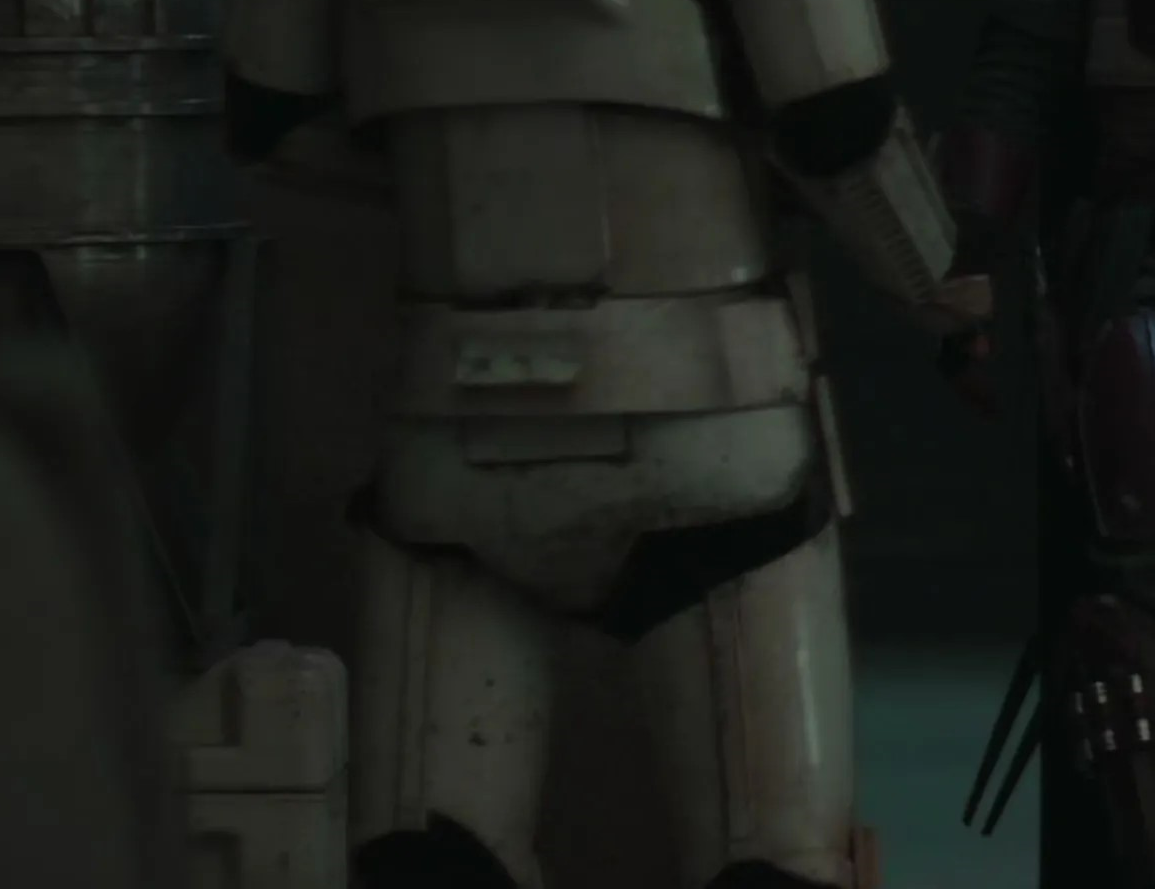
 Great to see all of the improvements you have made. Just a couple of things you could tweak, but ultimately they would be up to our DL @Sly11 Position of the pack, could be a touch higher References showing it's positioned just under the circle detail on the top right of the back plate and just under the shoulder strap mounts. The sides of your chest and backplate, not sure if you can pull the chest up any higher, notice the sides don't meet and are on quite a large angle One thing I hadn't noticed before (I may have and forgot) was the thigh cover strips on the rear, they angle inwards towards the top


-
Double up on your magnets and place them as close as they can get, staggering them slightly and alternating polarities as you place them so they want to push apart, not pull together. The more pressure you have on the strip, the more flush it's going to lay. Having inner cover strips glued in first will also make this WAY easier to allow for minimal gaps, as the coverstrip becomes more cosmetic than structural. I usually scuff my pieces before gluing with E6000, so watch when you scuff under the strip and ensure the part is level there also.
-
GREAT question, Brendan! Due to the slight curves on the limb pieces, getting the cover strips 100% flush is just not going to happen in many cases so nothing to be concerned about. As long as you have the inside cover strips you should have no issues.
-
Did a mock cover strip for the forearms and noticed that with the raised ridge side of the forearm, even with the magnets and clamps on, there seems to be a small sliver between the forearm and cover strips. Is this just normal for that side of the cover strip and will the inside cover strip help with this? Or should that cover strip be tighter? Thanks!
-

SublimeBW's Armor Master's (AM) ANH Stunt Kit - Build Thread
SublimeBW replied to SublimeBW's topic in ANH Build Threads
Build progress from last week: Trimmed the thighs but will wait to size until chest & abdomen are done (thanks @TKSpartan for the reference shots) Glued flexible handguards to rubber gloves Attempting round 2 of adhering interior cover strips to forearms I got to antsy and removed my magnets & clamps before the E6000 was fully cured so the joint separated Goals for this week (aiming small as it is recital week for my daughter, so am busy most nights through Saturday) Trim Chest & Abdomen during the week so that I can fit it over the weekend Be patient about the forearms so that I can put the exterior cover strips on over the weekend -

KJ Build thread? Walt's Trooper Factory Kit
MSF Productions replied to MSF Productions's topic in ANH Build Threads
I can now see the end of the tunnel! Yesterday afternoon, I spent a few hours with a member who lives nearby sanding, chit chatting, and ultimately fitting the forearms and biceps. All of this is going to keep me busy until the other member and I meet up again. Time to paint the thermal detonator tube, assemble it and work on the forearm and bicep cover strips -
I cut the openings a little wider on the back of the thighs so it's easier to bend my knees. Also attached the small ammo belt to the right thigh. It was trickier than I expected. Had to heat the piece several times to get it the right shape. Because I haven't added the cover strips yet, I taped a placeholder on the thigh so the ammo belt would sit high enough to slip the cover strip under. I also had to glue some shims underneath so the ammo belt had more points of contact to glue to the thigh. I'm mostly satisfied with it.
-
Running into a bit of an issue with the bicep cover strips. The ends seem to be popping up a very little when I’m removing the excess glue. But just on the covers trips on the bottom of the bicep. On this one the cover strip seems to be pretty flush with the bottom of the bicep, but should I put my cover strips further from the edge?
-
The right bicep is glued and came out pretty good! The left one had some issues when removing excess glue and the cover strip popped off partially and I’m going to re-glue that one soon. When I took off the cover strips pretty much all the glue went with them, other than a few bits I removed. Other than that I should be good to re-glue. Hope the other one looks good so far!