Thumper
-
Posts
176 -
Joined
-
Last visited
Content Type
Profiles
Forums
Gallery
Articles
Everything posted by Thumper
-
caboots sizes and hovi tips
Thumper replied to giric thren's topic in Hard Armor (General Discussion)
I took a chance and bought the boots off eBay. I haven't seen any blemishes in them. I could post pics if you want so you can see what I got but of course, that still won't guarantee you'll get a scuffed-free pair. You know they will get scuffed trooping in them but you want the first photo to be pristine. As for the size, I bought what I normally wear (10 US) and they fit fine with a little room to move. I've worn them in costume for a few hours at a shot now and haven't noticed my feet hurting. Gel inserts are probably a good idea though. -
If I can get a babysitter for my kids, I'm willing to fall down in mine New Years Eve.
-
Newbie's armor set up so far
Thumper replied to steveo's topic in Build Threads Requireing Maintenance
I wanted to make an anti-gravity comment..... -
Renaissance Dancewear makes a nice body suit if that is what you are sold on. Price out the door ran me something like $110 with a few modifications. Its a cotton/lycra blend; not the moisture wicking quality of UA. PM if you want the contact info. I also have the UA stuff. You can't beat staying dry and it never hurts to have multiple backups. You wouldn't want to be known as the "smelly stormtrooper".
-
My FX Bucket redone.....slightly
Thumper replied to ManInWhite's topic in Hard Armor (General Discussion)
I noticed the messed up rear decals. When you first apply the decals it takes time and patience (something I'm short on) to get them to lay flat. Something about the curvature of the helmet that the flat stickers just don't want to conform (but it can be done). If I remember right, this wasn't your fault (donated/found armor?). When you get the new ones, don't be afraid to use lots of Windex when you apply them. It lets you move them around and position them much easier. Just aim and spray; make the helmet wet. And if it starts to dry out, they start to stick, and you're not happy, just hit them with the Windex again. You might even try re-wetting them now and see if they loosen up and let you move them. I've never tried it but what could it hurt? It looks like there is enough open space that the Windex could get under the decal and maybe let it move or give you some play to smotth them out. Either way, its coming along nicely. -
My FX Bucket redone.....slightly
Thumper replied to ManInWhite's topic in Hard Armor (General Discussion)
Big improvement over the foam brow! And nothing like showing a more accurate color. Any plans to open up the frown vents and lose the sticker? Its an easy mod (for comfort) especially since it looks like you might be making a hero helmet (you don't have to cut the extra tooth). Looks like you reinforced the ears a bit too. Two screws in the new pics at the helmet collar instead of one rivet. I did the same thing to help close the gap. And don't knock the FX helmet. I have already decided, yea...I'll build a "more accurate one" in the future (got TB plans first) but there is nothing like your first. Keep up the good work! -
Good advice to watch what we post and to search ourselves every now and then in the public search engines and databases to see what can be found. And keep the faith brother! Its unfortunate you not only have to worry about taking a bullet but having to defend your good name. It sounds like you protect yourself well.
-
As you have already guessed, this is a scam. All that will happen is you will send him lots of your money. In fact, the email elicites you to participate in a fraud, as the writer says, "anonymous funds" and that the funds are "without any record of the owner, source, and origin". He then wants to claim the money by, "presenting you as the Beneficiary". In other words, you pretend this money is yours, help him claim it, and it gets split it 50-50. All that will be claimed is the money and information you send him. The only money that exists in this is the money you have in your bank account or pocket right now. Delete the email and don't reply to it, or any others, even as a joke or an attempt to string him along. All it will do is open you up to additional fraud and spam. And spread the word. The best way to stop this type of fraud is education, as it is extremely difficult if not impossible to track the individuals responsible and bring them to justice.
-
Ed, Paul, and Brian, Thanks for the kind words. When I started working on my armor my wife and I had a laugh because I was also having trouble caulking the edges of the bath tub at the time. I was seriously wondering how this project would turn out. A little peer encouragement goes a long way (and the bath tub doesn't leak either.)
-
If you look at the helmet teeth as they are designed, the third tooth on each side is pretty large. In essence, you are going to put a rectangle hole in the middle of the last tooth, thereby creating a fourth tooth on each side. You need to measure the third tooth size. The middle of that measurement is the middle of the new rectangle hole you will create. I then used an exacto knife to drill open a small hole in the helmet at this middle point. Then I used a small file to begin creating the rectangle. You can use the width of the other rectangles as a guide and the upper and lower part of the frown is the height. I also used a pencil to trace the rectangle size. This gave me a guide for filing limits and if I drew it to large, I could always erase the mark. Its also possible to use a dremel to drill out and shape the hole, but if you slip, then you get to buy a new helmet. With a file, you can take your time and size it better. This is my helmet with the fourth tooth. The hole is actually a bit bigger than the picture makes it seem. Small is good though. If you want you can always take more off; not so easy to add it back on. Hope this helps.
-
I haven't had any problems with Goo Gone eating my helmet or anything else for that matter but the bottle does have a disclaimer that it should be tested "on a hidden area before using" (what item doesn't these days?), and not used on silk, leather, suede, or rubber. But I didn't really expect it to say, "Don't apply to replica Stormtrooper Armor." I was going to post pictures of the bottle but just as easy is the website, www.GooGone.com The site has a whole list of products that they say are are made from "Citrus and Petroleum Solvent". The Material Safety Data Sheets are also there for those that may be more chemically inclined. This isn't an endorsement of the product. I just felt that since I mentioned it and there was a possibility that someone had a problem with it before, I wanted to make sure no one ruined their armor after reading my post when a little soap and water may have cleaned things up just as well. I know Tony (ItsThatGuy) said he used a different product but I thought in an abundance of caution, I would add a bit to my original post. Knowing what work I'm putting into my helmet, it would kill me if I helped (even inadvertantly) destroy someone elses armor. And as for the Magic Eraser, haven't tried it but I will now. Thanks for the hint.
-
I sprayed the inside of mine with Performix Plasti Dip but I did it after I had it together. It took some careful masking and I had to work one section at a time. Either because of the type of spray I was using or I might have just tried to put it on too thick to start, it started to run inside the helmet. I also figure this was a side affect of essentially trying to spray the inside rim of a bowl. (Gravity. Go figure!) Once it dried though it looked pretty good and I was able to spray over the run marks to even them out. There are still a few spots I missed but they are under the rim and can't be seen unless you crank your head funny when you put it on. If you want to spray it, do it before its together. If I had it to do over again and it was already assembled, I would have brushed it on. Either way, be sure to mask anything you don't want black (your hand could always slip) and have a wet rag and some Goo Gone handy in case you do. (Goo gone does wonders and leaves a nice orange smell.) I'm still working on the fans and speakers but the plan is the same as Bryce. Velcro boxes for easy removal and repair.
-
Now a proud member of the Legion! Please update my status when you get the chance. http://www.501st.com/members/displaymember...cfm?userID=8624
-
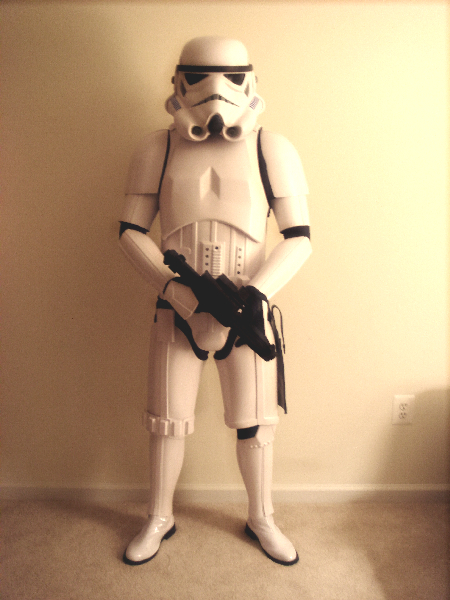
Completed my TK suit in time for Halloween. It's functional but I need to make some more adjustments and modifications (garter for the thighs, fans and voice amp, cloth belt, a little padding here or there, etc) but overall, I think it came out well. Thanks to everyones advice I reviewed on the board. I submitted my 501st application today as well so we should be able to change my status in a few weeks. And here's a picture of the happy trooper:

-
I just received my body suit from Renaissance Dancewear. Turnaround time was about 4 weeks. After searching the internet, I know they have been around for awhile and (supposedly) a lot of other people have these suits but I thought I'd throw out the info for any newbies out there (like me). I didn't see anything mentioned when I did a search in the forum. If anyone wants price and contact info, let me know. And if anyone has had a bad experience with them, throw that out too. (Of course I maybe should have asked that question BEFORE I bought it). Pictures will be posted if anyone wants to see it but to avoid embarrasment, I will not be wearing it in the pics untill I get my armor finished. Its a good thing there is a large Ab plate. I'm gonna go eat a salad now.
-
Jester, I read on another site you can use fine sandpaper to clean up the ABS glue spill, then use your ABS polish to buff out the scratch marks. I'm not sure how well this works as I haven't had the "oppportunity" to try it yet. You might want to experiment on a scrap piece of ABS. Good luck.