


troopermaster
-
Posts
3,638 -
Joined
-
Last visited
-
Days Won
12
Content Type
Profiles
Forums
Gallery
Articles
Everything posted by troopermaster
-
If they are hollow mic tips it is best to glue a backing plate on made from ABS (or any plastic). Drill a hole in the middle to bolt them into your helmet.
-
 E6000 works extremely well in my experience. Make sure you glue a good 3" square area of the strap inside the top of the thigh and leave it to set for 24 hours. I've had to remove the odd strap once glued and it takes some getting off. I've never had a problem with E6000.
 -
My First Big Brown Box
troopermaster replied to SapaWanmdi's topic in Build Threads Requireing Maintenance
Errr....a ruler? Seriously, use a ruler for the straight edges and for the curved ends, offer it to the tube and put it just over the edge, then use a pencil against the end of the tube to mark the inside the det plate. This will give you a nice straight edge and just trim from the inside rather than the outside. -
Stormtrooper Suit & Helmet Surfaces
troopermaster replied to riveting's topic in Build Threads Requireing Maintenance
I think the last photo shows off the difference between the painted helmet and hand plates compared to the off white of the armour brilliantly. -
Stormtrooper Suit & Helmet Surfaces
troopermaster replied to riveting's topic in Build Threads Requireing Maintenance
Match up to what? Hopefully they will still look like screen used armour. That's the whole idea of using the original strapping system. No matter how good or bad it is, we want our armour to be just like the originals back in 1977, not something shiny and perfect to make the public happy -
Stormtrooper Suit & Helmet Surfaces
troopermaster replied to riveting's topic in Build Threads Requireing Maintenance
Steve, This particualr suit has been repaired using new strapping brackets which have been attached using pop rivets and repair washers. You can still see some of the original brackets and screws in place, but most have been replaced and the old holes are visable. The top of the abdomen does have a very thin return edge. It's not enough for a bracket in the middle so it has been placed lower than usual. This is not uncommon on the real suits and screws can be seen 'on' the armour rather than hidden on the return edges. It looks to me as though the armour in the promo shot has already been repaired and I can see the washer and rivet. Usually there would be just the screw head showing originally and no reason to have a washer on the outside. It's a shame we cannot see the shoulder straps in this photo. This would confirm if it was the suit SiMan owns. As you know, Sandtroopers did not have shoulder straps and SiMans suit does have modified straps attached. There is no doubt that they were added in the same period as ANH as the attachments fitted to them are the same as others used on the suit. -
The paint doesn't crack (at least Halfords White doesn't). That was something that surprised me when I painted my 1mm suit. The plastic flexed a lot and the paint flexed with it Everything looks amazing Rich, especially with hair!
-
Are left and right handplates the same?
troopermaster replied to john danter's topic in Build Threads Requireing Maintenance
One is right and the other is left John -
I like your style Rich But PG tips? Come one, everyone knows Yorkshire tea is the best
-
Stormtrooper Suit & Helmet Surfaces
troopermaster replied to riveting's topic in Build Threads Requireing Maintenance
I've been looking more at this photo and I noticed this rivet showing which seems to match the one SiMan owns. The brackets have been repaired and the rivets are not usually in this position, so this could quite possibly be the same suit. It certainly looks like a rivet with a washer behind it if you look closely. -
TM's own personal 1 mm ANH weatherd Armour
troopermaster replied to SW1's topic in Build Threads Requireing Maintenance
Looking good there Steve! Nice touch with the gaffer tape on the chest -
Ah, I thought it was some kind of deglazer. Did you do any prepping of any kind?
-
What's the stuff in the 'during' photo Rich? Good to see you at least got the colour right mate
-
My new ESB TM stuff
troopermaster replied to Turrican's topic in Build Threads Requireing Maintenance
Nice one Stefan! Good to see more poeple taking this route with their helmets and armour. Adds a certain amount of realism to the kit in my opinion. Nice work -
Are left and right handplates the same?
troopermaster replied to john danter's topic in Build Threads Requireing Maintenance
You'll find most of the troopers in the OT wear their bells on any side, so you may well see a trooper with no bells or two. Same with the hand plates too. I like the fact they are odd. In fact, I am building up a couple of suits like this at the moment to recreate the screen used look. Not many troopers on screen wear their armour how it was designed to be and to me, that's how a good replica should be too -
My First Big Brown Box
troopermaster replied to SapaWanmdi's topic in Build Threads Requireing Maintenance
Jim, The panel should be 115mm wide. Leave 10mm past the end of the ribbed strip on the right hand side and measure from there. -
Are left and right handplates the same?
troopermaster replied to john danter's topic in Build Threads Requireing Maintenance
Pssst....it's the left one with the swoop -
Are left and right handplates the same?
troopermaster replied to john danter's topic in Build Threads Requireing Maintenance
The swoop is not missing. It's only on one bell, not both (like some replicas ) -
Are left and right handplates the same?
troopermaster replied to john danter's topic in Build Threads Requireing Maintenance
What are you getting at John? The hand plates are mirrored left and right, though I doubt they are perfect mirrored duplicates. Each side could quite possibly be slightly off from the other. Is that what you mean -
Your right Mathias. The chest brackets are longer than all the others on the armour, but all the elastics are the same length. This allows the chest to overlap the abdomen and still keep it's position. If they were the same size but had longer elastic, the chest would be able flap around and the abdomen would drop down, making the torso loose fitting instead of a closed unit. Helmet looks much better now Rolf
-
What's the best way to square the chest?
troopermaster replied to JimCem99's topic in Hard Armor (General Discussion)
The first thing I would do here is trim the back correctly and reposition it before attempting to do anything with the chest. Both the chest and back are over-sized so take some material away from the bottom edge of the back plate and also the tops where the shoulder bridges are. Get your back plate up high enough so the bottom edge sits butt against your kidney plate, not on top of it like you have it now. Reducing the length of the shoulder prongs on the back plate will allow you to pull the back higher where it should be. Try to cover as much of the neck area as you can - you have a lot of black showing there. For the chest, same thing really. It is sitting too low and you need to reduce the shoulder prongs and maybe the neck line so the plate is pulled up more. The red lines you have drawn look like a good starting point for trimming, but I would the modifications I have mentioned before attempting to trim the lower edges of the chest plate. You would be trying to trim the chest to match the back which is not right so it would be a losing battle from the start in my opinion. -
He's right you know
-
Leave the bottom where it is and tilt the top circular part 1/2" forward. It will look better than where you have it now in my opinion
-
So, do you really think anyone is going to bend their armour so severely while trooping as in the demonstration to get these crease lines? I don't think so. You would have more of a sad face if you tried bending a TE/TE2, AP, SDS or any other replica armour so much. You would be gluing it back together Remember, these are just costumes and not real space armour. They don't have to be super thick to resist blaster bolts. They are lightweight and flexible costumes which I hope are more comfortable to wear than other replicas out there. I know my own 1mm armour was super light and easier to wear than my 2mm AC ABS. The flexability is such a bonus in my eyes and allows much more movement with peace of mind of not cracking anything. Looking forward to seeing and hearing more Rich
-
Question about TE derived helmets
troopermaster replied to TK3202's topic in Hard Armor (General Discussion)
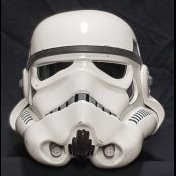
That's true in theory, but in reality a mould taken from a forming will never reproduce the original mould. The problem with casting from formed plastic parts is that the plastic never pulls into any crevices tight enough and leaves a mould which has soft edges. This means the next forming will be even softer than the first and then the forming starts to lose the original shape. We are talking really minor differences here but differences all the same.