


troopermaster
-
Posts
3,638 -
Joined
-
Last visited
-
Days Won
12
Content Type
Profiles
Forums
Gallery
Articles
Everything posted by troopermaster
-
Back plate to short for 501st approval?
troopermaster replied to n0c00lgamertag's topic in Assembly, Mods, and Painting
I would space the butt, kidney and back out with an equal gap so it doesn't look as big of a gap between the back and kidney plate. Maybe try pulling your kidney and butt plate higher too (it looks like it might be a bit low) if you can. -
Shin closure discussion
troopermaster replied to Rich330's topic in Build Threads Requireing Maintenance
Here are my shins: 1" elastic with hooks sewn in place. Note that I have left about 1" unglued from the ends to allow the elastic to stretch a bit. When gluing the straps in place I try to get the tip of the hook to line up with the back edge of the shin (not the joining strip) so that the shin is closed slug when they straps are hooked into the opposite piece. If you find you need more tension then simply move the strap back a bit until you are happy. -
Looks like you are a off to a great start to me
-
I have a special request for anyone (preferably in the UK) that has a Rubies Stormtrooper costume and is willing to lend it to me for a few days. It will be returned in the exact same condition it was received and there will be a bonus gift inside I do not need the whole suit - just a few parts for a special project I have been asked to undertake. PM me if you can help
-
Finshing strip question
troopermaster replied to Sonnenschein's topic in Assembly, Mods, and Painting
If that's how the bicep looks when it fits properly then go with a wider strip. I think you should try and cover more of the joining edge and use a 20mm strip. You can at least cut one and see what it looks like. -
I've never seen any strips on the inside. I think that is just what some guys to do add a bit more strength to the seams but I really don't think it is necessary.
-
Finshing strip question
troopermaster replied to Sonnenschein's topic in Assembly, Mods, and Painting
13mm is a bit narrow to start with, so go for 17mm if you need to. The screen used armour strips varied in size so there is no definitive size. Just trim the to fit comfortably and trim off all the return edge at the wrist. Leave a minimal edge at the elbow if you want or trim all of that away too. The main thing is that they fit your BF. make the joining strips whatever size is needed. No point having the strips cut too narrow and your BF cannot wear them -
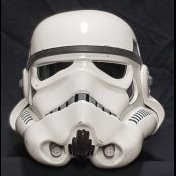
Here's a mean looking helmet! (Scott's RS Props helmet)
-
I think judgedredd on here is the man for ROTJ blasters. At least I think that is who I got my resin ROTJ blaster from about 10 years ago
-
RS Props Stormtrooper
troopermaster replied to Ghost's topic in Build Threads Requireing Maintenance
Very nice indeed -
You want to be cutting along the 51cm edge. Your strips for the front of the thighs will be around 40cm long so cutting it the other way will make them too short. Make the leg strips between 20mm-22mm and the arm strips 15mm-17mm. They did vary on the screen used armour so there is no definitive size. Just remember to trim the corners at 45` like this \____/ for that screen used look
-
7/16 = 11.1125mm
-
Correct wire for brackets
troopermaster replied to Sonnenschein's topic in Build Threads Requireing Maintenance
Not really. They are far too long and too thick as well. -
The armour was sculpted onto a body cast as a complete suit, not in pieces, so the clam shell parts automatically line up. Brian didn't make the vac form bucks. He did all the sculpting and the plasterers made the bucks AFAIK.
-
It might help if you post some clear photos of the blaster in question to help ID the parts. The ROTJ blaster is my favourite and it would be cool to see one built up from found parts. I believe all the parts are real world pieces, so we just need to find them. This will be a good build
-
Use elastic. If it ever starts to get stretched and loose, simply replace it. Webbing will not stretch will not hinder any movement. If you keep the forearm up tight to your bicep so there is a minimal gap on the inner curve, you will get better movement without pinching.
-
Ab plate side rivets - does type matter for EIB/Cent?
troopermaster replied to Jorran's topic in Assembly, Mods, and Painting
Your mistaken They used a different kind of rivet there. -
Ab plate side rivets - does type matter for EIB/Cent?
troopermaster replied to Jorran's topic in Assembly, Mods, and Painting
Yes, 8mm heads. I will offer these soon. I bought a bag of 200 and you need 7 for the torso, so I should be able to supply a few sets. I also have the matching brass washers too which will be supplied. I used a chisel to split the lugs and it worked just fine, but it is still tricky. -
Ab plate side rivets - does type matter for EIB/Cent?
troopermaster replied to Jorran's topic in Assembly, Mods, and Painting
My new rivets just came in and they are PERFECT! They match the original brass rivets in SiMan's original ANH armour. At last, I have finally got them -
Correct wire for brackets
troopermaster replied to Sonnenschein's topic in Build Threads Requireing Maintenance
I use M3 x 8mm countersunk slotted machine screws and matching nuts. -
Lazzy bands for Centurion
troopermaster replied to TK9477's topic in Build Threads Requireing Maintenance
Just use 1/4" white elastic. Tie it into a loop and keep the knot inside so it's not seen. You can then glue it or stitch to inner shoulder elastic strap to keep it in place or simply leave it loose -
I'd go for straight.
-
Correct wire for brackets
troopermaster replied to Sonnenschein's topic in Build Threads Requireing Maintenance
The torso pieces want to be close to each once they strapped together. I make the loops just over 1" long so that the parts are close together but not butted up too tight. -
Ab plate side rivets - does type matter for EIB/Cent?
troopermaster replied to Jorran's topic in Assembly, Mods, and Painting
No mate. They have a 8mm smooth head and 9mm shank. The tabs fold past the end of the washer which is not how they are on the original armour. Luckily though, I think I have just found the right size. I'll let you know in a day or two when the new rivets arrive -
Sounds good to me