


troopermaster
-
Posts
3,638 -
Joined
-
Last visited
-
Days Won
12
Content Type
Profiles
Forums
Gallery
Articles
Everything posted by troopermaster
-
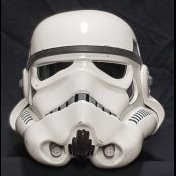
TE1/Brian R. Helmet found on screen!
troopermaster replied to troopermaster's topic in Build Threads Requireing Maintenance
Thanks guys It was easy, though unintentional. I wasn't really looking for it and suddenly I noticed the eyes and checked with my reference photos. These helmets have their own individual identity so picking a certain helmet out is not too hard once you have good reference photos. It's like picking out your own child in a room full of kids after you have looked at all these helmets for long enough -
TM's ANH Hero build[*TM]
troopermaster replied to troopermaster's topic in Build Threads Requireing Maintenance
Thanks Keith I measured the brackets on my suit and the holes for the brackets are 40mm apart on the torso and 55mm apart on the chest. -
TE1/Brian R. Helmet found on screen!
troopermaster replied to troopermaster's topic in Build Threads Requireing Maintenance
Here is a better photo on screen. Second trooper on left -
Found it! Finally! I have found the TE1/Brian R. helmet on screen. I was just looking through some of my photos and it just hit me smack in the face. I am sure you have looked at this photo lots of times as I have and I only just realised what I was looking at. Before I show it to you, I would like to show you it in the stack of helmets outside AA's workshop. I found it a while back when I was searching for Simons helmet in there. And now the helmet on screen. Take a look at the trooper on the far left. This is the TE1/Brian R. helmet. I don't have photoshop to zoom in and do overlays, but anyone familiar with this helmet can spot it. The vocoder, tube stripes, wonky eyes, all match. The same helmet again second in from the left. I am going to try and find better photos to prove my point, even though I am already 100% convinced this is the same helmet. If anyone has some better photos then feel free to post them.
-
TM's ANH Hero build[*TM]
troopermaster replied to troopermaster's topic in Build Threads Requireing Maintenance
I will measure the width of my brackets later today for you. I know the chest brackets are wider than on the rest of the suit. -
TK-5840 Requesting ANH Stunt EIB Status[243][TM]
troopermaster replied to rayzor's topic in Request Expert Infantry Status
Do not listen to this guy offering bad advice. Your belt is in the correct position. Congratulations on EIB -
New Battle Spec armour from SDS
troopermaster replied to Squigs's topic in Hard Armor (General Discussion)
AA's kits are cast from a GF or TE ANH (which was cast from a GF) which was in turn cast from an ESB MKII/ROTJ. You would be better off comparing AA to GF if you want to see similarities and not to any original armour which GF or TE is not like. -
Now your talking my kind of language
-
I make them just as Brent does. Heat a strip of ABS and form it over a screwdriver shaft into a kind of large G shape. You only need a small lip on the top to hook the elastic strap and maybe an inch long lower section to glue inside the bicep.
-
I think he maens the thickness of the plastic - not the width - which is 1.5mm on the original suits.
-
I think they are seamless and a mould would be very simple to make after the initial sculpting was done. I'm sure i don't need to tell you how to cast a thin membrane which is all these seals are.
-
Personally I would only make one version and it would be the pull on type. I think only hardcore troopers will want a latex neckseal and those guys will be looking for screen accurate seals with a shredded bib. Just my 2p worth
-
Help with sniper plate for Centurion
troopermaster replied to bigironvault's topic in Assembly, Mods, and Painting
I am not up to spec on the officail requirements for Centurian but I believe the idea is to make your armour as accurate as possible. If that is the case then you should aim to glue the sniper knee as per the screen used pieces. The screen used costumes ARE Stormtroopers. Everything else is other peoples versions, so choose which one you want to look like -
ESB shoulder bridges
troopermaster replied to tkrestonva's topic in Build Threads Requireing Maintenance
Forget the MKII suits. You have an ANH/ESB suit and the MKII's are like ROTJ, so no point even thinking about replicating one of those. The shoulder bridges are easy. Simply glue them to your chest plate and use a thin strip of white 1/4" elastic looped on the back plate to hold them in place. While Brain states not to use the elastic, I say otherwise. No doubt the original suits used in ESB lost theirs during ANH or after, I don't see why they should not be used when that is how they were originally assembled. -
It looks like an early AP to me. Definitely not a meatsock, TE or GF. Is it a smooth cap?
-
Help with sniper plate for Centurion
troopermaster replied to bigironvault's topic in Assembly, Mods, and Painting
Yes it was glued on Vern. Care to point out the holes you are refering to? I don't know why you have to talk rubbish all the time. If you don't know something for sure, don't say anything. You are making yourself look foolish by being proved wrong all the time. Just a friendly tip -
Helmet screws - flat topped or domed topped
troopermaster replied to DarkTrooper's topic in Assembly, Mods, and Painting
What is 6/32 refering to Vern? The bolts are 9/64 or 3.5mm in English -
There is more to a Hero helmet than just a low brow. The hero is a completely different helmet and can be seen with a low brow and a high brow as above. All Hero helmets have bubble lenses, are made of ABS and three teeth cut out. Some Stunt helmets also have three teeth cut out and have low brows, but that doesn't make them a Hero. Stunt helmets can take on many different looks due to assembly, trimming, and painting, so don't be surprised if you see low brow, three tooth Stunt helmets. You won't see any Stunt helmets with bubble lenses - just flat green acetate.
-
RS Express Build [*RS]
troopermaster replied to Locitus's topic in Build Threads Requireing Maintenance
Is there actually a mark on the plastic showing you where to drill? The rivets should really be towards the ends of the belt and not set in about an inch. -
RS Express Build [*RS]
troopermaster replied to Locitus's topic in Build Threads Requireing Maintenance
Trust me, you did not see where the original rivets were. More like a flaw in the forming tool since the belt is sculpted, not original cast. -
What are we actually seeing in the photo Karin? This is not what I was expecting to see comparing to the screen used neck seals.
-
RS Express Build [*RS]
troopermaster replied to Locitus's topic in Build Threads Requireing Maintenance
This is where you should put your rivets. I know it's too late for you but I hope this will help someone else before they attempt to attach the belt in the wrong place. -
No point making anything too slim so you can't fit into it. The whole idea is to build the kit as accurate as possible but still be able to wear it. This is where the test fitting comes into play and rushing gets you nowhere. I am seeing more and more poeple making silly mistakes with these kits when they could have easily been avoided if they had slowed down. Now, if you really want to add wider strips on the legs then you can still do it without having to buy new parts. All you have to do is a leave a small gap between the parts and add the wider cover strip. Nobody is going to pull you on it and many of the screen used armour parts are like this anyway. This is providing you only want to add a few mm's to the overall circumference of the parts. I would say you could get away with a 5mm gap on both front and back giving you 10mm extra. I regularly put 25mm joining strips on kits I build so you should be good for 10mm more girth. Anything more and you may need to have a hidden shim or new parts.
-
I think if they fit you that way then leave them. If not, then pull apart and adjust so they are equal. I never worry about side gaps and hate to see shims there, so I say leave them as is