


troopermaster
-
Posts
3,638 -
Joined
-
Last visited
-
Days Won
12
Content Type
Profiles
Forums
Gallery
Articles
Everything posted by troopermaster
-
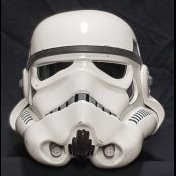
TK-8280's ROTJ Armor Build[*FX]
troopermaster replied to TK8280's topic in Build Threads Requireing Maintenance
The shoulder bells look better but......they are supposed to have straps. They are much thinner than on an ANH suit and placed higher up from the bottom egde. I'll see if I can dig out a decent pic showing them Bernard. -
Screen accurate holsters
troopermaster replied to BactaReality's topic in Build Threads Requireing Maintenance
Not any more. It was lost on my old computer unfortunately. -
TK-8280's ROTJ Armor Build[*FX]
troopermaster replied to TK8280's topic in Build Threads Requireing Maintenance
Excellent conversion job Bernard..well done mate Where did you get the white edging trim from? Looks good. -
No mate. Flat aluminium bar 1 1/4" available in B&Q bent to shape. Hold on and I will pos a pic of one of mine which is pretty close to the real version. Here you go
-
Newbie question: Glueing arm pieces
troopermaster replied to Pepster3D's topic in Assembly, Mods, and Painting
Glue all the seams except the back of the calves. There's no need for velcro, it's your suit so make it fit you. Once you have it trimmed nicely, glue all the seams shut with the joining strip and your good to go -
I reckon any grey satin should do the job. Try and take a piece of grey plastic pipe (from B&Q) to get a colour match as that is what used on the original costume (obviously not from B&Q though ). There are no silver trims on them either, just metal belt clips
-
I have some nice hi-res pics of the promo suit I made earlier this year if you want me to post them Paul? I am not sure if they are on this site or not, so I could make a new topic if you want to compare them to other armors. LMK
-
Screen used armor at the 1997 Wonderfest convention
troopermaster replied to Bill's topic in Hard Armor (General Discussion)
In that case then it wasn't screen used. None of the real suit's were made in fibreglass or thick plastic so I'm guessing here that it was a cast of an ROTJ screen suit or maybe a TE ROTJ? I'm looking forward to seeing any pics that may turn up -
Screen used armor at the 1997 Wonderfest convention
troopermaster replied to Bill's topic in Hard Armor (General Discussion)
Do you remember which film they said it was from....ANH, ESB or ROTJ? -
I don't use any kind of skirts on my moulds and never get webbing. The secret is mould placement. Make sure that the distance between the moulds is greater than their height and you should have no problems. Also with mould release, just heat up the plastic again gently with a heat gun and it helps a lot because the plastic actually shrinks when cooled so it's gripping the moulds. Heating them up gently will make the plastic expand ever so slightly, enough to release the 'grip' and makes mould removal much easier. Hope that helps
-
Look at the guy with the shades on 'servicing' the Dewback
-
I'm putting a pair of those pads in my new helmet. I am just trying to find a good way of arranging the pads so my helmet doesn't flop all over the place.
-
Prove it!
-
Question about assembling...
troopermaster replied to Benkenove's topic in Assembly, Mods, and Painting
Mine have no signs of cracking, but if you are worried, simply glue an extra strip on the inside to reinforce it even more On my shins, I just slip my foot through them without my boots on and they don't open up too much so not much pressure is put on the strips. I can see how it could crack though if you were to open up them up too wide. -
Replacement Thermal Detonater
troopermaster replied to Dishnu's topic in Assembly, Mods, and Painting
Is this accurate enough for you... -
Eh I thought you were having problems with the nail sticking inside the rivet tool. So was the problem that the nail wasn't snapping off the rivet or what If that's the case then the rivet body is too long and you need shorter rivets. You always need washers on the backs to so remember that when you buy the rivets and add that to the final length.
-
They get in mine too sometimes. I open and close the grips quickly to try and release the nail part or close the grips and stick another rivet in to try and free the nail section. I guess it depends on the quality of the rivet tool, mine is nothing special.
-
AP ANH armor progress
troopermaster replied to TK-4261's topic in Build Threads Requireing Maintenance
You still need the strap at the bottom of the bells -
The link to the comparison has now removed but the man who took the pics has kindly sent them to me and I will upload them very soon.
-
Hi Jester, The only things I get from B&Q are the machine screws for the ear caps. They do sell industrial velcro though if you want some of that. You'd be best off trying your local fabric shop for elastic or you can buy big rolls on ebay quiet cheaply. Here's a short list of things you'll probably need. 1. Glue (Not sure what's best fro ABS) 2. Black elastic- 2", 1.5", 1" and 3/4" for holding armour together 3. White elastic 1/4" for shoulder strap keeper 4. Snaps 5. Canvas for belt 6. White velcro for belt 7. Clamps for holding armour together while glue sets That should keep you busy for a while. -Paul.
-
There's a boat load of pics on the MEPD somewhere comparing AA/SDS to TM piece by piece. I'll have a look for the link.
-
AP ANH armor progress
troopermaster replied to TK-4261's topic in Build Threads Requireing Maintenance
Sure does. I don't attach my biceps to the shoulder bells at all due to them pulling down the bells. I like the shoulder bells to be free floating so what I do is I make a doubled up strap for the shoulder bells and biceps. I do this by simply putting a snap through two straps, one short one for the bells and a longer one for the biceps. Each end has a snap and that pops onto the inner shoulder strap from between the chest and back panel. Does that make sense? Fantastic job Curtis, this should definately be a sticky -
Question about assembling...
troopermaster replied to Benkenove's topic in Assembly, Mods, and Painting
Hi John, I think the AP suit should have the arm and leg parts joined together with strips just like ANH/ESB armour. The AP is an ROTJ suit so it has the joining strips already moulded into the armour but this is not a problem. I use 15mm strips for the arms so I would cut the moulded strips to 8mm on either side. I'd do the same for the legs, but using 20mm strips and cutting them at 11mm. That is just what I would do to make the AP more ANH accurate, assembly wise. -Paul -
Looks like a Marco recast to me.
-
Hi Del, The plastic shoulder straps are purely cosmetic. The original armour had them glued to the chest plate only, and were free at the back plate. A thin white elastic strap was sewn to the real shoulder strap which is actually under the armour, and kept the plastic strap 'in place'.. White webbing or canvas approx 40mm-50mm wide that was glued to the back plate and had a snaps along it to attach to a snap on the chest plate. You could put a snap at each end to make it easier. Take a look at my suit to give you an idea. Cheers, -Paul.