Sithtrooper02
-
Posts
76 -
Joined
-
Last visited
Content Type
Profiles
Forums
Gallery
Articles
Everything posted by Sithtrooper02
-
Dylans Imperial Armoured Captain
Sithtrooper02 replied to loyalImperialCitizen's topic in Imperial Commando Build Threads
The Colors seem in the right palet, I don’t think we will have any color details in the near future from original props, but we can always hope! I don’t know the last two brands, but we had a hard time with several blue colors of Montana gold for my partner’s Bo Katan armor, way worst than Rustoleum. it’s water base acrylic, but it’s not a high quality paint and you may get a sandy finish/inconsistent spray… That wouldn’t be my first choice for a glossy armor on which any imperfection will show. -
Dylans Imperial Armoured Captain
Sithtrooper02 replied to loyalImperialCitizen's topic in Imperial Commando Build Threads
Fully agree with Glen on automotive paint, rustoleum isn’t great and if I had to do it again, I would use my spray gun and automotive paint. Honestly the primer grey is ok, but the rustoleum matte white isn’t as great and did make some sandy finish and doesn’t cover easily without multiple layers. I had to sand it with 1000grit paper before finishing with 2K gloss to remove the surface defect. Everyone has his own recipe for sure! -
Dylans Imperial Armoured Captain
Sithtrooper02 replied to loyalImperialCitizen's topic in Imperial Commando Build Threads
Yes, you’re correct. Matte paint with gloss clear, otherwise you will end up with cracking issues like everyone has ( I had this issue on some pieces on my Sith trooper armor… gloss clear on gloss paint isn’t a good idea) -
Dylans Imperial Armoured Captain
Sithtrooper02 replied to loyalImperialCitizen's topic in Imperial Commando Build Threads
Hi, You’re on to a good start! Very exciting to see you diving in to this variant build! for the boots,The basic boot pictures I saw from both vendors were simply stitched on the top section, but I asked Giovanny to add padding so that we see the thickness as in the reference pictures. He did build me a custom version (maybe it’s now his new standard, but worth confirming) if you are aiming to level 2, then you should check with Giovanni from crowprops as you will need the thickness to create raised sections. These are very confortable boots and they fit snugly under the spat. This was my biggest worry when I ordered them. Stating the obvious, but if you go with keeptrooping, they would have to add padding to their design and you got to make sure that the ankle shape is not too wide or it will interfere with the spat. for the red color, I assume from the pictures that it would be the same red for the shin/knee/ gauntlets as the inserts in the bicep, thigh plates and chest plate (seems very close). I tried a few paints but the best matched I found in local shop is the one in my build thread, it’s an airbrush paint (I didn’t find a spray matching this color) -
Thanks! No Worries, I mentioned it at the beginning of my thread in the vendor list. I built the armor with some of big Fred custom parts, since he was the closest vendor, but as mentioned, some mods were needed on several of the components. I did start with GA armory first because they were not expensive but after diving in details into the parts (and even printing the helmet), GA were not accurate enough on some of the major components.
-
I didn’t propose EVA foam as this part is sliding a lot under the chest plate and you need a durable material to avoid having a lot of dent when moving around with it. I actually use EVA foam to protect components from hitting each other (hidden) on my other 3D printed armor and it dents very easily. Maybe if you add a protective coating layer over the EVA, it could do the job. The material I have selected for the AB is high density, is very though and won’t dent under reasonable pressure. Time will tell, but so far so good. I have added thin EVA foam under the chest plate / back plate of this build so that raw 3D print surface will not be in direct contact with the AB section. I will add those details on the main section.
-
There might be, depends on what you want to do with your armor. If you want it to be 501st approved, that is more limited. You need it to be in 1 or 2 sections and there has to be not gap between the sections. So if you go with a hard armor like PLA/PETG, you will suffer during trooping as there is no hidden place where it can expand. I would not recommend flexible PTU as the result would not be good enough and you would need multiple joints. My Sith trooper AB are 3D printed (very thin so that it can flex in the back section where it’s hidden and still,…this is very painful. I have tried several options to get it right and casting it still seems the only option I have found if you want to troop with it and be screen accurate. I am working on a simplified/ more robust method with different material to cast it as the current product I used is very challenging to process. I will post it in this thread once it’s good to go.
-
Thanks Chris for the kind words on my Armored imperial commando build. I will gladly help troopers who would like to start this build. I will also add content to my build thread you mentioned, in the upcoming months, to make it as complete as possible.
-
I added the pictures from the EIB application and added the pictures already available from my build thread taken in dimmer surrounding. It may not meet your ask, and it doesn’t show all the lights. ( I am away and can’t add more right now). If it doesn’t meet your requirements, I will take more in October when I’m back home. cheers, François
-
Sure! I only posted the pictures relevant to level 3 mention, but I will gladly do so as needed.
-
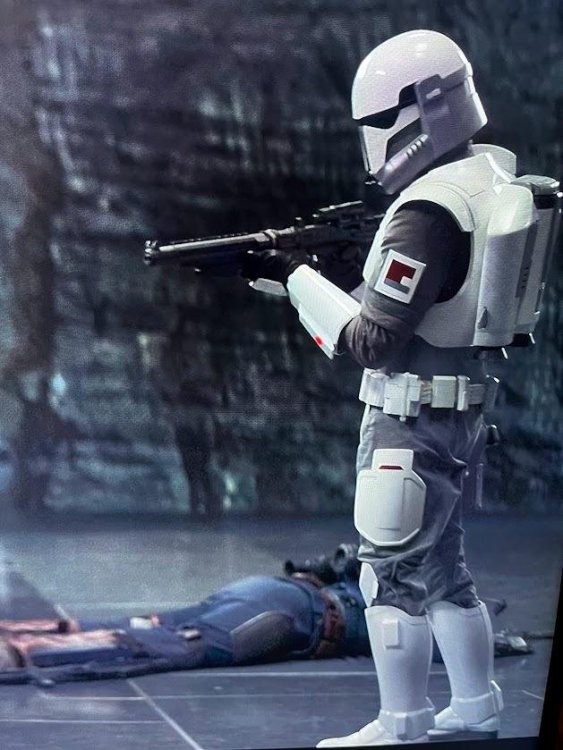
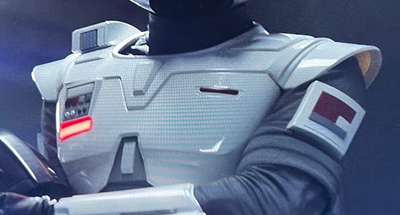
Name : Francois Pelletier TK20236 Forum name: Sithtrooper02 Garrison : Forteresse Imperiale Garison Social Media consent (photos) : YES ***This is the costume that was used to create the Imperial Armored Commando CRL Armor : 3D printed/finished by me Helmet : 3D printed/finished by me Blaster : 3D printed/finished and designed by me Height : 5’7’’ Weight : 165lbs Boots : Crowprops Imperial Commando boots Canvas Belt : designed and Fabricated by Veronique Jomphe Gloves : Crowprops Imperial commando leather gloves Suit : Keeptrooping suit modified to comply with CRL and added attachment points for the armor Link to approved armor : https://www.501st.com/members/displaymember.php?userID=39822&costumeID=664 The pictures (most of them are already on the CRL reference images): Action pose JETPACK OPTIONAL Level three certification : The top grill has functional red lighting. Left gauntlet OPTIONAL Level three certification : The two red colored square shapes are illuminated. Right Gauntlet OPTIONAL Level three certification : The two red colored shapes are illuminated red. Glove OPTIONAL Level three certification : Gloves are made of leather. COMMENT : Leather gloves provided by Crowprops Chest OPTIONAL Level three certification : The red rectangular shape under the ranking box is illuminated red (to be added to CRL ) for the lights in dimmer surroundings, the only ones I got right now are these two from my build thread, if additional are required, I will take more for each part when I’m back home in about a month. It is difficult to render correctly the nice red looking of LED lights, needs a SLR. Way better in real ( there is no orange like color, as it is a pure red LED with tinted red plexi to smooth the LED emission ) thanks
-
Request your EIB Certificate here:
Sithtrooper02 replied to justjoseph63's topic in Request Expert Infantry Status
François Pelletier 20236 letter Mario Congrats! https://www.whitearmor.net/eib/certificates/20236-eib.png -
Thank you (to you and the FISD staff) for all the time you took to go thoroughly through my armor and the CRL (and found some small things to fix in the description)! I will apply shortly for the centurion level!? cheers, François
-
Ok, perfect, this was a very quick fix luckily!
-
Done, thanks!
-
Apologies, I'm not sure what you mean by 'could you add to the bellow line to your application'? Do you mean answering the Social Media Consent (photo) and adding it to the main application? If so I just did it.
-
Vendors list for Imperial Commando costume parts & accesories
Sithtrooper02 replied to Sly11's topic in Quick find resources
MilleniumMaker is now offering the followings: Armor parts (WIP to complete them all) used in CRL build: - AB mold https://millenniummaker.etsy.com/listing/1765400582 - One piece shins https://millenniummaker.etsy.com/listing/1704251352 - Jetpack https://millenniummaker.etsy.com/listing/1768414266 -
Updated in main post, thanks
-
Name : Francois Pelletier TK20236 Forum name: Sithtrooper02 Garrison : Forteresse Imperiale Garison Social Media consent (photos) : YES ***This is the costume that was used to create the Imperial Armored Commando CRL Armor : 3D printed/finished by me - see the build thread in the Imperial Armored Commando Helmet : 3D printed/finished by me Blaster : Designed and 3D printed/finished by me Height : 5’7’’ Weight : 165lbs Boots : Crowprops Imperial Commando boots Canvas Belt : designed and Fabricated by Veronique Jomphe Gloves : Crowprops Imperial commando leather gloves Suit : Keeptrooping suit modified to comply with CRL and added attachment points for the armor Link to approved armor : https://www.501st.com/members/displaymember.php?userID=39822&costumeID=664 The pictures (most of them are already on the CRL reference images): Action pose Helmet OPTIONAL Level two certification (if applicable): Protruding ear section is visibly a separate piece. Clip greeblies and strap are visibly separate pieces. Aerators and diamond greeblie are visibly separate pieces. The collar has vent with oblong holes on the rear section. Flight Suit OPTIONAL Level two certification (if applicable): Flight Suit is one piece construction. Long sleeves do not have horizontal quilted ribs on the inside of the arm between the short sleeves and the gauntlets. Chest armor OPTIONAL Level two certification (if applicable): The 4 sections and shoulder box are visibly separate parts. The ranking box components have thickness and are visibly separate parts. The raised box over the right shoulder is visibly a separate part and has two semi-circular recessed lines on the outer side and a recess on the inner side. The raised box grid has exactly 5 vertical rectangular grey shapes and is visibly a separate part. Back OPTIONAL Level two certification (if applicable): The jet pack has 3 attachment points that are visibly separate parts and have a metallic finish. The two upper attachment points are circular T-shaped and anchored to the back plate with a circular plate. The lower attachment point to the jet pack is cylindrical with a taper at the tip and is anchored to the back plate with a rectangular plate. Jetpack : OPTIONAL Level two certification (if applicable): All grey and black components are visibly separate parts. The bottom grill is visibly a separate part. There are 5 small black vertical cylinders attached atop of the large grey box. The vertical cylinders ends have a 90° bend inward at the bottom and the top. They are not all equal in length at the top, as the middle cylinders are longer than the outer cylinders. Abdomen section OPTIONAL Level two certification (if applicable): Only one seam is present on the right side of the wearer’s side. The 4 straps are all identical in width and geometry There is the appearance of a clip on the straps approximately at the middle of the abdomen armor. Belt OPTIONAL Level two certification (if applicable): The push release button of the female buckle is visibly a separate component. There is a rectangular recessed line on the metal portion of the male buckle. The metal portion of the male buckle is followed by a black section entering the female buckle. Shins OPTIONAL Level two certification (if applicable): The shin is a single piece construction with a seam only present at the rear which overlaps to the outside. The rear spat box has a recessed edge on the outside creating a smaller shape. The spat overlaps the boot with minimal gap. See main pictures for overlaps Boots OPTIONAL Level two certification (if applicable): There are 3 stitched lines that run across the instep. The instep is made of thick material with the 3 stitched lines creating raised sections. Standard FOTK boots are not acceptable.
-
Hi, I would like to have full access to detachment TK-20236 https://www.501st.com/members/displaymemberdetails.php?userID=39822 thanks!
-
It was! But for me, that's the fun part! I didn't expect at first having to remodel/ adjust almost every parts to match screen reference. The existing models looked great from far away...! It can be indeed a lot of work, especially when you dive into it for the first time doing a 3D printed suit, learning to 3D print, scaling the armor, finishing the print to smooth finish and holding your breath when doing the final gloss finish But there's a lot of good threads/ tutorials on how to do these steps. And I will be available for those who wants specifics on the armor build. I hope that in the near future, there will be vendors that supply the parts (which complies with CRL) on a commercial basis to ease the work. Especially for the flexible abs, which would be nice out off an industrial mold.
-
On the Chest plate, the red light is missing, from the draft : OPTIONAL Level two certification (if applicable): The red light is functional under the ranking box
-
Sure, PM me for more info. we are rushing to get all the parts on Esty with CRL release. You can find the rifle and shin already. For now, what I’ll do is place all modified parts required (the ones I used ) and designed for 501st approval. These will be compatible with Big Fred’s basic armor. None of the current armor vendor can be approved without a lot of modifications and Big Fred was the closest I could find to start from. we will have the full armor package available sometime soon. MillenniumMaker On Etsy
-
I confirm, i wrote the text based of course on the reference pictures, but I checked that all costume parts pictures I took are matching exactly the text I submitted. I could easily provide additional pictures if needed for clarity.
-
To follow up on the above modification proposal , since the 3D printing is going to be used for the armor, I would suggest that the following general construction note be added similar to other detachments CRL : - 3D printed armor must be finished without any visible print lines for the flight suit long sleeve single sided exterior stitching proposal, I would propose to move this requirement to level 2, as it is not an obvious detail and even on reference pictures it is subtile . Some suits made with stretch material even seem not to have any stitch