


Short4ATrooper
-
Posts
62 -
Joined
-
Last visited
Content Type
Profiles
Forums
Gallery
Articles
Everything posted by Short4ATrooper
-
I’m in the U.K. so it’s rarely that hot here but I just got two pairs of fans for my TK & TX lids because as soon as I put my TK lid on with the balaclava - instant lens fog, I couldn’t see a thing. So, temperature aside - fans are good to have for that purpose too. Sent from my iPhone using Tapatalk
-
That’s exactly what I did. Then when I was dead certain of where I wanted them positioned at the front, I marked it off on the belt and riveted the elastic to it so it’s not going anywhere and keeps the thighs front and centre. Sent from my iPhone using Tapatalk
-
It’s barely noticeable on camera. Someone may very well come along to correct me but I don’t think that’ll be an issue at all. If you Velcro it in the corrected position, as long as it’s comfortable it should be fine. Is this an RS kit? If so, have you watched Rob’s build videos on YouTube? He covers every stage and addresses a lot of the little idiosyncrasies of certain parts. Sent from my iPhone using Tapatalk
-
As far as I know, it is indeed supposed to angle up as you have it. It looks pretty much perfect to me! (Just don’t forget to paint those rivets white [emoji6]) excellent work mate [emoji1303] Sent from my iPhone using Tapatalk
-
Ho-lee sh*t. That’s one of the coolest things I’ve ever seen! What a place to build in! It’s also a really nice change to have someone post video in their WIP. Sadly, I’m in U.K. but I think I would travel to Ohio just to check out that arcade! Great video Rodney, thanks for sharing it. Sent from my iPhone using Tapatalk
-
Ok, that’s great. The hollow space should give you enough room to get your finger in and snap the belt to the ab. Sent from my iPhone using Tapatalk
-
You should be able to get your finger in behind the plastic belt, and in front of the canvas belt in order to push the snaps and pop it on to the ab poppers. When you say “In between the hollow parts” do you mean red or blue here: Sent from my iPhone using Tapatalk
-
Well done Tim! In my opinion, it makes the whole thing a lot more exciting. You’d just have one WIP thread for the whole process with a title something like “Tim’s RS ANH stunt build WIP” and once you start posting in there, an armourer will come along to help you. It’s entirely up to you how frequently you post but it’s a good idea to post lots of photos and ask questions whenever you’re unsure of something. Good luck and congratulations for taking a bold and brave step! Sent from my iPhone using Tapatalk
-
All of them to be honest! I would head into the armoury>imperial>stormtrooper/sand trooper and just start at the top. Read any WIP marked as a TK *cleared*. You’ll get a good idea of common difficulties and you’ll run into plenty of people who had the same level of trepidation as you. Sent from my iPhone using Tapatalk
-
Forearm trimming question
Short4ATrooper replied to Short4ATrooper's topic in Hard Armor (General Discussion)
I’ll do that, thanks [emoji1303] Sent from my iPhone using Tapatalk -
So the shins are the same method as the thighs. Overlap to fit you, tape them off and mark them up. It’s easier if you lap the left side over the right for the left leg, and the right side over the right for the right leg as that’s how the cover strips will over lap when they’re finished. Make sure you do all test fitting on the shins with both your undersuit and your boots. You won’t get an accurate fit without the boots as you’ll need to see how far down your leg they can go. For actually fitting them and getting a look - use that top ridge to keep the overlap straight, and to see them I used a mirror. Then it’s a bit awkward but mark the overlap while they’re taped to you as you’ll have to i tape them to get them off. Once you’ve got your overlap, the process is the same as the back of the thighs. Make sure you have an even amount of that top ridge either side of your cut line and go straight down to your overlap mark at the bottom. Regarding them not matching up, align them at the top. Don’t worry if one is longer than the other at the bottom, you can trim any excess off once they’re finished. Sent from my iPhone using Tapatalk
-
Hard to say of any cons with RS, obviously you could find people who had positive and negative experiences as with anything. The biggest thing to consider with RS at the moment, and with a commission build in general is time and patience - you’ll need both. I’m not sure if you’re aware but RS had a fire in their studio recently. No one was hurt thankfully and I think their moulds are safe but obviously it’ll be a while before they start up production and building again as their vac forming machine was damaged. Once they do start up, I imagine things will be rather hectic for them dealing with fulfilling outstanding orders as well as new ones. Ordinarily I think they advise 4-6 weeks for commission builds but I could be wrong. With the fire though, who knows? Could be double or triple that. As far as fit, you should be fine. As long as you understand that even with commission builds they usually require adjustments which it sounds like you do understand that so no worries there. I’m sure anyone will tell you that RS is top notch kit and the preferred supplier for a lot of 501 members. I would also say that despite what you say about not wanting to build it from scratch, you’d be surprised how straight forward and super enjoyable it is. You’ll find many examples of people who started their builds with no DIY experience or proficiency and ended up getting cleared with no problems. Can I ask what’s putting you off doing a build? You could cut down on wait time and cost if you went for this option. Sent from my iPhone using Tapatalk
-
As it’s your first build, I’d go with E6000. It’ll hold fine and for me, I had to reposition a lot of the snaps which would be tougher to do with any kind of super glue. The other thing to be wary of with stronger glue is that some of them can react with the metal poppers and cause a heat reaction which can melt the plastic. I used the same glue I used for the rest of my build and backed each snap with a small square of duct tape, preventing it from coming into direct contact with the glue just to be safe. If you’re not using snaps/poppers and glueing the elastic straight onto the armour, I’d definitely use E6000. You will change the strapping lengths multiple times to get a good fit, I guarantee. If you’re going to be ripping elastics off and re-glueing, you’ll want to make it as easy as possible. Sent from my iPhone using Tapatalk
-
Forearm trimming question
Short4ATrooper replied to Short4ATrooper's topic in Hard Armor (General Discussion)
Sorry, no idea why there's duplicates of the images -
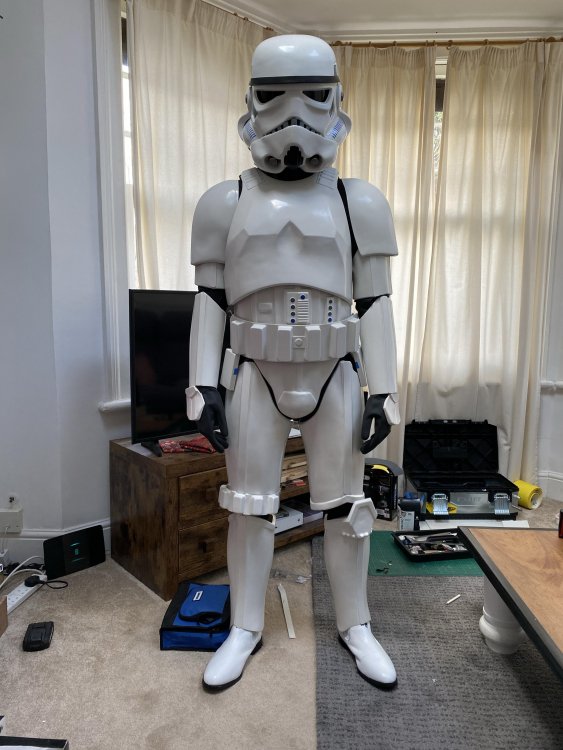
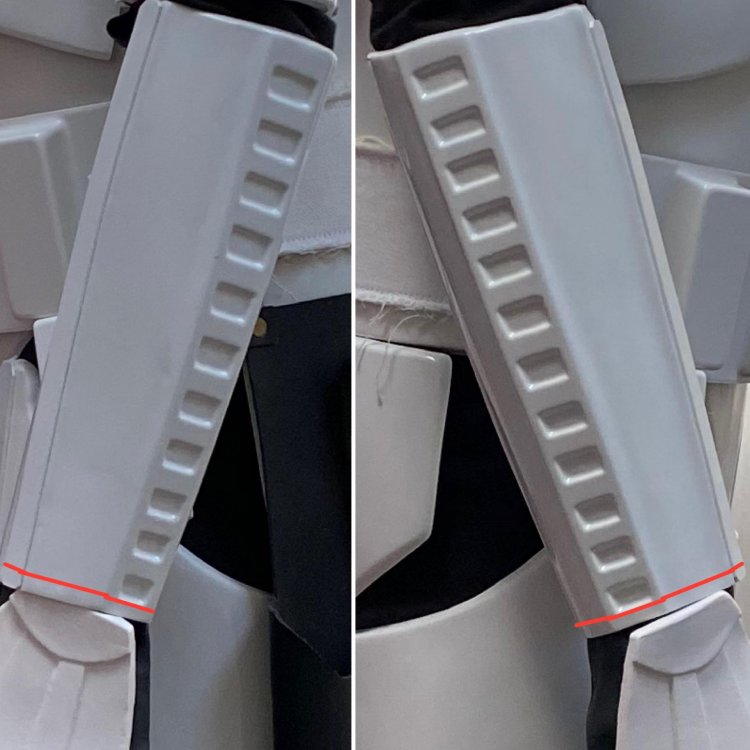
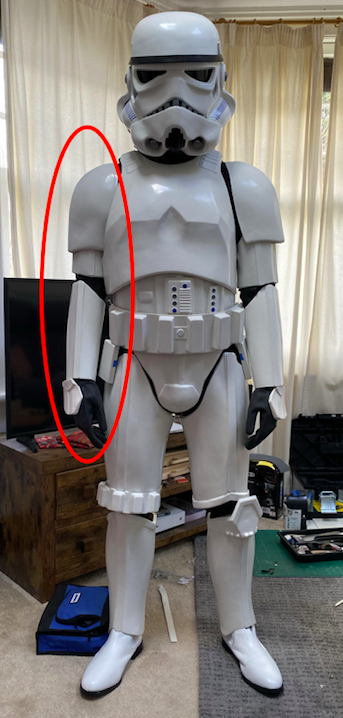
Hi everyone, I'm nearing the end of a TK build and have one little niggling problem I'd like to fix with my forearms. I am struggling for space at the wrist end, the hand guards on my gloves are catching constantly and giving me very limited movement there. As you can see from my most recent suit up, I've got the biceps as high as I can get them (ignore my left arm, the bicep came un-popped and slipped down) and the connection from bicep to forearm is as close as I can get without it catching so that really only leaves the wrist for me to trim. I know that the notches on the forearm are not to be altered but I'm wondering if I can trim from the wrist back to where the first notch begins? This would give me a lot more space at the wrist. Below are photos of my last suit up and where I'd like to trim on the wrists. The gloves are way too big, I know - smaller size currently on order. Thanks!
-
Looks better. Still too wide in my opinion but I’m not sure if it’ll affect clearance. Whenever I’ve seen someone need more room in the thighs, they’ve shimmed the back. The problem is, unless you do the same for the fronts of all the other limbs it’ll look odd. As I say though, not sure if it’s an issue or not. Best to check with an armourer before continuing. Sent from my iPhone using Tapatalk
-
Was also relieved to hear everyone is ok and it was honestly heartbreaking to watch Rob’s video as you can clearly see how emotional he is. Understandable, given what RS Props has become and how far its come since it was started. Super smart of them to store the master moulds off site and I’m sure they’ll be back bigger and better than ever. Sent from my iPhone using Tapatalk
-
Those lines look ok to me? I was going to suggest that you copy over the measurements from the right as a starting point. I’d tape that bad boy up using those lines you’ve marked and try it on. As someone said earlier, they weren’t made to match and quite often people end up with one leg bigger than the other. My right thigh came out slightly bigger. Sent from my iPhone using Tapatalk
-
If you’re having trouble holding pieces together when glueing cover strips, tape them together on the outside then tape the inside too. When you’re ready to add the strip, just remove the outside tape. The inside tape should hold them together for you to add the strip. If you leave the tape on the inside while the glue is drying too, it’ll give you a bit of extra pressure in addition to clamps and magnets. With pieces that have been trimmed further and won’t stay together with just one strip along the seam, I add two small strips going horizontally across the seam at the top and bottom and that does the trick. See below: Sent from my iPhone using Tapatalk
-
Maybe double check with someone who is a little more familiar with ATA armour than myself, I wouldn’t want to steer you wrong. Sent from my iPhone using Tapatalk
-
Good stuff [emoji1303] one other thing I noticed with the front of your thigh, you seem to have a lot of that front ridge left either side of the cover strip. Ideally, you want that ridge to be around 22mm wide - just wide enough to accommodate the 20mm cover strip. A general measurement most people use is have around 11mm from the ridge to the seam (red line) on each side whereas you currently seem to have around 20mm on each side. See here how you can just see the ridge under the cover strip? Sent from my iPhone using Tapatalk
-
Just a heads up, for screen accuracy you’d ideally want to snip the corners of the cover strips at an angle. Don’t completely round them off but just snip the corners at about a 45° angle. See below on the right thigh from RS’s original suit: Sent from my iPhone using Tapatalk
-
In my opinion, it’s not the overlap that’s making it difficult to test fit - it’s the huge return edge you’ve still got at the bottom. You could do with trimming that way back: I’m no expert though so maybe check before you take it that far back but I can’t imagine having all that excess makes bending the plastic around your leg very easy. Sent from my iPhone using Tapatalk
-
This one looks ok to me. As long as those two sections in red measure the same and the green line is straight and centred. Sent from my iPhone using Tapatalk
-
No I know. As I said, wasn’t suggesting to make mobility cuts. I’m the same as you - wouldn’t advocate for them unless absolutely necessary. Sent from my iPhone using Tapatalk


