

BigJasoni
-
Posts
316 -
Joined
-
Last visited
-
Days Won
4
Content Type
Profiles
Forums
Gallery
Articles
Everything posted by BigJasoni
-
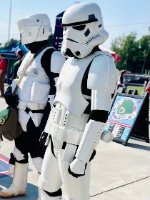
Good morning FISD! I want to resurrect this thread for a few reasons. First, in my ROTK build thread found here https://www.whitearmor.net/forum/topic/49826-the-bigjasonis-rotk-3d-print-build-thread/page/3/?tab=comments#comment-701421 I asked about a CRL for The Mandalorian Remnant Stormtrooper. I asked this question on the 12th, and then found this thread the next day. However, I'm not seeing any kind of answer as to whether or not we can expect a new CRL. Next, when The Mandalorian Season 2 Trailer dropped a few days ago, there was about a 1.5 to 2 second clip that showed some Stormtroopers running down the hall of what people are assuming is a Star Destroyer. Though this flashed up on the screen relatively quickly, it's clear that in season 2 the Stormtroopers are in fact wearing ROTK armor. I'm assuming these are some of Moff Gideon's troopers based off their shininess, but I can't tell if they're wearing OT or RO helmets. I believe these are ROTK helmets, but I'm basing that off of what appears to be an absence of S-trim around the opening of the bucket on the middle TK. Suspicions about the Stormtroopers should be confirmed on October 30th, but if we do indeed see ROTK armor with OT helmet again, can we expect an addition to the CRL for a Remnant Stormtrooper? Or, can we expect something based off of what we saw in season 1? This does seem rather unique; plus, I'd really like to order an OT helmet to go with my ROTK build. Thanks!
-

The BigJasoni's ROTK 3D Print Build Thread
BigJasoni replied to BigJasoni's topic in Rogue One Build Threads
So I didn't get as much done today as I would have liked. Apparently, I underestimated the amount of sanding I had before I could spray anything. Additionally, I fiddled around with strapping, made a vocoder file, and started sewing some soft parts for another project. So, by the time I started working, half the day was gone. Fortunately, I did get the prep done on the bucket and was able to lay down my final layer of primer before I do the gold paint trick. I think the vocoder turned out great; I just kind of stuck it to the chin just to make sure it fit well. I'm printing another one tonight at .1 layer height and 40 mm/sec to really catch the detail and ensure I don't have to sand anything on the back side. I'm not sure if there's a "market" for these things, but I'd be happy to start pumping them out if anyone needs one. Also, in these pics, you can see how the eye bump turned out. It doesn't jump straight out at you like an OT helmet, but it's just enough that if you're looking you catch it. I really like it. I tried painting the forearms in the dark and got a little carried away. You can actually see the runs right there on the "bumps" (I'm not sure what they're called). This had to be the worst place possible to get runs, so I'll reassess the situation tomorrow and update you all when these are complete. This is the only thing I have left for the arms, so I want to get them finished ASAP. Speaking of, I put the upper body armor together along with the strapping and ended up with this. I was actually working on this during a break on Friday morning. Though the shoulder straps looked good (not pictured) I really didn't like how stiff they were and how they were fitting in the trapezoid slots (also not pictured). As soon as I got the shoulder bells sitting correctly and took my measurements to install the snaps, I hit up Jeff @11b30b4 and ordered a set of his flexible straps. I'm really looking forward to trying them out and making them an official "uniform item." But, since this project is a 3d print build, I'll keep the originals as a back-up. Also, tomorrow I'm going to print a set with TPU just to see if it can be done. The shoulders look low in this pic because the weight of the shoulder bell is pulling down the strap. However, when I "gear-up," everything fits perfect. I'll do the biceps tomorrow, but right now I'm just having fun walking around the house wearing this. The only problem is my kids think this means I need to have things thrown at me. If my armor's scratched up when I get around to taking pictures, it's my own fault. So that's it for Saturday. tomorrow I'll have a gold helmet, and hopefully white primed abdominal, cod and belt. If I get there, I can start working on the legs and hopefully have this done by the fourth. Originally, my goal was Halloween, but that was before I had another project tossed at me which I intend on dedicating October to. Also, if I can get the armor done before my under suit arrives from The Dark Side Closet, I'll be stoked. -
The BigJasoni's ROTK 3D Print Build Thread
BigJasoni replied to BigJasoni's topic in Rogue One Build Threads
Oops, my bad. Well, thanks to Parquette for creating an awesome thread on the asymmetrical Rogue One helmet. -
The BigJasoni's ROTK 3D Print Build Thread
BigJasoni replied to BigJasoni's topic in Rogue One Build Threads
Quick update. hopefully I'll get some more posted tonight. So, after a little testing a few things, I decided to make an "eye bump" on my ROTK bucket. @11b30b4 provided some great content on this here https://www.whitearmor.net/forum/topic/48619-definitive-proof-r1tk-helmet-is-asymmetrical/. I'm sure you've all seen this post previously, but I believe it clearly shows what we were discussing with regards to the new CRL. The "morphing" picture is perfect. Also, I know that I can continue with the old CRL since I was added to the ROTK Build Roster on 9 August, but I really like some of the new additions, especially the clam shell closures and eye bump. Last night I really didn't feel like sanding, so I decided to play around with the strapping a little bit. Honestly, sanding may have been easier. A few days ago, @TheRascalKing made the simple comment "ugh, shoulder straps," which made me laugh, but this was an understatement. After fiddling around with my hard straps, it confirmed that I need to get some flexible ones. I'll install the hard straps tonight when I put on the shoulder bells, and again later when I submit pictures. Ultimately, for me, the trapezious doesn't seem like an area that pairs well with rigid bridges. I want the weight of the armor resting on the nylon strapping, not what I consider "ornamental" piece. After some careful measurements, I determined that I would need 11mm of space between the chest and back shoulders. From there I installed snaps on some pieces of 2" nylon strapping and the armor itself. For the armor, I held the snaps in place with JB Weld SteelStik. Also, yes the interior of the armor is unfinished for now. I used Plasti Dip on the inside of my last bucket, and had originally intended to do the same for the armor, but didn't like it at all. For my armor, I'll be taking another page from @11b30b4's playbook and using Flex Seal throughout. After I put on the snaps I decided to employ a secondary fastening measure by throwing in some Velcro as a test. This actually worked much better than I could have imagined. This is some sticky back stuff that I picked up off Amazon here for my Mando build: https://www.amazon.com/gp/product/B01KBBVWAO/ref=ppx_yo_dt_b_asin_title_o04_s00?ie=UTF8&psc=1 This isn't advertised as heavy duty, but it definitely is. I'm pretty sure I'll be using it in all my future builds. So, sewing really isn't my thing, but I decided it was absolutely necessary for my Mando build because I refuse to spend $600+ for a flight suit and cape. On the plus side, since it seems relatively easy, I'll be sewing my own Clone Commander Kama and all the soft parts for a future Shoretrooper build. For now, all I needed to do was this: And it turned out pretty good. I know this is simple, but hopefully it helps out someone in the future. I'll attach the shoulder bells tonight, I just wanted to give the one I painted on Tuesday another day to cure. On to other things. Even though I spoke about this at length earlier in this build thread, I just realized last night that I forgot to print out the correct ammo box with the "trapezoid" on top. Here's the correct box. This is such an easy step and like a 1 hour print. I would have re-printed it last night, but I had just started printing a new clone helmet. Whatever. I'll take care of this tonight. Finally, this is what I think I'm most excited about. As I said earlier, I decided to add a bump to the eye-socket of my bucket. Basically, I created a "dam" with some blue painter's tape and filled it with epoxy. I let the epoxy cure for about two hours, removed the tape and was left with this: I cut it with a razor blade while the epoxy was still soft enough to work with, but hard enough so that it wouldn't deform. When I woke up this morning, I was left with this: I may add a little more up towards the corner of the eye, but honestly, after some sanding and a thin layer of glazing putty I think we're good. Now I'm real excited about this helmet. Hopefully I can get it mostly finished by the end of the weekend. I wasn't going to add too many pictures of the helmet since I outlined my process earlier, but this has now turned into a much different project. I'll be sure to show the results because I haven't seen anyone else try this yet. If it has been attempted, my apologies, I couldn't find it in the forum. If not, hopefully this helps someone out again. Cheers! -
The BigJasoni's ROTK 3D Print Build Thread
BigJasoni replied to BigJasoni's topic in Rogue One Build Threads
@DarthBiscuit, thanks for catching that. I may have worded it wrong. I'm thinking about snapping them off and moving the tabs out a little to adjust the fit. Currently the belt is raw and the abdominal armor is primed. The tabs are already rubbing on the greeblies and I think it's only going to get worse once I get primer and paint on them. I actually just put glazing and spot putty on the belt, so it'd be a small mess if I tried to do anything now. I'll post a picture tomorrow. -
The BigJasoni's ROTK 3D Print Build Thread
BigJasoni replied to BigJasoni's topic in Rogue One Build Threads
Wow. Where do I start? I'm really starting to like this community a lot and glad I'm getting into this. The help has been amazing. Also, I appologize for taking so long to reply, I totally missed these comments. @gmrhodes13, @11b30b4, @tarok, and @Sly11 thanks so much, this really helps out. Jeff, that's what I thought, but I was thrown off by the pic in the CRL. The shoulder straps appear to go "through" the back armor. However, I haven't seen anyone else do this in their ROTK builds. Maybe I'm seeing things... I don't know. Ok. Awesome. Challenge accepted. I was thinking about doing this, but was wavering as to whether or not to try it. I may get creative, if anything because I really love the idea of paying "tribute to the original trilogy designers." I think it was brilliant of the Rogue One designers to do this. Perfect. That's how I read the CRL and I couldn't be more happy about this inclusion. Here's what I've done: This feels so much better now. Making the forearm a "clam shell" was actually the first change to the 3d print file I requested from the designer. Originally they had this as a solid "slip-it -on" design. I reached out and asked "how in the world am I supposed to fit my hand through that wrist opening?" Apparently, I was the first to ask this question. Also, after watching The Mandalorian season 2 trailer today, I noticed this: Pretty much every question I've asked in all of my posts was answered in this one clip. This includes everything from posterior armor and leg sizing to kidney plates and clam shells. This flashed up on the screen for about two seconds and I immediately went back and paused it. However, I'm still trying to figure out the middle trooper's kidney plate. It almost looks like he's got a "tall-guy extension" on the top of the rectangle. Maybe I'm seeing things again. Also, these guys look shiny, unlike the "Remnant Stormtroopers" in season one. So here's a question for those who might know. My original plans for this armor were to eventually weather it and turn it into a Jeddah trooper kit. But, if I wanted to do a Remnant Stormtrooper instead, what's the process for approval? Does this require a new CRL? Would it basically say "refer to ROTK and weather it?" I believe I saw this in a few threads. Thanks for the reminder. I need to hurry up and order mine. My undersuit should be coming from The Darkside Closet in a few short weeks. Andrew, thanks for that info and the PDF. I'll look through it and post any more questions I come up with. After all that, I have a very small update. I've taken to filling and sanding again because I'm thoroughly jealous of @DarthBiscuit's FISD Sanding Award . I also sprayed the rest of my arm stuff in hopes that I could be completely done with all my upper body stuff by the end of this weekend. Primer runs are awesome. Yes, there's only one shoulder sitting there. Since I absolutely love painting adventures, I decided to drop one face down when I was moving it. I actually just sprayed it tonight, so It'll be ready for handling in 2 days. Also, I totally forgot to take pictures, but I've been getting all my stuff situated for strapping. Hopefully I can get that done pretty quick. Finally, I re-printed the belt for the fourth time and this one's great. I probably should have decreased the infill percentage to give it a little more flex, but it fits good. Also, I may snap off the tabs and adjust a little, because it's a pretty tight fit. I'm nervous that once primer and paint goes on they won't work well together. I'm pretty sure I saw others encounter similar issues in other build threads, but now I can't find them. So, not much of an update, but slow relentless progress nonetheless. The goal for this weekend is to have everything complete from the cod up. If I can go into next week with only the thigh and shin armor remaining, that'll put me light-years ahead of my goal date. Thanks again for the help! -
The BigJasoni's ROTK 3D Print Build Thread
BigJasoni replied to BigJasoni's topic in Rogue One Build Threads
So, I just saw the CRL... challenge accepted. Ok, maybe not with this build. There's actually a few things in there that may help me out a little, but others I may need input on. @Sly11, @11b30b4, @gmrhodes13, you guys have really helped me out during this process. Maybe you can lend some advise. Really, the only major differences I see are the eye socket bump and the arm pieces; everything else seems like clarification to existing requirements. On the biceps and forearms, I noticed that the CRL now says they are "loosely held closed in the back with elastic, shock cord (bungee cord) or white Velcro and are designed to remain flexible." Does this mean that the forward leading edge is still secured with velcro and that the rear is no longer "fused" shut? For the forearms, this would really help with sliding the things on and off if that's the case. I know this one's not new, but I have questions regarding the shoulder straps where it says "These shall be inserted behind the chest tabs and into slots of the backplate." The picture in the CRL shows this clearly where the shoulder straps appear to go straight through the back armor. As I've tried on my armor, I feel like I need all the shoulder strap I can get (I'm no longer a 160 lb. distance runner). Is this just for sizing, or is there more to it? The gloves say that they "shall be made of a nylon material." Is this a new addition? Is Elastane (Imperialboots.com) no longer permitted? The belt makes much better sense now. For my 3D printed kit, the eye-bump's probably not happening. Are there other additions I'm missing? Thanks for the assistance. -
DarthBiscuit's R1TK Build (Jimmiroquai kit)
BigJasoni replied to DarthBiscuit's topic in Rogue One Build Threads
This is awesome. -
The BigJasoni's ROTK 3D Print Build Thread
BigJasoni replied to BigJasoni's topic in Rogue One Build Threads
Ok. So I'm guessing that most will look at this update like it's much ado about nothing. However, any progress, regardless of its magnitude kind of gets me excited. Additionally, actually finishing a few more white pieces was just enough to motivate me beyond anything I could have imagined. First, I think I've done a fairly good job at documenting my issues with paint. For future builds, I will definitely employ a makeshift booth setup with HVLP sprayers, rather than using the rattle-can method. Actually, for my clone armor, I'll do rattle-cans, but others will receive different treatment. While the finished products have turned out great, the process, and resulting errors, has left me kind of "head shy" when it comes to painting. I think that by just going out to my garage tonight, and spraying a few small items, I was able to overcome the memories of recent disasters. Let me get you all caught up to speed... First, my printer's putting out more products than I can keep up with. Every time I finish something, I print something else and each requires a lot of post processing work. I just wanted to share this picture because it shows the lineup of current and future projects. Of course, the one in the middle is the priority, but the other two are fun. Unfortunately, Mando has the same deadline as the Stormtrooper, so I've got a lot to work on. But I also wanted to ask anyone who might know... are clone helmets really that big? This thing is enormous. I'm going to post in the Clone Trooper Detachment forum, but my gosh; I feel like I can put the entire TK bucket inside the clone helmet. Kind of like a Turducken. I posted this pic a few days ago when asking questions about the belt (which I've since corrected). But again, it kind of shows the pain of removing 3D print lines. In the previous picture, you can see the horrendous lines left on the bucket after a long two day print. In the center of this pic, you see how I used almost an entire bottle of glazing and spot putty (bottom right corner) to turn the helmet into a "sandable" chunk. After a lot of manual labor, you're left with a much smoother, almost pink helmet that's nearly void of all lines. After a nice layer of filler primer, some sanding, some touch up spot putty, and more sanding, I'm left with this. But that's enough about the helmet. I'll get back to this in a few days. Overall, I'm very excited about how this one will turn out. This pic kind of shows all of the stuff that's piled up during my "fear of painting" period. Please notice that if I would just get over it and paint everything on this bench, that I would only be left with the legs and strapping remaining for the build. I know that nothing is sitting quite right in this picture, which is primarily due to the absence of strapping, but I wanted to check everything regardless, before I start going for "permanent" solutions. As a side note, I have to print the inner forearms again, but that should be a quick fix. Which reminds me. I've started a pile of misprints, reprints, and screw-ups. In the end, I'll weigh this all up to see how much money I wasted. This is just a closeup of the hand armor to show the print lines. This is mostly due to me printing at 180mm/ sec. When I slow things down, it's much cleaner. As I stated previously, I just needed to go out there and spray something. Because of the print lines, I decided to use the gold paint method again. After putty, filler/ sandable primer, sanding, white primer, and gold, this is the hand plate improvement. The difference is remarkable. Other than a little wet-sanding, this is ready to join the white armor club. As is this. And all of these. Yeah, I got some bad runs, but I've seen worse. Also, I didn't even realize that this was more of a brass color than gold. In the end, the results are the same; it's still got flake in it that finds its way into any remaining lines or errors. I love this process. Honestly, I wasn't going to use it on these pieces, but decided to at the last minute and I'm glad I did. Also, the shoulders had a big crack going through them that got obliterated after some alex-flex, primer and gold paint. And finally, the white pieces. Butt, kidney, and ammo boxes. The arms, shoulder straps, hands, and trapezoid pieces should be white tomorrow. Again, this seems like a long post which resulted in very few completed pieces, but when I laid them down with the back and torso I got very excited. Like I said, this was the motivation I needed to start cranking this stuff out. Additionally, since I've now reprinted the shoulder straps and trapezoids, as soon as their white paint dries, I can start assembling and strapping the armor. This should be a good weekend coming up. Until next time. -
The BigJasoni's ROTK 3D Print Build Thread
BigJasoni replied to BigJasoni's topic in Rogue One Build Threads
@TheRascalKingthanks a lot for the kind words. I have to say, your ROTK build is the other one I'm constantly referencing. That is a great build. I myself have questioned the practicality of this build. However, the input from the community has been a huge boost. There's no way I'm getting discouraged by the advise I'm being provided, because I know that in the end, the results will speak for themselves. Everyone's experience is really helping to create something that's screen accurate, and after I go through the "growing pains" we should have something available that indeed makes this a practical choice. Also, now that I've made all the mistakes one can possibly make, I've learned how to do this right next time. By comparison, it's only taken about five days to print all of my Mando armor. The only thing I have left with that set is the Shoretrooper shin armor, but thanks to @11b30b4 sending me a link to Sean Field's files, this should go pretty quick. By the way, regarding Sean's Shoretrooper set... Wow! Finally, that Hex3d/ Geoffro file was the one that I put a link to in my first post. I think it's a fun prop, maybe something I'd make for my kids, but no way I was going to try engaging this community with something like that. Also, when I saw their FOTK helmet, I knew there has to be better things out there. Here's my favorite pic: Honestly, this had to have taken some work, but there's no way I'd put a picture of the real thing next to it. -
The BigJasoni's ROTK 3D Print Build Thread
BigJasoni replied to BigJasoni's topic in Rogue One Build Threads
@tarok they are. Every change has been added to the original file. If a person downloads the armor file, they get all these changes. You only have to dig through the files and find the ones that say V_2 or something of that nature. I think at this point, there's four different belts, -
The BigJasoni's ROTK 3D Print Build Thread
BigJasoni replied to BigJasoni's topic in Rogue One Build Threads
@tarokthanks for the input. For that rendering, I just chopped the bottom portion off to show the curve on the cod, so there were bound to be errors. The belt has since been corrected. This pic has a small error under the far left and right ammo boxes, but the belt bottom has been straightened and the boxes are offset from the edge by about 5mm. I think I'm ready to print. I'll post pics after I'm done. Thanks again! -
The BigJasoni's ROTK 3D Print Build Thread
BigJasoni replied to BigJasoni's topic in Rogue One Build Threads
@gmrhodes13 thanks! That actually makes sense because as the designer and I have sent pics back and forth, they've frequently referred to the promo photos. I'm making some changes and should be set this weekend. Thanks again. -
The BigJasoni's ROTK 3D Print Build Thread
BigJasoni replied to BigJasoni's topic in Rogue One Build Threads
@TheDecisiveRaindrop honestly, I'm amazed that they've been listening to my suggestions. I've had other designers essentially tell me to model it myself if I don't like what they made. I never try to come across like that, I really want to help them with their files, but I understand that it's a lot of work. I think this one's kind of curious about what I'm doing more than anything else, but they've been nice to work with. I've already bought a few files from them. Eventually I do intend on learning how to do my own 3d modeling, but for the time being I'll keep doing it this way. -
The BigJasoni's ROTK 3D Print Build Thread
BigJasoni replied to BigJasoni's topic in Rogue One Build Threads
@gmrhodes13 thanks again for the advise. After you posted this, I started racking my brain over why this wasn't looking right. I put the model together in Meshmixer along with the belt to see what was going on and it turned out like this. When the uppermost portion of the cod is hidden by the belt, the curve starts about 2/3 to 3/4 of the way up. By this weekend, I hope to be able to put the belt together and try everything on. Also, I'm either going to have to cut the belt front or reprint it for the third time. I just looked at the reference pics and realized that my belt has something extra. I don't know where this part came from, but it should be an easy fix. This was actually the first belt I printed off before I realized the ammo boxes were supposed to be separate. However, my most recent belt has the same "hanging chad." Honestly, these are the kind of things I was expecting more of when I decided to 3d print a set of armor. Also, yes, that is my new bucket. I'm so happy with this print. I just started working on it, and it's perfect so far. I ended up using the Nerdforgedesigns file again because of how awesome it turned out last time. Also, the new helmet file needs a few adjustments that I don't feel like making right now. I'll work with Akira-Yuming on this later. Also, though I said previously that I refuse to cut out the tears on the back of the helmet ever again, I realized that the issue previously was me attempting to cut them out after bondo and primer. This time, it was very easy and they turned out great. I have no idea what I was thinking last time. I'm probably not going to outline the helmet process, since I already did it previously, but I will post a finished pic when done. -
The BigJasoni's ROTK 3D Print Build Thread
BigJasoni replied to BigJasoni's topic in Rogue One Build Threads
All, Quick update. The files were redesigned and look pretty good. I'm going to print the new cod and go with the butt plate I chopped. Thanks for the input. Also, I just realized that it's September and that I really need to get moving on this project. Hopefully I can carve out some time this week and get some good updates posted. Thanks again for the help. ' -
The BigJasoni's ROTK 3D Print Build Thread
BigJasoni replied to BigJasoni's topic in Rogue One Build Threads
Ok. Quick post before I hit the rack. I'm following @Darth147's build in which he's used a few of the parts from the Akira-Yuming ROTK files. I told him I'd post a quick pic and see if anyone could provide feedback on the cod and posterior. First the cod: This is how the original file looked. I believe the "underwear look" is more in-line with the original trilogy armor. Please correct me if I'm wrong. This is how I corrected the piece: I couldn't find anything to prop it up with, so I used my clone helmet. Side by side with the CRL. These are at different angles, but when I put on the armor it looks like this: This is before I cut it down. Input please. Next, the posterior. Two different angles, but I think you can get a good view. Side by side with the CRL pic: Again, different angles, but is this worth chopping before I spray it this weekend? The only pic I have of it on me is this, but it's from the side: Please let me know if these are significant enough to start chopping my armor. Also, this is before I made changes to the thighs, belt and abs. Everything fits great now. Thanks -
Darth147s R1 BUILD-Part of the SCG Group Build
BigJasoni replied to Darth147's topic in Rogue One Build Threads
@Darth147 I ended up modifying the cod piece myself. I think their file was based off of the original trilogy TK. It almost looked "underwear like" if that's what you were referring to. I think I asked some people in another forum about how the cod was supposed to sit and they gave me some good feedback. The butt plate was a disaster when I originally purchased the armor. They actually had the kidney plate attached to the posterior. It does appear to drop down on the sides a little lower than the CRL picture, but when I printed it off and put it on, it seemed to fit how it was supposed to. No one commented on it when I posted a picture of me wearing it. I think I'll post another pic in my build thread tomorrow and see if I can get some input, because I'm about to paint mine. If you do find anything, hit up Akira-Yuming and let them know. I've probably sent them around 50 pictures so far and they've responded with changes rather quickly. Also, I'm not sure if you bought their helmet or not, but when I started to print it off, I immediately realized that there's absolutely no way to get your head in it. It would even be a challenge for my seven year old daughter. I didn't feel like bugging them right away, but I may start working with them again on improving the helmet. -
The BigJasoni's ROTK 3D Print Build Thread
BigJasoni replied to BigJasoni's topic in Rogue One Build Threads
All, thanks for the tips on the paint. It's just weird since I haven't had any issues putting the white on top of the gold, it's only when I try to put anything on top of the white. I think I'm going to follow Tarok's advise and play around with a couple scrap pieces before I try to lay paint down over a cured coat again. Since I showed a pic of the ab armor yesterday, I thought I'd outline this process a little. I'm hoping that by the end of the weekend I'll be posting pics of a few more finished pieces, but for now, I can at least bring this thread up to the current time. First, I'm going to post a pic of something that has become a very valuable tool throughout this process. I'm not sure how widely used this tool is, but the concept is very simple. Of course, these pics are a joke, but the basic steps are gauge body part, measure, and then scale armor in your slicing software. In theory, a person should be able to use this tool when measuring for any type of armor before trimming. If you guys want the file, they can be found here https://www.thingiverse.com/thing:2892755 They were created by Uncle Jessy, but he credits NikkoIndustries with the idea. For an in-depth view of how to use them, check out Nikko's video at https://youtu.be/8p0iqI_qWK8 or Uncle Jessy's video at: https://youtu.be/OM5hwTrVnRU After scaling my armor, there was no way I was going to get it to fit on my print bed. When I chose the CR-10S, I did so because of its large surface, but as I alluded in a previous post, something even larger will be very welcome for future builds. The CR-10S Max is very attractive, but also very expensive. I started to make my cuts in Meshmixer, but was not a fan of cutting right through the front greeblie. Instead I decided to print off the file without the boxes which also helped extraordinarily well with hiding the seam. As I stated yesterday, if I can cut a file behind something that gets affixed later i.e. the belt ammo boxes, it eases the post processing burden. Additionally, printing the greeblies separate allows a person the opportunity to print them again slowly, at a much higher resolution. Preferably, I would like to print detail pieces off with a resin printer, but that's another future purchase. Here's the slice without the boxes. Between the front greeblie and the belt, over half of the cut will be covered with another item. The side slice was a little trickier. Again, I wanted to hide the cut, so I decided that the best place to do so would be along the forward edge of the semi-vertical seams on both sides. I posted this picture yesterday, but this illustrates how I was able to "weld" the armor on the front. Typically I won't plastic weld anything on the outside of the armor, but since this will all be hidden, it was perfectly acceptable and did a great job of strengthening the seam. Greeblies were printed separately, but as I said yesterday, I totally forgot to change my print settings. Regardless, they turned out pretty good. For this part, I did my post processing a little out of order. After I welded the inside of the armor, I ran a thin bead of the Alex Flex along the front seam and sprayed a thin coat of filler primer over the top; this was what sold me on the process. The print lines were actually deeper than the seam I cut directly through the middle of the armor. When I'm able to pick up a tub of the Alex Flex spackle, I'll update the thread. Again I went heavy on the glazing and spot putty before doing my first sanding and priming. Also, this is where I decided that I would stop post processing until after I sized and fitted the rest of the armor to this piece. Doing the plastic welds is kind of fun. It's nothing more than a soldering iron and extra filament. The only issue I've had is that I've burned my knuckles about a hundred times, but that's just me being stupid. After I do the modified tig weld, I typically follow that up by smoothing the weld line, which forces the plastic deeper into the seam. The weld is obviously finished in this pic, but it's worth noting that prior to welding the pieces, I tacked them together using a few dabs of super glue and a bead of E6000. After allowing the E6000 to cure, I ran a bead of super glue along the seam and then dusted it with baking soda. While this cures the super glue almost instantly, I found that the baking soda cement line wasn't very forgiving to flex. In the future, I will fill the gap with the Alex Flex. Really not sure what I was thinking, but I really didn't like how narrow the gap was in the back of the armor, so like an idiot, I cut it wider to give me extra room to slip the piece on and off, and bring the gap up to "approximately 4 inches," which I swear I read somewhere but can't find now. I'll discuss this in a minute. After cutting these pieces out, I stress tested the armor and was able to flex it open to about 9 inches, which was plenty of room to put the armor on and off. However, knowing that I would be doing this frequently, I decided to print off two flex plates that would cover the seams I just welded. Unfortunately, I forgot to take a picture of this, but here's the Simplify3d visual. The flex plates were wide enough to cover the seams and the high-stress portions of the side-abdominal area. Additionally, at only 2mm thick, they didn't have much infill and were highly flexible. I secured them using E6000 and then welded around the edges. Following this addition, I was able to stretch the abdomen pretty wide, and kept walking around the house like this: Unfortunately, when I put this on, I realized that the rear gap had opened up beyond the dimensions of the rectangle (kidney) plate. Thanks to Jeff (11b30b4) for verifying the size of the kidney plate for me. I had suspected that my kidney plate dimensions were off, but after he told me what his measured in at, I realized that the length and width of what was provided with my armor was correct (I actually increased the depth based off reference pics). Fortunately, I was able to get all my measurements done and adjustments made before I got ambitious with the cutoff wheel. That's how I was able to appropriately size the chest, back and side extensions as well as get community input regarding the thighs, cod, and belt. I agree that the abdominal should be the starting point for this reason; the placement of almost everything seems to hinge on where the abdomen sits. Also fortunately, the rear (kidney) section of the abdominal armor was only like a six hour print. I was able to set everything up, do my telework thing, and come back to finished armor. Last night I welded the sides back together and now have this: Here I clamped one of the old flex plates on so you can see what I was referring to earlier. I totally forgot to print off some new ones this morning and started printing the back of my clone helmet instead, so I won't be able to put the new flex plates on until tomorrow. Following that, I'm going to hit the inside with some resin and keep moving along. Ultimately, though I'm holding it a little low in the pic, it fits how it should. Hopefully I can do the strapping and add this to the pile of white pieces soon. Also, please ignore the mess, that's our COVID stash and evidence that my kids have been feeling rather cooped-up all summer. -
The BigJasoni's ROTK 3D Print Build Thread
BigJasoni replied to BigJasoni's topic in Rogue One Build Threads
So, I haven't updated this in a while, because I wasn't feeling like much was getting done. However, after looking at my MCT (Medium Clear Tub) I realized that there wasn't much left in there. It's not that progress hasn't been made, it's just that it's been slow. Additionally, the biggest issue with 3d printed helmets and armor is the sanding. Sand, sand, sand, sand, sand, sand, sand, sand, sand, sand, sand, sand, sand, sand, sand, sand, sand, sand, sand, sand, sand, and one more sand. While I don't have a lot of white parts sitting on my finished table, my workbench is absolutely covered in primed parts that have gone through two rounds of sanding and are waiting for their final inspection before paint. Also, I ran into a few issues I wanted to get feedback on, because I'm sure they're problems the community has encountered several times. First, since I didn't get to feel the excitement of receiving a BBB, I created the aforementioned MCT. Really, the only things I have left to prep are the legs and belt. I may have to get creative with the lower legs because after 30 years of running and cycling, my calves are kind of "bulky." I can make the armor fit (as in the second picture), but I can tell that I'll be stressing out the Velcro every time I move. Here's my first question, what is typically done in these situations? I'm sure I can shim it fairly easily, but I don't want to screw up the aesthetics of the armor. Please don't mind the Birkenstocks, that's my telework attire. Also, after seeing this, I'm glad I'm going to be tearing up the carpet in a few weeks. Back to the build: Here's some pics of all my armor greeblies and a few other items for the blaster. However, I'm not really liking how the E-11 is turning out, so I may abandon that effort in favor of a built model. I really like the idea of getting a full metal blaster, but stock seems pretty low everywhere I look. After a full career in the Marine Corps, I'm really not concerned with the weight of an all metal blaster while trooping. Any suggestions are welcome. If you look closely at this pic, you can see some print errors. For anyone else who attempts this, fix your print settings before doing intricate work. I forgot to slow down the print, so I left this stuff jamming at 180mm/sec. For greeblies, one should really slow it back down to 60 or below and decrease the layer height to .1. Also, if you look at the ab greeblies, they all separated from the build surface. I've since started using helper discs as seen below. Filament sticks best to itself, so if you help your prints out a little bit by providing a surface for it to stick to, warping in minimized. Also, since the helper discs are relatively thin, the heat from the bed seems to really keep them warm and stuck to the surface. The file for helper discs can be found here: https://www.thingiverse.com/thing:217725 Additionally, Uncle Jessy does a much better job at explaining this in his video which can be found here https://youtu.be/EIXvhJKRTU0 I have absolutely abandoned the idea of using rafts and do not advise anyone to try them. As I stated, filament sticks best to itself. Removing items from rafts is harder than needed, and typically destroys the first layer of the print. The helper discs do the same thing as a raft, but are incredibly easy to trim off. My bed was a little out of level in this pic. That's why there's so much space between lines in the first layer. Typically if you see this, you can easily raise the bed a tiny bit. This pic shows me that the bed is a little low on the front left leveling screw, and very low on the right. My printer is supposed to have an auto-leveling feature, but I never updated the firmware. Also, even the auto-level feature requires you to perform the paper shim test, so I stick with leveling tests available on thingiverse https://www.thingiverse.com/thing:2187071 and I always keep my eye on the prints during the first few layers. After I pulled the greeblies off the plate and gave them a quick inspection, I realized they weren't too bad. All the errors appeared to be superficial and could be cleaned up with putty and filler primer. While I appreciate the print volume of the CR-10s, I've determined that I really want a CR-10s Max. With a 500x500x500 print volume, a person can scale and slice their armor and then print the entire section in one piece. Typically, I'll try to hide seam lines in inconspicuous locations (such as behind an ammo box on the belt), but for large pieces such as the chest and back, these larger seams cannot be avoided. Fortunately, bondo works great, as does the Alex Flex caulk I mentioned in an earlier post. On this piece, I had fairly good results without the caulk. After I finished off my second tube of glazing and spot putty, I found a Galactic Armory video in which he mentions using Bondo Resin instead of the putty. The resin goes a lot further and does a great job at reinforcing the armor. I think the draw back of resin is that it's a little harder to sand than spot putty. I'll probably go that route with my Clone Armor. This is a small trial. If you look just above the top left portion of the middle blob, you can see a small crack in the paint. Similar to the chest armor, these were some of those cracks that just wouldn't go away with primer and sanding. As a test, I used wood filler to see how it would work, and the results were pretty good. I've seen people do this in 3d print tutorials, but I've been somewhat leery. However, after trying it out, I'm happy. I will keep my eyes on these spots in the future, just to monitor how it holds up. After I affixed the greeblies, I was very happy with the results. The 3d printed parts add a lot of detail and realism to the part. I'm almost fearful that it looks too detailed, but I'll defer to the the CRL for that decision. Also, the last few pics are a little misleading, the appropriate curves are present at the bottom of the armor and at the arm holes. I mentioned earlier that I didn't change the print settings for the greeblies which resulted in less-than-optimal print quality. But, as I suspected, the putty and primer did a good job at sealing up the gaps. I really laid the primer on heavy here. This was due to me accidentaly dropping the piece after I laid down the first layer. I caught it, but left an awesome thumb streak going across half the piece. I wiped it down and then re-primed. All it meant was even more sanding. As has become standard, I painted the back piece gold and let the particles do their magic, unfortunately, I got a little sloppy (which seems to be the norm with this piece) and created a few streaks in the paint. Additionally, if you look just below where the cat is sniffing, you can see the thumb streak I mentioned in the previous step. Here's a better pic. This really sucked. I wet sanded and coated again, but then had to stop. I've had so many paint problems recently, that I had to remind myself that less is more. This whole gold step is probably unnecessary for the armor, but I don't want any evidence of a 3d print at all. Here's my second call for assistance. When I threw down my first layer of white, I decided to hit my shoulder straps, hand plates, and shoulder clips with a second. I originally painted them two weeks prior, but as soon as the paint hit them, this happened. What causes this? This is the same thing that the clear coat did to my original helmet which had been curing for a month. Everything I read says it's caused by an uncured undercoat, but I don't see how that's possible. I'm only using Rustoleum products and have had no issues laying the white over the gold. The issue comes up when I try to add layers on top of dry white paint. After this happened, I sanded everything down and re-sprayed, but it happened again. Since they're small pieces, I just threw them away and re-printed. I really need help, because I originally intended to clear everything later, but there's no way I'm trying that now. Please help. Got these finished. I think I mentioned previously that I've been using several ROTK build threads and the CRL as my references. Jeff's 1130B4's ROTK Build has been my favorite so far. In it, he mentioned that he had received the advice that "for sizing and fitting, you start from the center and work your way out." Though I haven't included any pictures, this is actually what I did. I'll post some pictures of the abdominal in my next post, but it is entirely unfinished. I kind of assembled it and have really been putting it through the wringer. Since it's essentially the base of my project, it's really taken a beating, so much in fact that I just reprinted the kidney pieces and am reassembling from the ground up. Also, the following question/ comment from Sly11 got me really thinking about trying some new things. So, while I absolutely cannot change the scale of the armor now, I can play around with the parts and really improve the process. Laying down the resin on the inside of the abs will be critical. Thanks for getting my gears turning Andrew! Here's the base of the project. Until next time... -
Darth147s R1 BUILD-Part of the SCG Group Build
BigJasoni replied to Darth147's topic in Rogue One Build Threads
The ab greeblie looks great! If you find anything at all that seems off, or just need some changes that improve the file, they'll be very helpful. I haven't updated my build in a while, but last night I realized how much I like the forearms. There's lots of good parts in that armor set. Glad it worked out, -
The BigJasoni's ROTK 3D Print Build Thread
BigJasoni replied to BigJasoni's topic in Rogue One Build Threads
This is the video I watched that made me curious about flexible filament https://youtu.be/96mIEBRZvNY Rigid, yet flexible. Of course it's out of stock, but I definitely intend on picking some up once it comes back. The only issue with the flexible stuff is it's difficult to smooth and paint. If I'm able to get some, I'll try it out and post some pics. Ok, So Akira-Yuming came through again. I asked if they would take a swing at altering the file for their ROTK Bucket. Specifically, I asked if they could remove the vocoder, and remove the filling of the teeth, tubes, traps and tears. Their response at 11:57 P.M. last night was "This is more troublesome, I will try it, it will take some time." At 8:42 A.M. the responded with this: And with my separate vocoder file the sliced helmet looks like this: I'm so excited to print this out. The helmet before the alterations was essentially the same as the one I previously made, which I loved up until I destroyed it. However, with the changes, I feel the helmet will be at another level. I was so happy with their work, I bought their Phase 2 Clone Armor as well. I'll try to post more progress updates later. -
The BigJasoni's ROTK 3D Print Build Thread
BigJasoni replied to BigJasoni's topic in Rogue One Build Threads
This is the video I watched that made me curious about flexible filament https://youtu.be/96mIEBRZvNY Rigid, yet flexible. Of course it's out of stock, but I definitely intend on picking some up once it comes back. The only issue with the flexible stuff is it's difficult to smooth and paint. If I'm able to get some, I'll try it out and post some pics. -
The BigJasoni's ROTK 3D Print Build Thread
BigJasoni replied to BigJasoni's topic in Rogue One Build Threads
Andrew, Thanks for asking, I neglected to add this to my post. Initially, I tossed around the idea of using fiberglass/ resin on the inside of pieces that rub a lot, but decided that I would only do it to pieces that flex. I'm more than likely going to do this with the abs and when I do, I'll post the pics. One of the issues often encountered with 3d printed armor is when people decrease their infill percentage or outline/ perimeter shells in order to lighten the print or make it go faster. For mine, I left the infill at 20% and kept the perimeter shells set at 2, but I've also increased outer shells to 3 for a few pieces. This makes the armor a little thicker than typical, and basically gives the outer shells more surface to "cook" together. While these are fairly common settings, I'm laying down the plastic a lot hotter that typical. This really helps with layer bonding since I'm still running the .4mm nozzle with a .2 layer height. In my first post I talked about the different settings/ combinations I've tried. By far, the worst prints came from the 1mm nozzle, but I'm probably going to step up to a .6 for my Mando chest piece, it just comes down to trying different settings until I find the one that works best. Also, I'm starting to find that filament brands all act differently. With the Inland brand, I haven't had any issues unless I lower the temp, or go too big with the nozzle. Temp swings of even 5 degrees have screwed up my prints, and make the parts susceptible to the issues you mentioned. Ultimately, I'll watch the non-fiberglassed parts and adjust as needed. Thanks again! -
The BigJasoni's ROTK 3D Print Build Thread
BigJasoni replied to BigJasoni's topic in Rogue One Build Threads
Jeff, Thanks again for the feedback. It just dawned on me that you made the 11B3OB4's ROTK Build thread. I think I've referenced that thread more than any other; thanks for the awesome resource. I'll talk about the shoulder straps in a minute. The third pic you referenced is indeed the trapezoids that go on top of those boxes. The designer sent it to me as a separate file to see what I thought. Here's a pic of the two sliced together. For the chest and back, when I inserted this pic, I noted that the "shoulder strap slots" automatically gets separated. So, I printed them separate from the chest and back. These are the trapezoids you talked about, I just didn't know what to call them. I keep going back and forth on whether I should have printed them on the chest and back instead, but I feel that I made the right decision because this eliminates the possibility of a misprint on the smaller detail parts, especially since there's a cavity underneath. When I attach them I'll probably regret it, but I'll be crossing that bridge this weekend. You can see it attached in this Meshmixer pic. Here's the golden trapezoids and shoulder straps after wet-sanding. When I started sanding last night, I realized that the paint wasn't 100% cured, so I decided to hold off for another day. However, after wet sanding the slightly "soft" paint, these got real smooth. I really don't want any more paint issues, the helmet broke my heart. So, here's an idea I had after I saw the silicone shoulder straps on Jeff's 11B3OB4's ROTK Build thread, "can I make flexible shoulder straps with my 3D Printer? I've heard about how good flexible filament is for armor prints, but I've been nervous about printing with it because you really need to get the slicer dialed in. Plus TPU comes in various forms, so it's kind of important to test different products to see what works best for your application. Initially, I picked up some Inland TPU from Microcenter, because I wanted to make the rear portion of my ab armor with it, but after running a test print, I laughed pretty good at what came out. https://imgur.com/H9FwHaT I chose the Hovi Mic Tip as my test because it was the smallest piece I had and was only a 45 minute print. They look innocent enough But they're very flexible. I could never make armor with this brand. The Zyltec filament Nikko Industries uses is pretty good for these applications because it's somewhat rigid. With mine, I may try to make some shoulder straps, but that'll be more of a test than anything else. I guess TPU that's this flexible needs to be dyed rather than painted, so I'm really not confident that they'll match the rest of the armor. I'm very interested in the silicone straps.
