
Sea_Marshall
-
Posts
77 -
Joined
-
Last visited
Content Type
Profiles
Forums
Gallery
Articles
Everything posted by Sea_Marshall
-
 Greetings. Requesting 501st Stormtrooper status. Gogo shield patches! https://www.501st.com/members/displaymember.php?userID=28514&costumeID=368
 -
Awesome and thank you for the replies. It's really keeping me motivated and working on things. Yes, I rough sand with 100 grit on both sides to help bond things. Thanks for the button clarification. I used some colors I had laying around and just now remembered I have a gloss paint I can brush on too. I'll look for a few scraps to cut and fit the back.
-
Thank you for the critical eye. I knew I'd fumble a few things soon enough. I hadn't done super in depth research until I had already crossed a certain threshold of progress, which points to the button thing. Looking into it today I noticed exactly what you mentioned. It's a clever idea to back it with scrap and fake it/rebuild it. I love the Level 3 mindset. Here are the buttons I painted by hand, didn't mask anything. I may need to dial the paint back a bit? Raise it further from the base? Or is that itty bitty left over at the bottom the dome okay? It's just acrylic paint so it chips off rather easy, which is also unfortunate. Do folks gloss clear coat these panels to protect the paint? Hoster: Copy that. It came with the raw straps attached and the black straps were separate, so I'll figure out how to swap them. Belt: Ah well. This got me confused going from the CRL to a detailed construction breakdown. I knew there was something behind the button covers and figured it was a permanent attachment, so just went with the glue. bummer. I'll make it work. The ends aren't attached so there's room for the rivets and the belt snaps should be in that gap next to it. I can figure out the center rivet. Truth be told, I have a 2nd belt coming in on order (I'd like to swap between ESB and ANH, so I'll get another crack at it.) Snaps on the suit to hold the belt! Wow! That's rad. I had no idea, but it makes sense. I'll see about marking this when I get to fitting. Going from casually seeing the costume to building one has it's learning curves, that's for sure. Thank you again for the guidance. While glue was drying I checked a few things off the list: Gloves and various snaps in the E-6000 queue. I did 5 inch elastic straps so it has a bit of grab when I put the gloves on. Feels good. I set the posterior and Han snap. Not pictured is the Boba thong and snaps being set on the lower cod plate. I'll have to determine the length of the 1 inch nylon tape I'd like to snap in using the existing male snaps. I've just received the split rivets and set one to the cod. I'll have to get to the torso/ab area later, but the ammo belt for the right thigh can be set and painted now. After tonights E-6000 is done setting I should be able to test fit everything minus an assortment of accessories. Hoping to be in the app process sometime in February then help a buddy build his TK since I've just stumbled through my own build, which is immensely satisfying as far as building Star Wars costumes go. Really appreciate the insight and tips on the build.
-
So i measured the waist of the WTF TK kit and how I have it trimmed it's a 38 inches on the kidney/torso area. I'm currently a 42, which means 4 inches of adjustments to close the armor gap. Wondering if I can drop the weight or make the mod faster, haha. I've got the thighs to do, so maybe that'll make or break my decision. Super excited, things are really coming together now: I made my own belt. It was simple enough. I got a 60" strip of white canvas and measured to 7 inches. I folded the fabric almost in half, leaving a 3 inch belt and 1 inch overlap. The overlap was roll hemmed to strengthen the belt. In addition, I cut strips of plastic canvas, doubled them up, then slid them into the belt. Here's the belt with the 45 degree cuts to meet the belt and the belt itself being within the plastic belt limitations. At the ends of the boxes you can see where the plastic canvas bolsters the hip area where the holster will sit. Clamped down the canvas and e-6000'd the strip. Shoulder strips went down too. I found a few minutes to drill holes in the posterior and ab for male snaps. Quick and easy. I'll probably end up using them. The Han Snap could be used to secure the armor and the cod/posterior would be handy to have a 'boba thong' type thing to keep the back from flying away. Double snapped and setting the posterior/kidney straps. I believe this is the last of the sanding finished: boxes, buttons, and button covers. I'm waiting on the TD clip then that'll get done up quick. Hoping to get the buttons painted and done tonight. Once the belt is done setting, I'll add the button covers. Do I need to put in rivets or screws and cover them? I realize it would make the belt sturdier, but I don't know by how much. Thoughts on that? Fitting is coming up soon then closing all the armor and finalizing edges. Little detailed things now. Almost ready to start work on the helmet!
-
Thank you much! TD clip in transit. Lots of fun going on. Things have picked up speed but now I've got some actual work to do on the kit. I haven't done much for the belt at all. The boxes are still rough cut as I haven't done any research on the build, but I DO have the canvas to make the belt arriving soonish. I've got a weekend to clean up the parts. And the right knee ammo boxes still need cleaning up. The hardware for that is on the way. Think I'm going with split rivet on this one. (implying that I enjoy this build so I'd probably build another) The initial snaps have been laid out! The torso dangles with what appears to be proper spacing. Other snaps installed were on the thighs to go with the belt rig I finagled. I had this belt handy so I sewed some velcro on 1.5 inch nylon straps and added a pair of snaps. It's kind of adjustable with the extra length in the velcro. I still need to do final fitting so length may change. On the topic of non-armor accessories, I've received boots from the fine folks at Imperial Boots. Neck seal and holster also on hand from Trooper Bay, who I enjoy browsing their wares. Dangerous. Interesting thing is it came with the black straps separate from the holster, which I believe is an ANH setup? I'll have to look into how it attaches, but should be an easy fit. With the arrival of the rubber gloves, also from Trooper Bay, I was finally able to size my gauntlets proper. huzzah. First piece of armor sealed. Fun fitting note is the hump can be used to fit my thumb through the gauntlet easier. Everything felt snug and the gauntlet opening appeared acceptable, however I neglected to take a photo... I trimmed them a bit from the first fitting images. The sniper knee came out exactly how you explained it would. I need to revisit the edges of all the armor and round out excess areas. I'm sure there's reinforcement I need to back in a number of areas and prep the abs paste for application. I've done a few consistency tests with the paste and I'm feeling confident on application. It'll be a fun learning experience. Yay. I think this is in the ball park. Admittedly I'm building in a frenzy because I have a limited amount of free time to get the bulk of the work done. All of the pieces are sealed and stripped on the front facing edges with openings in the back awaiting final measurements before I lock them in. Regarding final measurements, I did an impromptu test fit and had a good laugh at how silly I looked. It is with great sadness that I must once again resize my thigh armor. Story Time: When the kit showed up, I had the foreknowledge of thighs being my nemesis, so I left as much of the form as possible, and well, I still need like +2 inches. This trigged flash backs to resizing fiberglass thighs for Captain Phasma. It was a scary yet rewarding experience, and now I get to do it again but with abs plastic. This thread emboldened my decision to take it on with gusto: Looking forward to doing it, but man, not looking forward to doing it. On the upside, I'm confident my kidney plate and torso is far beyond the required half inch gap, so I'll be able to use this same method in a similar circumstance to close the gap on the sides. And then I get to learn how to polish armor, which I'll probably want to do from time to time anyway. It'll be fun.
-
Thanks for the sharp eye on the gauntlets. I'm going to revisit them soon. I've started attaching cover strips to the front facing armor parts keeping in mind the spacing of the strip-to-ridge area and allowing for more to be taken out of the back. I've been using a combo of magnets and clamps for the strips. Clamps at the top and bottom, magnets in between, then shuffling things around to other parts. I did my best to keep the thigh and shin cover strip-ridge ratio consistent. At this point, all the backs of the armor shells are not sealed. Something I stumbled upon while reading the CRL was the sniper knee matching the grooves of the shin tops -- this dictates where the shin would align in the front right? -- so I dry-clamped the sniper knee to the spot then put down my cover strip. Unfortunately I had done the right shin first, not having the left shin as a guide to width, so my left shin top is wider (but hidden by the sniper knee). I think it'll be ok once it's all put together. Test fit soon. I got the front facing bicep cover strips down and will size the back later. On the insides of the thigh and shins, I felt like I needed to add cover strips/reinforcement along the seams. Having to space these items out a bit left gaps (covered by the strips) so I just sandwhiched the parts in cover strips and E-6000. I saw there were reqs to back or fill the gaps of the shell halves, so I'll give that abs paste a go in small areas. I'll have to revisit all the sides once assembled and smooth out some edges. While things were setting and gluing for hours, I got to work on the straps to connect the torso parts. I counted 11 joining areas and cut them out. Most should work. I'll need to measure some shorter straps but the bulk of them are done. Here's a few clamped and drying. I think I know what I'm doing, but its a first build so I'm prone to loads of mistakes. Fingers crossed that I haven't done anything irreparable so far. PS: Where can I find the thermal detonator mounting hardware? That curvy-clippy thing. Any vetted vendors or is it a common place thing?
-
Thanks for all the comments everyone. Really appreciated. I did some cuts to bring the armor down to size for blue tape fitting. I was fairly intimidated by this process and after having stumbled through it, it wasn't so bad. I have a jump suit from Trooper Bay on hand and used it for part fitting, but didn't do a whole mock up yet. I've taken a look at how the cover strips are going to align and I feel good on most of the armor, however, thighs have caused me grief in the past. When I trimmed the thighs, I left all of the excess that came with the raw cut on the fronts and back knowing I'd need every millimeter, and yes, it's a snug fit as is. My question is this: The raised ridge (marked in red) and the cover strip (yellow)... is it a problem that the red and yellow lines are not closer together? The tops and bottoms align proper, but the examples I've seen has that ridge and the cover strips closer together. Any insight on this is helpful. I need the extra space. I think the armor worked out well? Everything slips on comfortably and moves proper. Good call on the boots @justjoseph63 . I do have them and I will totally size my shins with the boots on. Thank you for that pro tip. With my shins (and arm items) I was able to close the ridge-to-cover-strip spacing to give it the proper look. If expanding that ridge/cover strip spacing is a fair play, I'd probably do the same to the shins to free up some space. I've never used abs paste before, but I have a mason jar outside cooking with acetone and scrap. I saw that I could weld plastic, sand and polish it? That's rad. I planned to use this to reinforce the interior of the armor along the cover strip seams. That should weld any loose gaps and really solidify the parts. Super excited to get to the snaps. I've got to check my inventory of nylon strapping, but I've got plenty of snaps and a hand setter.
-
dropping off a few image collages: cover strip creation and return edge clean up Walt's Trooper Factory provided about 16 edges of abs strips. It looks like they were the hard edges from the sheets used to stamp the kit, so I measured out lengths and made the cuts using a box cutter and a yardstick clamped to a table edge so I could score-and-snap the strips. Success. I picked the numbers in the middle of the recommendations: 16, 21, 25mm respectively. Once I have the armor fitted, I'll revisit these strips to cut them the proper lengths. I revisited the return edges on the armor and trimmed back a number of pieces: gauntlets, bicep scoops, shoulders, bottoms of shins, and tops of thighs. In the photos you can see the comparison of return edges, some in progress, others side-by-side. Think I'm ready to start sizing parts! I wanted to do an ESB TK, which I intend to do, but a buddy of mine wants to do ANH. Looking at the differences in appearance it seems the helmet, hand plates and belt/holster setup will need some spare parts to pull off the swap. Not too bad.
-
Greetings Troopers I'm Chuck with the Golden Gate Garrison of California and am back with another build, this time for a Walt's Trooper Factory Empire Strikes Back Stormtrooper (WTF ESB TK). It's been slow progress over the holidays but am hoping to put some time in and motivate myself with a work in progress thread. I really appreciate the support, tips, and insight for these costume builds, so thank you in advance for following along and chiming in where you think it would be most helpful. I believe I have everything in hand minus the belting material and E-11 blaster (optional). I'm on the lookout for a quality trooping E-11 as I progress through this build. Big Brown Box Day! A lot of the armor was rough trimmed but others were trimmed down to the return edges in some cases. I found some time to lay out the TK and trim back a lot of the rougher areas using a score-and-snap method, but also dug out the dremel and shears for a few parts. I happened upon a new dremel and belt sander for this project and found a few hours to trim back the rough cuts even better. The curved end of the belt sander was perfect for a lot of the curves in the kit. I revisited the edges with 220 grit sand paper and smoothed everything out as well as detailed a lot of the corners where I couldn't get sanding tools in. Now that I've made it to the point where I can fit things, now I'm really looking at the return edges and have decided I need to revisit a number of parts to trim it back even further, to none at all. I've popped into this thread for tips and tricks. I'll be getting more time on the edges this weekend and that should square me up for proper sizing! More to come.
-
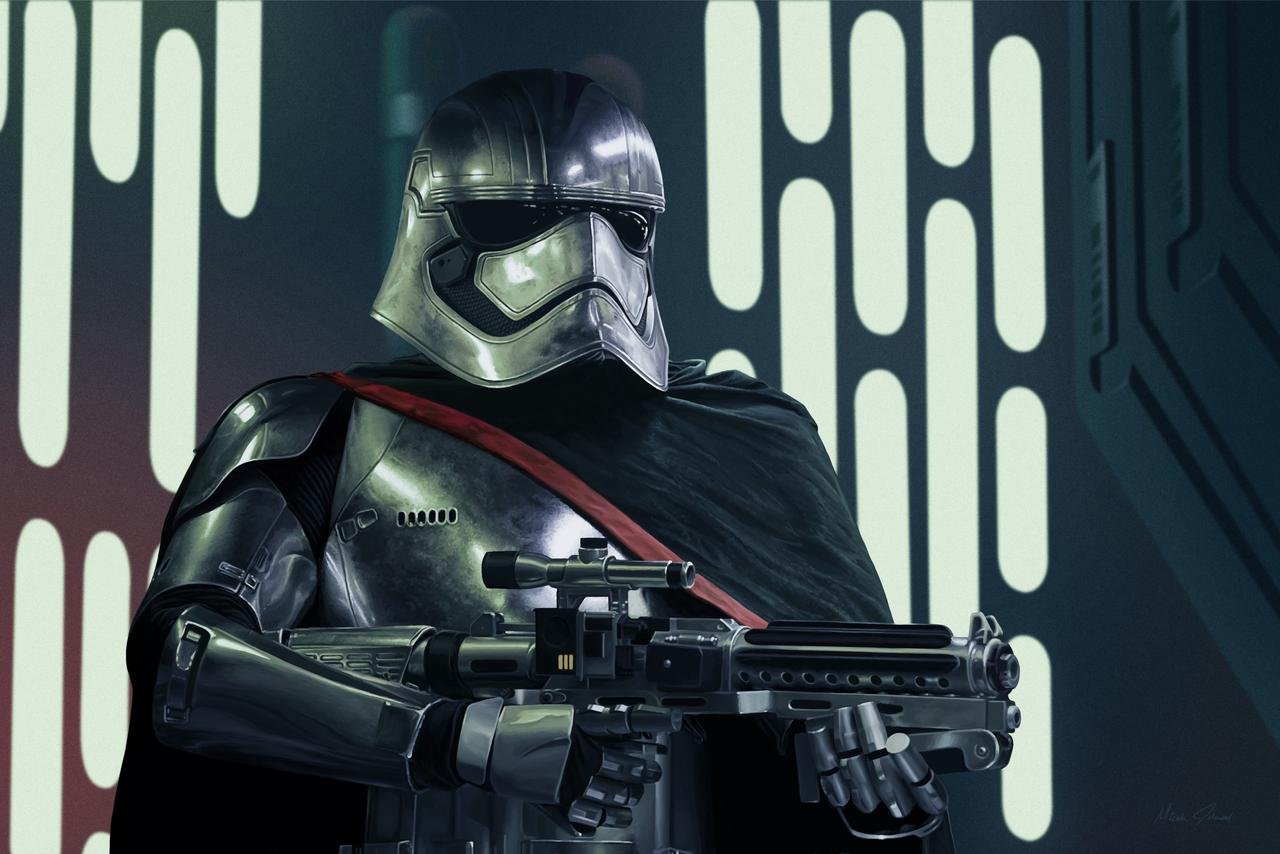
Sea_Marshall: Captain Phasma TFA
Sea_Marshall replied to Sea_Marshall's topic in Captain Phasma Build Threads
Got the official word This was a crazy intense build with a roller coaster of successes and failures. In the end, I've emerged far more confident working materials, met some great people, and learned a great deal of experience. What a crazy build. Holy smokes. I've got a TRamp sound system in the works with Gwendoline Christie spoken lines for a variety of video game content. Hoping to work that into the chest with a handler on the buttons. Can't wait to give that a test run. I'm honored to have joined the FISD and have been assigned a TK designation. In the final set of photos I sent, I had just received my gaskets and neck seal from Geeky Pink. Teresa was great, as I had also used her template for the initial cape build. What a boon to the community. The rubber gaskets from T&A looked great but restricted too much movement for comfort, so I had them swapped out which improved fitting and mobility, which is what I has struggling with. Thank you for following along on this build log! -
Sea_Marshall: Captain Phasma TFA
Sea_Marshall replied to Sea_Marshall's topic in Captain Phasma Build Threads
Tightened up the belt and abdomen section. The velcro attachment worked out easily for placement. The makeshift harness for the thighs did a good job as well. It kept the thighs up at a reasonable height to prevent the traffic jam of leg armor. An improvement overall. Looking forward to the cloth gasket upgrade. That should address any fitting issues I'm having with the rubber set. Huzzah. Coming to a close. -
Sea_Marshall: Captain Phasma TFA
Sea_Marshall replied to Sea_Marshall's topic in Captain Phasma Build Threads
I got to work on some fitting changes. For one, was the way I wear the boot armor. I had a problem with the outer shin armor sliding around and knocking on the heel. After simply moving the heel under the outer shin, it actually allows me to bend my knees without putting stress on anything. https://i.imgur.com/h6HvkvL.mp4 I made a rookie error and didn't get a harness for the costume until just last night. My thighs were attached to the rubber belt that held the boxes, cod and posterior. I was hoping the snug fit of the armor, plus rubber gasket, plus a strap attached to the belt would do the trick. Nope. Gravity is still doing its thing. So I made a quick harness based on my own thought process, but I have opened an inquiry to Geeky Pink on Facebook for a set of gaskets, harness, and bike shorts. In the mean time, I've modified my set up for a better fit: To resolve the abdomen/belt gap, I've added a 2inch strip of nylon around the abdomen and put velcro strips on the belt to help hold the position. The thigh harness seems to do the trick. It's just nylon belting and clips. The straps go down the back of the thigh and clip in the rear. The straps can be cinched to pull the legs up. Test fits seemed to work after adjustments. I don't think we'll see the straps with the cape on, but there's plenty of room to move things around. -
Sea_Marshall: Captain Phasma TFA
Sea_Marshall replied to Sea_Marshall's topic in Captain Phasma Build Threads
Test fiiiitttttt Huzzah. Now to make it comfortable. I found that my belt was sagging under the weight of the thighs. I plan to attach the belt to the abdomen section (via nylon+velcro hinge) to steady everything and help keep it high and tight. Once the thighs are in the proper place, the knees will open up more and it won't be such a train wreck in the shins. I made a black nylon Boba-thong to assist with keeping the cod down. It attaches to the posterior armor. I feel the rubber gaskets need to go. I made them work for what they were out of the box, but I feel a tailored set of cloth gaskets would assist with mobility. The rubber set was snug and made for restricted, snappy movements. Still need to steady the shins and boots more than they are. I really don't think the mylar tape is a good idea. I think it'll damage the finish. ...but I guess that means tape the same section every time after that and it's a done deal... but I'll wait for the need to arise. HUZZAH. Test fit. What a chore. fun costuming exercise. -
Sea_Marshall: Captain Phasma TFA
Sea_Marshall replied to Sea_Marshall's topic in Captain Phasma Build Threads
In the down time waiting for a final suit up, I've squared away a few more things I didn't think I'd do: I attached the thermal det to the lower back plate with a screw and washer. Figured it's optional for TFA, but hey, there it is. Maybe one day the wind will pick up the cape and I'll see it, lol. I used the TLJ detonator for placement and paint. I used the black matte enamel on the end caps and back panel. Taped off the left cap to make the pin stripe. Last thing is I picked up some Mylar metallic tape. 2 inch x 72 yards. Looks good! This can be used to help keep the shins closed if I anticipate a lot of movement, maybe a parade. I guess a quick fix where black tape won't work out. A bit of hesitation, however, since the chrome finish can be lifted by tape, or the residue leaves impressions on the finish. On the upside, I've got glue on the surface that might get lifted instead. Something to keep in mind when and if I use the tape to secure something. -
Sea_Marshall: Captain Phasma TFA
Sea_Marshall replied to Sea_Marshall's topic in Captain Phasma Build Threads
put on a few finishing touches on the captain's cape: Pockets, straps, and some extra stitching on the seams are good to go. It is worth noting that I glued the two straps on the cape hem. If they were to be sewn on, we'd see the stitches in the stripe. So, they're clamped and drying. For the final fitting we're going to sew folds anchored into the cape to hold the look and shape around the shoulders, then install the cape clasp at the right shoulder. -
Sea_Marshall: Captain Phasma TFA
Sea_Marshall replied to Sea_Marshall's topic in Captain Phasma Build Threads
Did some work on the lower legs. Yay. I could lock down the ankle a bit better, but it's in a good place right now. Here's a look at the completed leg: I have the upper shin armor strapped down with nylon and velcro. That strap holds down the back plate and the front plate velcros to the strap. It kind of works. I need to revisit each of the pieces and really dial it in, but its in a good place. For the toe, I went with an elastic strap under the arch of the boot to pull the pringle shaped thing down. I put a small velcro tab on the back end of the toe armor that the pringle can grab onto, meanwhile the elastic keeps it down. When I move my ankle for walking, you can see the pringle slide up the shin and return to its position after the step is done. Armored Ankle and Toe Movement Need to run interference for my wife so she can finalize my cape lol. Then, I think I can suit up for the first time. -
Sea_Marshall: Captain Phasma TFA
Sea_Marshall replied to Sea_Marshall's topic in Captain Phasma Build Threads
Another small update: Got the uppers sorted out. The shoulders are on nylon strips velcroed to the shoulder bell and yoke. The chest is wrapped around my neck and clipped at the rear. I explored other ideas for attaching this, but didn't want to commit to any one way. The cape and helmet will easily cover this attachment method. I'll likely add velcro/nylon tabs to the sides where the back and front align. The abdomen corset is giving me a hard time on the way the chest sits. The upper armor overlaps the corset, but causes additional strain to how it sits, so I might need to revisit a way to secure the shape. I've found the chest tends to raise up if it doesn't sit right. Been procrastinating on the shins, but they're up next. -
Sea_Marshall: Captain Phasma TFA
Sea_Marshall replied to Sea_Marshall's topic in Captain Phasma Build Threads
Quick update: Everything, including the helmet, blaster rifle, and cape, live comfortably in the Husky bin, with individual pieces wrapped in cotton bags. Huzzah. To get started, I filled in the black bits on various parts with a matte black enamel. Same stuff I've been using on the helmet. Its a nice flat black that pools and settles cleanly without much for brush strokes. Here's a before and after of the primary helmet: Everything got its Elmer's glue and paint makeover, which is a bit of black paint in a puddle of glue, mixed to the darkness of preference. The glue mixture can be applied in blotches with more paint for a darker application, or dabbed/dry brushed for a foggy effect. I feel much more confident handling this newly dirtied set of armor. It's a relief actually. I was always looking at any irregularity, smudge, or fresh scratch, as minor as they were with intense scrutiny. But now I like it. It will come off with a wet wipe or a damp cloth. A photo shoot in the rain would be awesome, but also awful. The main goal was consistency across the costume, while having pockets of clean chrome for pizzazz. It's dirty enough to be seen from like 6 feet, but at 10 feet it nicely subdues the bright chrome. The beacon of light it could have been would have been fun, but I like the peace of mind heh. We kind of forced a test fitting to get some cape measurements. Also decided how to strap the chest plate down. Still need to set up the shin and boot rig. The cape is weird. It felt heavier, or at least bulkier before I added the gloss coat gel. Now its wispier and not as flowy. It might need some massaging to jog its memory of how to be a cape. Now I'm lazy because it's so close and conveniently packed into a kit box. Still got that TFA anniversary target, so I have that going for me. -
Sea_Marshall: Captain Phasma TFA
Sea_Marshall replied to Sea_Marshall's topic in Captain Phasma Build Threads
I thought I'd be more productive, but the time off has been nice. Been pretty lazy, but the build is in a good spot now. Got the chest/shoulder rig thing ready to try out. Seems sturdy and comes up my arms high enough. With the back yoke on these should tuck in nicely. Waiting on the day I can put time in for the test fitting and measurements. This is an encouraging photo. Everything except the cape and helmet are in the box. A little First Order tetris organization and I'm sure the cape will put a snug finish to the bin. Hoping to get the cape length finalized, whole kit weathered, and final strapping tomorrow. Fingers crossed for some test photos! -
Sea_Marshall: Captain Phasma TFA
Sea_Marshall replied to Sea_Marshall's topic in Captain Phasma Build Threads
Not much here, but I got the gloves and gauntlets sorted out: I was going to glue these to the gloves, but it wasn't going as planned, so I went with velcro tabs in the fingers and knuckles. It works; when I curl my hands it pushes on the velcro. Speaking of velcro, I ran velcro tabs along the gauntlets and they can slip on and off. A downside to this set up is the abs gauntlet is thin and feels like it could tear if yanking at the velcro a lot. Once sized, it should cling to the gasket at my elbow. Test fits felt good! Next up is the shoulder gasket and shoulder rig. -
Sea_Marshall: Captain Phasma TFA
Sea_Marshall replied to Sea_Marshall's topic in Captain Phasma Build Threads
Screwed down the cod plate nylon to the rubber belt to the front belt boxes. Kablam. The right hip boxes are screwed down similarly and the cloth pouches move freely to hide the buckle that closes on the left hip. Posterior is velcroed to the belt for placement. Next up is to attach the drop strap to the thighs. Finished up the cape gel coat and put a few layers of red paint. 3 parts gel to 1 part black paint, mixed and applied with a brush. You can see the before and after on the fabric. Splattered a bit of the gloppy goop for effect. Took a swipe at the red stripe. May do another layer. Pockets and straps are coated! I think all the pieces can come together soon. -
Sea_Marshall: Captain Phasma TFA
Sea_Marshall replied to Sea_Marshall's topic in Captain Phasma Build Threads
These are awesome! Thank you. I went looking for them but I guess I didn't look in the right place. -
Sea_Marshall: Captain Phasma TFA
Sea_Marshall replied to Sea_Marshall's topic in Captain Phasma Build Threads
Ready to pick this up again. Got some time off next week and hopefully will be able to wear this thing by Dec 18th, which I believe is the 5 year anniversary to The Force Awakens, so I'll attempt to hit that date for funsies. Here are the two helmets: One I got from a buddy, and the other came with the T&A kit. One helmet had the nose attached, and since I was sending everything to get chromed, figured I'd quickly prep the 2nd helmet and send it off as part of the batch. There are notable differences in the surface work because I sent one prepped for chrome, where the other was only sanded to 220 and had some partial surface work in the grooves, but didn't fill all the pitting. This was a lesson in surface prep before it went in for chrome. I wanted to see how bare I could send an item and compare the prep work that would have been done for chroming. Seeing as the work I had done may have impacted the surface prep of the chrome, sending a bare finish with no filler was the test. The outcome: not bad but my prepped helmet is the one I'll be wearing out. The other is a fun shelf piece, emergency back up, tester. So I got some work in on the tester: I used a matte black enamel on the frown and eye line, the used a drop of black acrylic paint to several parts Elmer's Glue-All. It mixed to a light gray. I had seen a number of videos explaining the use of glue and paint to create a foggy surface weathering trick that I really like. Because both the acrylic and Elmer's is water soluble, I should be able to take off the weathering without too much fuss or surface damage to the chrome. Everything was applied using a ripped sponge to create an erratic texture to the application of the glue, which I lightly dabbed along the lines and in choice areas. Does anyone have reference links to high res Phasma images? I have an assortment of D23 images, but they're not really high res. I don't think I'll be applying weathering exactly to what I can see in the images, but where it seems appropriate and to give an even layering of coloration. The chrome is very bright, pretty much a TLJ bright, and the weathering can't really be seen from afar, but up close, will be noticeable and a fun detail for onlookers to see when up close. Wondering if I need to go darker on the weathering. Test helmet is all for this. Side by side: -
Sea_Marshall: Captain Phasma TFA
Sea_Marshall replied to Sea_Marshall's topic in Captain Phasma Build Threads
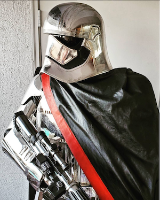
Heyo. Phasma is ready to be handled! I still wear gloves if I can, but fingerprints, smudges, and eventual wear and tear is going to happen. I've already dropped two pieces on a concrete floor today. That was great... nicked a corner of a belt box, but the shin took it like a champ. Whew. I should work over a carpet, heh. There's lots of stuff I need to get working on and additional research here on the forums to figure out how to strap this thing to my body. I've got some ideas to pencil out. Phasma Leg Day I started on the boots, found that the left foot is reallllly snug and I may want to replace the toe armor at some point to relieve the pressure on my foot. That sucks, but it'll do for now. Did a dry fit of the shins and shin/boot armor and it appears to be a good fit, but didn't take any photos while they were on. So this kills me a little... check out this heel: It's got like a quarter inch or more on either side and these boots are tight on me. I can't imagine filling that heel. The toe armor itself is already biting my foot, even if I went to my proper size, I'd imagine it would be harder. I may just have to order another set of boot plates, but, we'll go with what I have for the time being. On the upside, the shin/boot armor part goes over top of the heel and neatly hides the gaps. Maybe I can fill it out if necessary. Walking seemed to be okay. On the topic of leg day, I took a close look at the thighs. Remember all that reshaping, cutting, fiberglass, etc? Well, my first thigh didn't look so good because I can see the pattern (this is my bad for not filling it correctly) but the other was good to go. In either case, this will be behind the cape, so it's more of a "ah, so that's what happens." I revisited the F11-D and put on another mirror coat. Not bad, not nearly as reflective, but should meet the color reqs. I found a guy online who sells resin casts of this rifle, so I may pick one up down the line as an upgrade. The parts are even hollowed out for LEDs. I picked up the FISD 3D files, so I may give it another go, but at this point, I am so sick of sanding and filler primer that I just want to quit 3D printing altogether. Anyway - I'm going to get to work on the belt. I plan to screw the belt boxes to the rubber belt. I attached the covers for the cloth belt pouches, easy peasy, and they hide the buckle well. Once I have the spacing worked out, I'll drill in the boxes and sort out some velcro for the cod and posterior. Following that, drop down straps for the thighs. Whew, lots of work to do and I don't have what I need right now to make any more advancements. Now I'll be focused on one part at a time. Getting there! Ugh, and I still need to dial in the cape. Then weather everything. I tested the glue and black paint thing I want to do for the foggy armor look. Success. Comes off with water. Pretty sweet way to weather and that should disguise most of the imperfections and inevitable scuffs and scratches. On the upside, once the glue goes down, handling the surface becomes much easier and sort of gives it a second skin. I have to schedule a call with Chrome Factory for care and feeding of the armor and will share the knowledge I gain once I apply their techniques. More to come. -
Sharkbait's TFA Captain Phasma Build
Sea_Marshall replied to sharkbait's topic in Captain Phasma Build Threads
Congratulations! I was just wondering about your application as I started to tinker on my kit. Great work! I screwed my belt boxes on for a permanent attachment. Washers on the back to hold it to the belt and so the screws don't pop out. Chicago screws would be less permanent, however, they have a mandatory depth/thickness between the nuts to meet so they don't have a gap; you'd have to countersink one into the box. I suppose you could rivet or glue on velcro for the boxes as well. Congratulations again!
