

Sea_Marshall
-
Posts
77 -
Joined
-
Last visited
Content Type
Profiles
Forums
Gallery
Articles
Everything posted by Sea_Marshall
-

Sea_Marshall: Captain Phasma TFA
Sea_Marshall replied to Sea_Marshall's topic in Captain Phasma Build Threads
...and we're back from Phasma's Vegas Getaway with Chrome Factory. At this point and time, the costume was chromed about 5 days ago and has been curing for transportation. It was recommended not to mess with anything and allow the coat to cure for a full two weeks, so she'll sit back for another week or so before I get into strapping. Time to get into the blaster rifle and finishing the cape. This procedure was a chemical chroming process, same as I had set out to do myself, except a blow torch and 20 years of experience went into the effort, heh. The finish is fantastic and my feelings on the work is "best that could have been expected". It's not perfect and based on my personal experience, is forgivable considering the undertaking required to pull it off at this level. There are tell-tale signs of chemical burn, debris, unfinished edges, and runs around the armor that I faced myself and will need to touch up some choice areas. I will spend some time weathering and fixing some flaws and use that exp. as basic training for upkeep and maintenance. These critiques are few in comparison to the entirety of the costume. At 3 inches, I can see the flaws. At 3 feet, not so much. A little touch up and light weathering will go a long way and it's going to knock the socks off of spectators for sure. I'm still convinced of weathering the costume and once I can give it more attention after its cured, will see what options I have. Enjoy the shiny box opening for QC and inventory. Great to have everything back in hand. -
Indie's TLJ Phasma Build
Sea_Marshall replied to indiechixor's topic in Captain Phasma Build Threads
https://imgur.com/a/tEzXb2i I was referring to that box thing. I could have taken another 1/8th inch or so off. Minor detail on my set I overlooked in my haste. -
Indie's TLJ Phasma Build
Sea_Marshall replied to indiechixor's topic in Captain Phasma Build Threads
I'll echo the "check the screen references" note. CRLs are a great guide, but screen references are the best if available. Something I noticed after the fact was that I didn't trim the gauntlet boxes (the part under the wrist) thin enough. Mine are a bit thick, but shouldn't be an issue. I face palmed after I realized what I did, only after gluing, painting, and sanding. Doh. I haven't showed attachment method yet (since I was waiting for chrome) but I left strips of abs on the side of the lower attachments. I intend to run a velcro strip along that piece and join it to the gauntlet along the inside. This makes it easy enough to adjust as necessary but I plan to leave it attached for slip-ons. Also, Holy Smokes! You're taking on the 3D printed helmet. Good on you. It's a worthy challenge for sure. You look to be on the right path. -
Sea_Marshall: Captain Phasma TFA
Sea_Marshall replied to Sea_Marshall's topic in Captain Phasma Build Threads
I had about 1/3 left in my original can of Spaz-Stix so I black glossed my blaster: This can is 3.5 oz and is like $13 each. It was very shiny and chrome. So, that method is proven to work, as many have done before me. Also from what I've learned from those before me, is that aerosol paint, when coated with an aerosol clear coat, tends to turn the mirror to a dull gray. I knew this. Touching the mirror chrome finish easily scratches off the layer. Even when cured, it's pretty easy to chip, at least from what I found. The next test was to see if the uni-coat, when top coated over the mirror chrome, would kill the mirror. I also wanted to ensure if the coat did it's job, it wouldn't tint gold, so I added a bit of violet to counteract it. Note it reads "silver metal" has an optical property...etc. Ah well, just confirmed my suspicions. Can't clear coat aerosol paint. Is there even an answer for protecting a paint coat? Or just touch-ups whenever you want to suit up over the years? This is a before and after. Left is the clear coat, right is without. I'll gloss black this again and hit it with a mirror finish, then just roll with the punches. -
Sea_Marshall: Captain Phasma TFA
Sea_Marshall replied to Sea_Marshall's topic in Captain Phasma Build Threads
"This is not how I thought this day was gonna' go" -- Han Solo Learning indeed. It is both a bummer and a relief to pack up the garage workspace I've been working in over the past 4 weeks. Phasma is packed and ready for a Las Vegas getaway. My Mrs has decided she'll make the drive. Sort of a 'ladies night' lol. She gets a few days to herself and I don't have to pay shipping. Deal. I'll be signing off from my work till about late October when I can crack open a shiny box of goodies. Tomorrow will be a test fitting for the cape! I still have the notes coming up, and a WIP of the gel coat and stripe. Still plenty of fun to be had. The last thing I have to do is treat the waste water for disposal. Another hidden side quest of a chemical chrome process. Would I recommend this method to anyone? No. Not at all. Not at this scale and not with the resources I have on hand. We all know that having the right tools to do the job will make or break a project. I've worked on a number of projects in the past and I've learned to get the tools to do the job right and not to cut corners. I felt I knocked out the prep and even took on resizing fiberglass, which was probably the highlight of this build for me. Well, working this kit was an undertaking and I really, really wanted to chrome it myself. Alas, I don't have the right tools to do this job and I'm not going to cut corners. I gave it a shot, encountered problems, found the answers, and drew my conclusions. Cape, await Phasma's return, weather the kit, strap in, and suit up. Huzzah. PS: I'm not sending my blaster rifle to get professionally done. It's a 3D print that I'm not totally crazy about and I don't want to hassle the guy with having to deal with it. SO, I'll use this as an opportunity for a test: I'm going to black gloss the blaster, use what Spaztix I have remaining, and top coat it with Uni-Coat. This will do two things: Answer my question of protecting an aerosol spray chrome finish, and test the durability of a professional job compared to the wear and tear on a painted piece. -
Sea_Marshall: Captain Phasma TFA
Sea_Marshall replied to Sea_Marshall's topic in Captain Phasma Build Threads
Posting this to make me feel better. I found a glass cup that was going to be thrown out, so I chromed it to ensure that I'm taking the proper steps. I did the process so many times I just slammed through this in like 10 minutes. If my costume were made of glass, this would have been a cake walk. -
Sea_Marshall: Captain Phasma TFA
Sea_Marshall replied to Sea_Marshall's topic in Captain Phasma Build Threads
Well, I confirmed that the red color is covered by the chemical process, however, I didn't take much care in that piece and the bottom line is: it didn't work. So I made a proper test piece: The Heels I'll say the black gloss had a brighter appearance, and I noticed the newly glossed heel, when washed, sheeted the water off better than the uni-coat. In the end, however, this is beyond my skill, patience, and materials. This one is a job for the pros. In my experience with this chroming process, from the very first attempt on my helmet to this chemical chrome kit, if I had stuck with the black gloss and spaztix, perhaps Alclad, I'd have made better progress and at a "reasonable" cost. In either case, $300-$500 minimum is my guestimate for the pay-to-play price of the finish. $1500-$2000 is the professional route. Ye-owtch. I hit up Chrome Factory LLC based in Las Vegas, NV. Referred by fellow Phasma's on the Facebook Group. I hear he's got dozens of Phasma's under his belt. This is the guy. On the upside, this quarantine lifestyle helped me purge my debt. Time to hop back in and stick a fork in this build. -
Sea_Marshall: Captain Phasma TFA
Sea_Marshall replied to Sea_Marshall's topic in Captain Phasma Build Threads
At least I've confirmed that the base color doesn't matter when using the chemical process so long as the gloss finish is good. That was an expensive test confirmation... Good news and bad news. The good news is I now understand why things happened the way they did. The bad news is, I may have to repaint the whole kit. Before I share my solution, which at this point I don't know if it will even work, I want to document what the heck went wrong and why I'm so annoyed by it. So here's my educational rant. Here's the jist of the errors: This was a STEEP learning curve because not only did I have to prep the entire object to be chromed, in this case, the whole costume, but I have to prep all the chemicals and apply them in order and I won't know if the sensitizer worked until I spray the chrome! You would have no idea if it worked until you've used all of your materials in the process. If it fails, which is a high probability in my experience, I have to remove the silver, and literally, LITERALLY, wash-rinse-repeat. I took a quick inventory of my supplies during clean up of this session and I give you this telling photo: The 2-part silvering solution retails at $160. That 1-inch of used solution equals $50. I failed on those test parts asking "why am I seeing these results?" From the Angel Gilding website: Question: Why does the water bead up? Answer: Plastics, such as polyurethane (Clear Uni-Coat) repel water because, unlike glass, they have a very low level of surface energy. Water molecules on the surface are more attracted to each other than they are the plastic - they form beads and roll off. The answer is to increase the chemical attraction between the plastic and the water. Ok, so the the Uni-coat... used for the gloss coat... repels the freaking wetting agent, sensitizer, and silver because it's ONLY diluted by 95-99% distilled WATER. So the answer is to increase the chemical attraction between the plastic and water... Want to know how? "Flaming the Base Coat" by using a propane torch's flame to ionize the air around the surface so the surface energy increases. Yeah, sure, let me spend way too much for a propane torch, refill canisters, and a lot of room for error. Why didn't I know any of this? Why did I just suffer and fail all day to discover this? Because in the tutorials for the spray chrome, they're not toting a freaking blow torch. In the description of both the basic and master spray chrome kit, nowhere in the "You Supply" section does it say you need a blow torch. However, in the instruction manual of the steps to take, the step following the rinse but before the wetting agent says to Flame the Base Coat. Silly me. I thought that was optional way to speed up the silvering process. No. Re-freaking-quired, because the Uni-Coat repels the hydro-based chemical process. I feel misguided by angel gilding. If I were chroming panes of glass, I'd be a pro. ::Breath:: So here's what I'm going to do in my next session: I've confirmed that the surface color does not matter once the chrome goes down, so long as the base has a mirror like finish (gloss) I've confirmed that the Uni-Coat repels the water based application of... everything. I've concluded I need to increase the chemical attraction between the surface and the water -- and I'm not blow torching anything. So I'm curious -- Does gloss paint repel water the same way the polyurethane does? If it doesn't repel water in the same way, then I'm going to lay down a gloss coat of PAINT (not Uni-Coat) and hopefully get a better chemical bond on the surface for the chrome. Because once the chrome goes down, it will mirror the gloss coat, and then the Uni-Coat can go over top of it all to seal the chrome. Since it's 85 degrees at 11:30pm, I decided to lay down a Black Semi-Gloss and a Red Gloss paint on either side of what was to become a Jawa Ion Blaster: This should be ready to wash, rinse, apply wetting agent, sensitizer, and chrome by the time I get back to the garage. Since color "shouldn't" matter, I'll see the difference between black and red, but also semi-gloss and gloss. Pretty sure I'll just want gloss. If this works, I think I can pull this off with what I have left without having to buy new materials, aside from the gloss black. If it fails, well, I may have to leave the chroming to the professionals. I'm not about to buy in for a second round of chemicals on a possibility of success, I need more assurance. I'd much rather put that on the pros. Cheers to a new day. End rant. -
Sea_Marshall: Captain Phasma TFA
Sea_Marshall replied to Sea_Marshall's topic in Captain Phasma Build Threads
Don't hold your breath. This is considerably more challenging than anticipated. I need to sit down, take notes, and figure out what the heck I'm going to do. In each attempt, I cleaned the surface, rinsed with distilled water, used wetting agent followed by sensitizer. Let it sit for 30-45 seconds, then rinsed with distilled water. Next came the two part silvering. Video: Spray Chrome Video: Silver Remover Exhibit 01: Failed SO what's going on here... color burns, liquid runs and a general mess. Removed all the silver with the Silver Remover, which is great stuff, and went for another shot. Exhibit 02: Failed More liquid runs in the application... Even on the 2nd attempt, I was seeing a splatter issue in the application. Exhibit 03: Failed Take two, more splatter effect...something isn't making sense here. Exhibit 04: Shiny I spent more time washing the piece, used a bunch of distilled water to thoroughly rinse the piece. I then sprayed a load of wetting agent on the surface. I then sprayed a load of sensitizer on the surface. When I mean a load, I mean more than I thought would be reasonable. I saturated the heck out of this thing in each step. Then I hit it with the spray chrome... Hey, not bad! Exhibit 05: "Show the me one who's safety deemed such destruction" When they said this was a wet process, yes, yes it is. The amount of distilled water being used is ridiculous. Distilled water is used to mix every ingredient, rinse the part, and rinse again after the chrome is laid. Each time a failure occurs with the chrome, its back to washing it, then rinsing with distilled water. At my current rate of water usage, I might as well buy every gallon in stock at the grocery store. I've been at this chrome thing for... 4 hours? And I've got one piece to show for it, and it's not even that good. The edges could use some touch up. Woof. Not sure what to make of this so I walked away to collect my thoughts. -
Sea_Marshall: Captain Phasma TFA
Sea_Marshall replied to Sea_Marshall's topic in Captain Phasma Build Threads
Sanding fixes and the new Uni-coat was a success! Annoying having to have made fixes, but third times a charm! CHROME TOMORROW. Huzzah. I hope it works out. This time I took extra precautions... I ordered spare measuring cups, so I don't have to reuse them, rather, use and toss. No more debris! I had extra aerosol Spra-Tool cans on hand this time. SO, when I did two large pieces and the can started to get cold, I just popped it off and loaded a fresh can at room temperature -- this ensured the pressure was consistent and I didn't need to wait for the can to cool. Additionally, I found that spraying off to the side to get a spray flow THEN moving it over the object kept the sputter to a minimum. This also applies to rattle cans to prevent sputter. Don't know why it took me this long to consciously make that connection when working on these last parts. So why did I use all these one use things? Because I don't own an air compressor, nor do I have the spray gun rig. I suppose if I were to open up shop and use that stuff on the regular, it would be worth the investment, but I managed to stagger through this. On the upside, now I've got a feel for the spra-tool and I hope to nail the top coat with whatever Uni-coat I have left. Tomorrow will see whether or not I did the base coat justice. On the upside, TFA gives me the option of weathering the surface and with that, I can hide the sins, or at least blend them to appear intentional. Chrome and top coat this weekend! Game on. ps: I've seen lots of folks use a black gloss/urethane base to help give the chrome a better mirror. I've also heard the color doesn't matter, so long as you've got the clear mirror base. I've put quite a bit of trust into Angel Gildings products and I guess we'll find out tomorrow. -
Indie's TLJ Phasma Build
Sea_Marshall replied to indiechixor's topic in Captain Phasma Build Threads
Heyo. Got bored waiting to work on my kit. Here's a quick reference that I could tell. It looks like you have spare parts because I believe KB provides the FOTK parts and additional parts to upgrade to Phasma. Just realized how different the TFA and TLJ kits are. TFA has additional shin armor, where TLJ has spats - convenient. Belt is different too, among other things. Good luck on the build! -
Sea_Marshall: Captain Phasma TFA
Sea_Marshall replied to Sea_Marshall's topic in Captain Phasma Build Threads
Nothing cool today. Just a bunch of failures across the whole range of things that can go wrong. I was amped to finish this final clear coat for chrome, but not today... The chest plate was first up and the clear coat looked good until I got a closer look... dried urethane debris was left in the mixing cup (despite my efforts to truly clean it) and so it propelled that into the finish, despite a pretty clear reflection I sanded the thighs to 220, didn't have any other grits on hand, so I skipped to 1k and 2k wet. The surface looked good and I put down a clear coat. To my dismay, the deeper scratches left from the 220 were vibrant in the finish, which means the chrome will amplify it further. I moved on to the helmet, did two passes on a side and the nozzle clogged with debris. This was a new spray rig, but that debris just ruined everything. I swapped out the nozzle, changed aerosol cans, and finished the coat. The finished coat looked awesome on the front, but there were no less than four runs on the back. I guess I passed over too close or too heavy. I'd go with too heavy as I was looking to get some good coverage, but alas, a runny finish... I still had like 2oz of clear coat left, so I decided to empty the left over into a red cup and clean out the sprayer with lacquer thinner. I figured I'd let the clear coat set, do some quick helmet touch up and finish it off. While I was doing so, I returned to my station to find the urethane melted through the cup bottom and poured onto my makeshift table (it's a $12 piece of plywood on saw horses). I didn't care about the table so much, rather the fact I had to make another clear coat batch. So I walked away from this utter failure of a session. The clear coat dried, I sanded everything down, and just put down a fresh coat of filler primer... Back to where I was two weekends ago... on the upside, of 54 items to clear coat, only 4 are being held up. What I've learned in just about every step of this build is to take it slow: -- Sand in small batches and take your time to get them scratch free. -- Fiberglass/Mix Resin in small batches. -- Bondo and gap fill in small batches. -- Clear Coat in small batches -- I slammed out the entire kit and the last 6ish items failed. I reworked those items and did the work, while working on the next parts. The first items came out good, but the last items, chest, helmet, and thighs failed. The result of which caused me to repurchase materials because I had to use more than anticipated. I reworked the thighs because I was set back a week, but neglected to properly finish them. Which resulted in a fresh repaint, which I should have done anyway. I planned to even! I just didn't because I wanted to push through. Should have just taken it slow. And now I am. My momentum has hit a wall, but on the upside: only 4 parts to go. Bleh. Gonna finish the surface prep, again, during the week and hopefully, hopefully get a nice clear coat. I'm stuck in this surface-prep-pre-chrome-purgatory. And you know what's killer? Getting the chrome right and THEN nailing the top coat. A failed top coat on chrome means you sand it off, hit the chrome, and go back to the base and start over. Huzzah. I suppose now I can slow down since I'm in the final stages. Cape still needs to be modified. I can stand to lose a few more pounds. And I just need to clear coat, chrome, clear coat. Then I can start strapping. Once that final coat goes down, it's a sprint. It's more about finishing the project than getting to wear it at an event. I've got a four day weekend next week, so I'll be prepping to knock it out once and for all. -
Sea_Marshall: Captain Phasma TFA
Sea_Marshall replied to Sea_Marshall's topic in Captain Phasma Build Threads
Had a solid session today and made some great progress on a few things: My wife carried on with cape progress and I sanded until I developed a blister and filed my nails to the skin lol I removed the tape from the fiberglass resizing job and was pleasantly surprised. Not bad! I just took a dremel with cutting blade and sheered off the excess and sanded it down with some 80 grit. I couldn't tell if I was dressed for the grocery store of for working fiberglass... small victory following a three day fiberglass job. This was a learning experience for sure. Confidence boost x100 This is officially the largest bondo job I've done. I've only ever spot filled in the past, but this was a good learning experience as well. Bondo's got like... 5 minutes of work time once you add hardener? You can see the left thigh is super goopy where the right side is considerably better. I found that smaller batches of bondo application is preferable. I ended up wasting materials because it would harden on my plate. Pro tip for other first timers out there. Following the literal slap-dash application of bondo, I sprayed plasti-dip over the interior work and its as if the fix never happened. I made sure to layer the fiberglass to be close to the original thickness. Pleasantly surprised. You can kind of see where the checkered cut is. Not too shabby. The whole time I was just hoping this thing would work out. No going back. Some 80 grit sand paper took the excess bondo off and a 220 grit smoothed out the rest of the thighs. In the end I sanded both thighs down to 220 because I had the clear coat already on these (before I decided to resize, which I'm SO glad I did despite dreading the work). Then a fresh coat of filler primer went down and is drying over night. 1k and 2k wet sand tomorrow. (disregard the splotchy paint job. it's getting cleaned up in the next step) I superglued the abdomen boxes down a while back, but I found that stretching the corset around my body requires some flexing of the parts, so I worried the boxes would just pop off (because super glue is brittle) so I drilled screws into them and called it good. Unfortunately, I bought those screws for my belt boxes, so I'll have to get another set. Might plasti-dip the interior again to cover up the screws. Yay, and now, cape progress! Pockets and straps cut to size. My Mrs has made some notes on her cape build (her first one) and I will add those notes to this WIP once she's done. We're using the TLJ measurements (since TFA does not mention sizes, only location) and you can see those noted on the corresponding item. And then my Mrs. mentions she can't make any additional changes to the cape until she can see me in it, with armor and boots on. So... I did my first partial suit up! This is the most I've been in costume since I've started this build. The chest was scheduled to be re-sanded, and it was done following this image. There was some misting going on from the clear coat, so it doesn't look as nice in this image. (but them shoulders! mmm hmm) Also a back image of Phasma from Disneyland for reference. Also realized the abdomen area needed to shift over a bit, so it's unaligned. Ah well. There's some work to be done on the cape. The middle panel is going to be reduced by a few inches on each side to bring the seams closer to my back. To note: The CRL (level 2) states "the cape is three panels with seams on either side of the back plate." Well... there's seams on either side of the back plate... but every reference photo I've seen is closer to the backplate than mine is, so we're going to bring it in a bit more so the pockets line up. There's also some length issues going on but we didn't hem anything until this test fit. We've found that the Geeky Pink measurements weren't quite what I needed, but it was a great help and landed us in the ball park. The cape was remeasured and will be tailored to hit the marks in another session. (More seamstress notes to come!) Lastly, the red textile paint showed up. Huzzah. That's going to be a fun session when the time comes. I think tomorrow is just surface prep on helmet, chest, and thighs. Then Unicoat can go down. Again. If the gloss coat isn't beautiful, it'll be magnified by the chrome. Like many before me, I'm stumbling through this step and any failures results in a clean sanding to try again. Cheers to a new day. -
Sea_Marshall: Captain Phasma TFA
Sea_Marshall replied to Sea_Marshall's topic in Captain Phasma Build Threads
Thank you for the kind words! I've been going pretty strong following a 5 month hiatus. Great to hear you're starting your journey! It is a bit overwhelming, I agree. WIPs help keep me on target and documenting my errors for others to see is part of the learning experience. -
Sea_Marshall: Captain Phasma TFA
Sea_Marshall replied to Sea_Marshall's topic in Captain Phasma Build Threads
Bleh. Day 2 of fiberglassing. This time I remembered to close the balcony door. I am not a fan of fiberglass. But the end result will be awesome. The first thigh held up good! I let it sit over night, about 14 hours before I pulled out the spacers. Solid. I taped to the edges and put down the last two patches. Once dried, will have to cut off the excess, dremel it to the edge, sand it clean, and coat the interior with Plasti-dip. And then comes bondo. Yay... bondo... and sanding. and filler primer. and sanding. then wet sanding. then washing. then clear coating. then chrome. If keep saying the steps enough times, it'll just happen on its own. The center glass went down on thigh two, following the same set of instructions: Just needs to dry, then I can glass to the edge! and then comes bondo... and sanding. and filler primer. and sanding. then... you know the rest. -
Sea_Marshall: Captain Phasma TFA
Sea_Marshall replied to Sea_Marshall's topic in Captain Phasma Build Threads
Doing my best! I'm getting pro-tips here and there from a number of folks. Everyone has been supportive and are as excited as I am to see this thing come together. It's been an enormous undertaking but gratifying with each new step. WIPs keep me engaged and focused and I'm so stoked I've been able to keep this momentum going after a 5 month hiatus. Can't wait for the weekend! -
Sea_Marshall: Captain Phasma TFA
Sea_Marshall replied to Sea_Marshall's topic in Captain Phasma Build Threads
Can't stop won't stop! The cancelled Star Wars Celebration weekend approaches. I believe I mentioned in the early stages of the build that the thigh armor was too small and I was hoping to drop some weight... but I like food way too much. So, I reached out to Shawn at T&A and inquired about cutting the thighs open and how to go about repairing it. He was great help and (Krennic voice) "let me share with you, some details." He advised that I should do a zig zag square cut down the flat side of the armor, facing the back. He sketched up a quick diagram and explained how the cut would assist with the fiberglass repair. Basically, cut it so it can touch the adjacent side, space the top and bottom, tape off the center, and fiberglass the interior (after rough sanding it). Looking at his diagram, I asked him to check my work and confirmed I was on track. Given the green light, I made the cut with a dremel diamond blade, and was pleased to find the parts separated without issue, and would lay flat when I move to bondo the surface. This next bit of resizing required my wife's help to position the thighs and mark the gaps I needed to create. It worked out surprisingly well, and I asked her to just mark up the armor with measurements since I was going to repaint anyway. It was a snug fit, but the gasket worked out and I got what I needed. You can see where the dremel skipped and dinged the armor. Whoops. Easy fix. On another note, you can see the rear of the gaskets! Even with the elastic, the gap is pretty well closed and I hope to have the cape disguise it further if the boot and thighs don't cover up most of it. Next was the fiberglass work. I've only done this once before and it didn't really work out the first time, but here we go anyway. I put on my trusty breather mask from Angel Gilding, but neglected to close my balcony door... and well... I (Rey voice) "flooded the house with poisonous gas!" ...so I accidentally drove my wife and child out of the house while the fiberglass is drying. Once this center mat is solid, I can remove the spacers (paint stirrers), and fiberglass out to the edges. In the same session I'll shim up the spacers for the 2nd thigh, glass the center. Last session will glass to the edge on both and let dry. Once dry, interiors will get a plasti-dip job and I will proceed to bondo the surface to fill the zig zag and prep it for paint. Then fresh primer, sand to 800, wet sand to 2k, wash surface and Uni-Coat -- back where I left off. But this time, the thighs will fit, lol. -
Sea_Marshall: Captain Phasma TFA
Sea_Marshall replied to Sea_Marshall's topic in Captain Phasma Build Threads
T&A was a one stop shop for a lot of the items in the kit, including rubber gaskets. I was referred Geeky Pink on Facebook for cloth gaskets but I'm going to give what I have a go before buying into other items. T&A's is a one size fits most. I used some CA glue on the ribs and bound them together. The arms were a good fit, but the knees are a tight fit. At this point, I'm not sure about the shoulders, I need to research how they're worn. I'll be adding a strip of nylon down the seam of the gasket to help secure the bond. It's pretty solid as is, but reinforcement isn't a bad idea. The knees, when wrapped, don't fit up my knee/thigh, even though tapered. So, I'm attaching a section of black elastic to help fill the 1.5 inches I need for a good fit -- this means the gasket won't be a complete wrap as far as the ribs are concerned, but elastic at the back will be out of sight and covered by the cape. If this proves to be a CRL issue, I'll hit up Geeky Pink for a set of gaskets since she will build them to size. The Liquitex gloss gel and black paint showed up. Red for the stripe will be end of week. Here's a test swatch with the gel alone and with black paint added, with D23 references to the cape. The gel goes on white and dries clear. Not a huge difference, even when light hits the gloss coat. I'm going to go with adding black paint because there are parts of the cape where it appears glops are on the finish. Having the black color should help achieve the glops. Thinking about the size of the cape, I hope this 16 oz tub of Liquitex will get me there. I didn't need to coat it too thick for this result. -
Sea_Marshall: Captain Phasma TFA
Sea_Marshall replied to Sea_Marshall's topic in Captain Phasma Build Threads
Got a little progress on the belt and it's awaiting a clear coat and chrome. Another reason I went with T&A's Phasma kit is because he also provide the belt material, pouches, and boxes. I believe its just a ribbed rubber floor mat that is cut to size. The boxes are resin blocks that were trimmed and sanded. The two pouches on the left hip are a canvas fabric sewn to size. The kit was missing the covers for the pouches but fortunately I had some 3mm komatex plastic from a previous project. I measured the pouch flaps and cut out the lengths, rounded out the corners, and took a file to the long one for that line across the upper portion. This will get chromed and then attached to the pockets. I'll likely grab a bit of foam to fill out the pouches for shape. Maybe pop trading cards into one of them. Alright here's a DO NOT DO: Plasti-dip and rattle can red for the cape? Nope. Observe. The plasti-dip and aerosol paint just absorbed into the fabric. You can see the left side has rubber and paint, the right side is paint on fabric. This method is useless. The paint also soaked through the fabric to the other side. Some of you may have already known this, but news to me haha. I reached out to the Phasma builders and was tipped off that this was a route to take to get the rubber-like medium on the cape: Liquitex Professional Acrylic Mediums, Gloss Gel -- I got the 16oz bottle and arrives later this week -- this will be the rubber like medium Jacquard Textile Paint 122 Black -- I believe I can add a bit of this to the Gloss Gel to keep the black color on the cape. Jacquard Textile Paint 106 True Red -- This will be hand applied for the stripe. I'll get a test swatch going once this arrives next week. There are splatters of the gel coat on the cape. Should be fun to replicate. Pockets and straps are cut! Sewing to commence through the week. I've seen a bunch of folks, even the crl images, where the straps are a leather like material. Double checked the D23 images and pretty sure its the cape fabric, coated. The others may be TLJ, which I just noticed specifies leather straps... Bummer that the strap lengths are not mentioned, but their widths and locations are. TLJ's CRL does mention them, so we'll use those lengths for now. -
Sea_Marshall: Captain Phasma TFA
Sea_Marshall replied to Sea_Marshall's topic in Captain Phasma Build Threads
I've enlisted my wife to take care of the captains cape, because I can't cut a straight line or spool a bobbin. We're following Geeky Pink's pattern from the Phasma's Facebook builder's group. The measurements on the diagram are a bit confusing with the lengths. I suppose so long as the left side lands near my ankles, we're good. We ordered 7 yards of fabric, about 5 was used on these three cuts with enough to rework the longest panel in case we come up short. We'll be referring to the CRL Level 2 for the construction, pocket sizes, straps... and I picked up some plasti-dip to achieve the thin rubber-like medium. I should have a test swatch up soon with fabric, coating, and red stripe. -
Sea_Marshall: Captain Phasma TFA
Sea_Marshall replied to Sea_Marshall's topic in Captain Phasma Build Threads
Back in the garage today for some fixes, re-coats, and finishing the rest of the armor's Uni-coats. Got some closer looks and found a few things under better lighting, like this area I completely missed on a bicep. Wet sanded it down and reapplied the uni-coat. Last night while staring at the Phasma image before this post, I noticed that the chest ovals were cut out. To note, the CRL image isn't cut out and the wording says recessed ovals. So I cut and filed them out while waiting for the other bits to dry from cleaning. I had three items that had runs in the coat, so I took some ...400?... sand paper followed by 2k wet sand to clean it up. Here's the shoulder before and after. The other parts followed the same fix. Pretty happy with the new coats and I finished off the rest of the large armor pieces. I used the whole Spra-Tool can and the refill to get the base coats down (+the re-coats). I used some lacquer thinner to clean the Spra-tool and nozzle last night, but not good enough it seems, and I threw away one of the nozzles this morning. I replaced it with another one and began to spray. At some point the can started getting cold because it was just pushing out the air, and NOT the resin, because I guess some residue was in the bottle and it got into the hose. Bleh. That caused some issues but I was able to revisit the base coat without issue. I did notice, however, that when I did the chest, it sputtered... so now I'm typing this up waiting for the resin to harden so I can wet sand the splatter and do the fix. Hopefully it'll settle, but I doubt it. After that fix, the day is done until tomorrow, and I'm pretty sure chrome is going down. Shaking the can or tilting it at an angle causes it to sputter, so orienting the parts for the spra-tool was critical to success. The next steps of chrome etc will be using a hand pump and I should be able to spray at any angle so long as the fluids can get into the tube. I've got a new Spra-Tool and refills on the way from Angel Gilding. This will be for the top protective uni-coat, and whoo boy, I hope the practice I've gotten in the past two days will guide my decisions when the time comes! On a downside, I need to wait for these replacements to come in and rework the chest and helmet, but everything else looks great! Everything's on a hard stop as I sand down the helmet and chest. Bleh, you know, just the two most front facing parts... this spra-tool thing... it works best on a full can and when it gets to about 15%, its better to just toss it than risk the sputtering of a low tank and used nozzle. Man, what a bummer. Lesson's learned. Guess I'm working on the belt, gaskets, and cape until I get refills. -
Sea_Marshall: Captain Phasma TFA
Sea_Marshall replied to Sea_Marshall's topic in Captain Phasma Build Threads
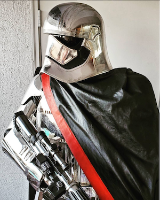
Dropping this off as a reminder of my goal and a bit of motivation. At the get-go I knew the chrome would be a challenge to maintain, so weathering is my answer. In this image I can see all sorts of blemishes and scratches which gives it a nice gritty feel. In either case, the mirror finish has to look good as a base to pull it off. Click into the image to magnify details -
Sea_Marshall: Captain Phasma TFA
Sea_Marshall replied to Sea_Marshall's topic in Captain Phasma Build Threads
I spent the first part of today's session using the concentrated cleaner and some water to sponge down the armor surfaces in preparation for the Uni-coat base coat. Following that, I prepped all the parts on red cups or bungee cables suspended from the garage door rails. I thought I was clever using kabob sticks to arrange my finger armor and stabbed them into a cardboard box. I mixed the Uni-coat for the first time. Easy enough. That respirator is pretty much required to do this, but at least there was a minty scent from the resin. The Spra-Tool is awesome. It's a can of air and the uni-coat solution goes into the bottle attachment, then press the trigger and you're good, no shaking required. I used 5/6th of the can on everything EXCEPT the helmet, chest, back and thighs. I've decided I want to revisit them for another pass of wet sanding. I have one more can to revisit my errors and finish off the helmet, chest, back and thighs. I'm going to order one more can as back up for the final coat and it should arrive in time once chrome is down. Alright, so there were some successes and failures. The Spra-Tool can is finicky and has to be upright at all times. Moving it even at a slight angle causes it to sputter. You have to find that sweet spot distance to prevent it from misting, but prevent it from glopping. You either get a bumpy or runny texture if its not in the sweet spot. I really think I'd have benefitted from better lighting for inspection. Here's a sweet spot finish: Too far causing misting: Too close, causing a run: I didn't look at all the parts in detail, but its more successes than failures. I think I saw 4 or 5 items I will need to sand down either mist or runs, and will then reapply the uni-coat during the remaining armor session. I started on the feet and posterior to figure out the sweet spot, but looks like I got too close trying to achieve a glossy coat that wasn't misted. Glad I got a jump start in the week. Not sure how this weekend session is going to go, but I hope to see it ready for chrome Sunday or during the week. I have a three day weekend coming up next week -- which happens to be the cancelled Celebration Weekend. I did mention in my original post that I wanted to get it done for Celebration, and I think its fitting to be working on it that weekend. I'm so close, but need to take the time to dial in the details. -
Sea_Marshall: Captain Phasma TFA
Sea_Marshall replied to Sea_Marshall's topic in Captain Phasma Build Threads
Here's the gauntlets, gloves, and blaster at 2k wet sanded. Here's the new garage config for the gloss uni-coat sessions and chrome. I found a lattice thing that should work well for the run off into the bin. Cracked open the Angel Gilding box and read through the detailed instructions for mixing and application. I'm going to need another hardware store run for a few things before the next session. If you are at all interested in watching the box opening and some commentary, here's a link to my Facebook Live recording: https://www.facebook.com/chucketh/videos/10219012606327343/ -
Sea_Marshall: Captain Phasma TFA
Sea_Marshall replied to Sea_Marshall's topic in Captain Phasma Build Threads
woo. not much to look at here, but the 2k wet sand is done for most of the kit. Gauntlets, hands, and blaster will get the 800 and 2k treatment tomorrow. I'm glad I managed to get this done in small sessions instead of entire days, as originally planned. Each session has been 4-8 hours, so that's basically a full day... it really is a marathon. On another related item, the black canvas for the Captain's cape has arrived. Same stuff as Kylo's tunic and sleeves! I'm going with this Colonial Red for the stripe, painted on and decorative stitching to be added. My wife is a seamstress wizard so I'll be following her work on the cape and will do my best to document the process here as well. I found the patterns on the Phasma builders group on Facebook via Geeky Pink. Weehoo. Getting to the fun stuff.
