
Easy
-
Posts
80 -
Joined
-
Last visited
Content Type
Profiles
Forums
Gallery
Articles
Everything posted by Easy
-
Thanks. I’m hoping this build goes well enough to meet centurion standards and will benefit future builders. Detail is very important to new guys like me. This will chronicle the build through it’s entirety. My goal is to be submitted and approved before the August FanExpo in Toronto this year. At at some point I’d like to get together with a member from my area and demonstrate that help is not just in these forum pages but available with accomplished builders in hands on situations.
-
I’m trimming the return edges to about 1/8” later, maybe a little more depending on how they fit or if they bite.
-
Continuing with the arms, this is the right forearm with the final trim lines marked. I put the undersuit arm on and did a quick fit to see how much I could take off. There will be about 1/8” left as a return edge. I’ll likely fill the gap with ABS paste I have on hand. Made a 15mm cover strip for the outer forearm. Just having a look because…well because I just want to. Something I do before gluing is rough up the gluing area with a couple passes of the sandpaper. It makes a little better bonding surface. Time for some bicep sculpting. With a little help I did a quick fit and mark for cutting. The AM Armour is plenty deep…Dwayne the Rock Johnson might not need to trim it…and it’s proportional to the arm. Even cuts off every edge and another quick fit and they’re ready for inner strips and glue. I made the inner strips from the cut pieces. Gluing them on to one half first makes it much easier to set and glue the other half. This is the nice surface to set the other half This is why I like the inner strips. When the pieces are glued together after trimming they don’t always line up square the way they came. When this dries I’ll pull the pieces together, glue and clamp them to set up. The inner trip will add strength to areas that are naturally somewhat stressed. Here it is with the inner strips holding. The back half is trimmed and the other half will be trimmed to match. Sanding will finish it if needed. Time to start the right side. Again the inner strips on one side first…the back half this time because I can. Once the inner strips cured enough on the remaining bicep and forearm I glued the halves together. This pic is of the final edges being joined. The bicep was very easy and needed only normal clamping to set the edges straight and even. The forearm was a bit tougher to bring together. I preset a strap with clamps to set it up. Once set I removed the clamps and slid the strap down to open the arm up. I carefully applied some e6000 to the strip and slid the strap back into place then clamped it. There was a couple uneven edges so I added the magnets (2 sets of 4in/4out) to set it right. Time to let it dry. I’ll make the rest of the 15mm cover strips while it cures. Notice the wrist end of the finished forearm in the pic. Some trimming and smoothing will be required. I’ll do this once I’m ready to test fit with at least the chest and back armour assembled. I’ll know better then how much wrist clearance I’ll need for decent movement and minimal gap between the parts. Here are all the parts glued and set with inner strips, and one outer because I just had to see it. Got a little first order supervision happening. The left forearm looks like a pretty straight tube but it’s not really. The red on the wrist is not blood. It’s marker I used to make trim lines. I trimmed the left wrist back flush now because it at a good length for my arm as it is. This arm will be the most extended which the blaster so I’m hoping to cover the arm with minimal gaps between the sections. The cover strip didn’t seat as nicely as I’d like. There were noticeable glue bubbles showing under the edge. I ran a bead of white E6000 down that edge to fill it in and tidy it up. E6000 grabs dirt and really stands out so if this dries as nice as I hope for I’ll put a little white paint over it to seal it. 15mm cover strips ready for the left forearm. It’s fun how plans change. I was going to leave the cover strips until later but I just can’t get over how strong the one I did is. Notice the clamp on the right arm. I wasn’t happy with the way the glue set at the wrist. The halves weren’t flush at the but joint so I pulled them apart slightly, about 2” up the arm, and removed some glue. (This is where the benefits of E6000 are evident…it’s easy to work with and redo,if you’re not happy with your work). I squeezed some new glue in and clamped it. Should be better tomorrow. One strip glued on. Again the magnets set it squarely down. Both strips glued, clamped and set with magnets. Heres a close up view of how the magnets really pull it together. I had to put this pic in because you can really see the quality of the AM kit. The surface is like a mirror. Bicep cover strips, 15mm, are ready for when the forearms are done curing. So these came today. From PropsEmporium in England. A bit tight on these big hands but they work. Nice surprise that they came ready to wear. The left forearm is done. Both cover strips are on. The strength that inner and outer cover strips add is incredible. The right forearm has only one outer strip on and it has much more flex with a squeeze. Last strip for the right forearm. Lots of clamping power to keep it on the contour. Left bicep gets the outer cover strips. I should have shown this earlier but I just didn’t occur to me until just now. The marks you see there are to center the strip when the clamp is on. You can’t really see if it’s centred with the clamp on it so I use the strip to mark each end and adjust it if needed with the clamp in place. All pieces glued and drying. A view from the Death Star. All return edges will be trimmed later. Once these are ready I’ll move on to the leg armour.
-

Early 2019 CRL update change requests
Easy replied to CableGuy's topic in Hard Armor (General Discussion)
I adjusted my brow, not as easy as I’d hoped. I raised it to 5mm. I personally don’t like it as much but it still looks very cool. This is an AM ARMOR bucket. I was careful to rake the ears correctly when I started. I do need a new brow trim now though…little slip with the knife. Saved my finger though, the force was with me. -
Early 2019 CRL update change requests
Easy replied to CableGuy's topic in Hard Armor (General Discussion)
Here’s some interesting troopers from ANH. Gaps and open biceps, and the one on the far right that’s not circled is obvious as well. A bit hardline to ‘Forbid’ accurate armour. As stated by others here, we are not all built the same. Our armour is a reflexion of us as individuals as much as it is a reflection of our screen heroes…troopers are heroes too…and that hardline position would mostly serve to ostracize those who don’t naturally conform to the parameters set by Mr. Lucas during filming. He had the luxury of screening to fit his needs. We, as individuals, don’t. We are a community of equals in odd sizes and shapes. I’ve read the posts through this thread and, much to my dismay, have to agree with the intent and reasons for the changes. Since my lid has a low brow and is not yet approved I will need to alter it to meet the L3 requirement. Fortunately it’s just the brow for me, a slight trimming should fix it. For those who have, or are just about to, submit for centurion it may be a crushing blow after countless hours of dedication to a build based on the old standards and acceptabilities. It may be prudent to inform everyone who receives the newsletters that submissions after the next newsletter will be subject to the updated CRL amendments. I only found this because I was looking for information on correct return edges. -
Early 2019 CRL update change requests
Easy replied to CableGuy's topic in Hard Armor (General Discussion)
There will always be those who critique every millimeter of a suit…and everything else…to death. “Screen accurate” is ideal, but to which stormtrooper in all the footage to we emulate? We’ve all seen the perfect standing still armour shots, the open calf armour during action shots, at least one had no brow trim, various gaps in brow trim and so on and so on. The word ‘Ideally’ is by far the most fair wording in some cases. Some will always strive and achieve the absolute pinnacle of perfection and others will only ever be able to get close. This is is a suggestion, from other examples I’ve encountered such as martial arts, and by no means am I trying to step on toes: Perhaps it it would be acceptable to incorporate levels, or degrees, to the centurion level. L1, L2, L3 so to speak. Just a thought. -
Digz Graavz First Build - ANH Stunt from AP
Easy replied to Digz Graavz's topic in ANH Build Threads
I’m getting a custom neck seal made by Geeky Pink’s Phantastic Gaskets. You can FB search that and message her. Im going back and forth between a two piece under armour suit or another one piece. -
Starting work on the limbs. First is a forearm. There are two distinctly different forearms. Not sure which is left or right. The difference is one is slightly longer with a deeper cut into the inner forearm piece. I’m told they are interchangeable so, based on movie stills, I’ve decided to use this piece on the trigger arm. It will be my right arm piece. The reason is that this arm will generally be bent farther when holding the blaster so ideally for comfort. So this will be the left forearm. I matched the left and right inners with their outers, trimmed off the lower return edges and did a fitting on my bare arm. I marked the inner forearm for trimming. Only the inner pieces will get trimmed because the outer pieces came trimmed properly. I marked the cut lines with a pencil and made the first cut…oh me nerves…which is the edge that will be on top and the straightest cut. The second cut cut is on an angle that will give the forearm the taper it needs to fit the arm nicely. After the first cut I taped the cut edge to the outer arm and fit it again. You can see the old line has been replaced with one that works better. I use the aluminum ruler to score straight lines. A few passes with the blade then I snap it nice and cleanly. I usually do some light passes in the groove just to make it a nicely trimmed edge. I use tape and magnets to set it up and try it on. You can see the trimmed edges and the taper. I line up the return edge end, at the elbow, and will trim the wrist end for a nice smooth line around. I’ll be using inner and outer strips to complete it. The cuts are really straight and mate nicely with the outer arm. No sanding has been done to the cut edges. Notice the stack of magnets on the left…it picked up a screw bit as I moved it across the table. The bit was still there from the bucket build. Put your stuff away when you’re done with it folks. It’s neater, you won’t likely lose stuff or damage stuff. Left forearm trimming and fitting. First the wrist end return edge goes. Again a quick fit and marking for the sizing cuts. Here we can see the difference in the two forearms. Right forearm has a slight taper at the top. Left has a fairly straight, 90 edge at the top. From Victor Matts, maker of this armour, of AM Armor: The right forearm tapers at the top as this allows the right arm to be bend more easily when carrying a blaster, while the left arm extends more straight, holding the barrel of the blaster farther away from the body. The strips run up the top and bottom of the arm so this cut should run this line. With the cuts made an the halves taped I did a test fit. Everything lines up nice and it’s ready for the inner and outer cover strips. Some troopers only use outer strips but I like the strength the inner strips add. The first inner strip ready to be glued in. I applied E6000 to the strip and secured it with clamps at the ends and these very strong magnets in the middle. Inside view. I doubled the magnets inside for better pullin power. The strip will seat perfectly flat to both halves. I’ll be doing inside strips only to start with to form the pieces. The outer strips will go on once I’m satisfied with the final fit.
-
Here it is. Outside is done. I was told that it’s not symmetrical and I can clearly see that. The imperfections add personality.
-
Decided to paint the inside of the bucket. This is the first coat. Yes it’s a brush on not a spray. It’s called Gun Metal. The second coat really looks like I want it. Most will be covered with padding and fans etc. but it will look great when done. May as well do the Hovi mic’s. Mics drying and screens ready.
-
Got some new paint brushes from Santa…and a bottle of 40 Creek. Shall we begin? I masked off the ears for paint. Looks pretty good good so far. I started here then the teeth after. It’s a good idea to do a coat then let it set up for a while then do another coat…then let it dry. I know this because I didn’t do that. I think I did a pretty good job on the teeth. Starting to look like a trooper. I also redid the side vent stripes. I’m happier with them but still might do them again. The vocoder looks ok. Will do some touch-ups on it after it dries a bit. While doing the vocoder I pawed up the teeth and ears that weren’t yet dry. Patience. It’s been preached every step of the way and it’s necessary. Lesson learned. The unmasked ear. I painted the screws white, all flat heads now, and touched up the areas that bled into the masking. Here you can see the results of impatience. The black went on too soon and the grey bled through. I’ll fix it later. I ordered some helmet padding on amazon. My plan is to paint the inside of the bucket black. I’m also going to try to make some custom covers for the inside screws and nuts if the padding doesn’t cover themaqa. I’m tossing around the ABS paste mould idea or a heat and press to fit ABS cap. Also still tossing around the idea of painting the tears and traps. The stickers look good but paint has a feel I like when I touch it…and it just seems to look a bit nicer.
-
I pulled the stickers and relaid them. I also replaced the lower screws with flat ones. I’m much happier with the look of both. I cut cut up a hard hat yesterday and started trimming the liner mounts to fit in the lid. I’ll mount them with Velcro to start and if I find it’s a good fit I might glue them in. I like the liner in my other bucket so this should be pretty easy. One of the things I like about this one is that I don’t need to twist it onto my head. It goes on and off straight. I’ll put the pics up later.
-
I am considering pulling those stickers off the sides, I dropped the left one while lining it up and it looks odd. I might try painting them but will need to find a stencil. The screws on the bottom of the ears are what I was told to use by a very qualified builder. I like the flat ones personally. Not sure what you mean about them being reversed. Ok...I figured it out. Never really noticed that subtlety.
-
Sorry. I didn't know to put it in a special thread. Thanks.
-
Grandtrooper.
-
Added some stickers and the S-trim. A little paint on the outside and mic tips. Inside screen, and headgear. I have a hard hat liner in my other bucket , I like it but would like to know what else I can get and where to get it. I’ve seen some nice looking padding. The liner that came with the kit is too small and it just bobbleheads on me. You may have noticed the bucket in the background. My granddaughter, 2yrs, loves to troop around the house with me.
-
Since I don’t have brushes yet, and can’t sit still, I started the assembly. Setting and clamping was tedious. The bucket is not symmetrical, which is screen accurate, so I found it a bit difficult to keep everything lined up. I had to get my big vice grip clamps to set the tubes to the face where I needed it to drill. I tried to keep the contact area where it would be covered by the ears in case I marked it up. The ABS is flexible enough to come together nicely. Drilling here will make a nice transition of the pieces. Both holes drilled, same on the other side. AM supplies all the correct screws to build a bucket. The Master, Eric Dyck, uses rivets, which I might switch to because I don’t like all the hardware inside, nuts and screw ends sticking inward. Maybe the padding will cover it, we’ll see. Both sides look good. I followed the steps in the build video by Eric Dyck as I went. It’s a great help. The right ear needed very little work to fit this well. Very little gap front or back. Right side, looks pretty good. Left side seems acceptable. I think it will be really nice once the mic’s, neck seal and paint is done. Thanks Eric for the personal help on this. The brow is not exactly as I’d hoped. More stunt on the left and hero on the right. Oddly enough it’s lower on the squint eye which only seems to enhance the look of ‘aiming’ for a shot. I might be the only stormtrooper to hit his target. I measured the height of the traps and the right side is 1/4” taller than the left. I may trim it across to even it out. Not sure what to think of it right now.
-
Would using it jeapordize achieving centurion level?
-
IT CAME!!! IT CAME!!! Guess I should have remembered to get brushes.
-
Thanks. Troop-cat (white on black) is great support lol. Not in these pics is my black lab Trooper.
-
Ok I started on the bucket. Still waiting for the paint to show up so for now I’m getting the parts ready. I’ll paint before assembly. I’m undecided on using a one piece lens or making a left and right with custom mounting clips. Teeth all cut and trimmed with a small craft blade and the Dremel. Cutting this piece off will help line the ear pieces up with a more movie accurate rake. Left side cut off. The filter front line should line up with the corner of the eye on both sides. This centres the face piece nicely. The dots are where I will drill to attach the pieces. The brow gap for stunt configuration. I set it here because it looks right. I haven’t found an actual measurement for it. It’s just somewhere between hero and sand trooper as far as I can tell.
-
Starsaber, thank you very much. I’ve been trying to figure out the images thing. Looks like it worked. Thanks to all of you for the welcome. I’m aiming for centurion so this might not be done tomorrow but I will post my progress. Looking forward to learning from some experienced people along the way. Got some great help so far. Just need to pick a place to start. Maybe I’ll do the build in the order it’s put on when done. Things I will need are a good neck seal, holster, gloves that fit these Sasquatch hands and patience.
-
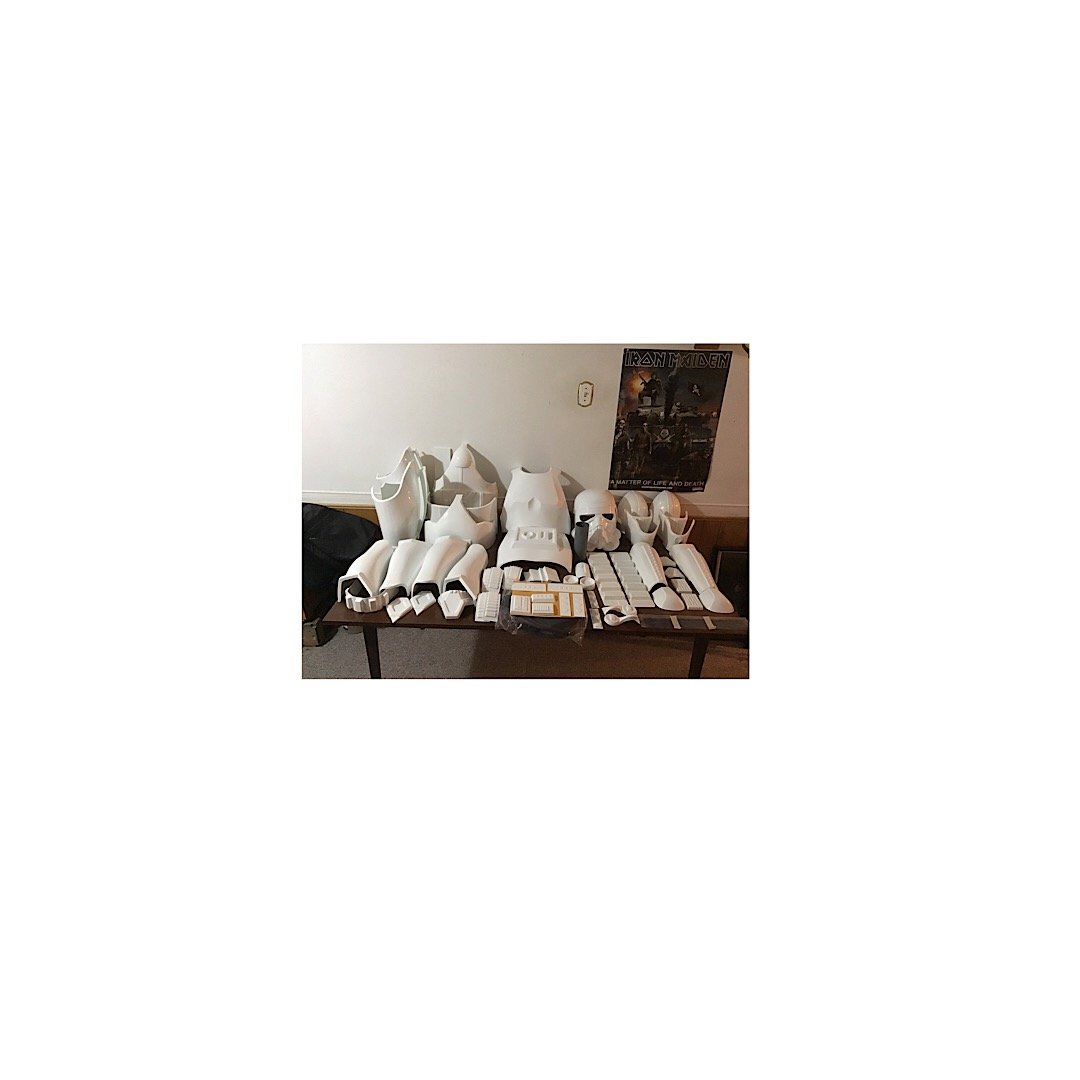
IF YOU ARE READING THIS please know that it is a long and detailed thread. L3 Centurion is the goal here. It’s broken into sections and includes the mistakes and changes to fix them. It also has some very special custom pieces that are designed to save your armour from normal use damage like cracks or breaks. READ EACH SECTION THROUGH FIRST. I made mistakes and corrections. You’ll want to avoid the mistakes so I left them in to show what not to do. READ AND PAY ATTENTION TO THE ADVICE FROM OTHERS HERE. Most of them are accomplished builders. Start your own thread so you can get help specific to you. Don’t be afraid to ask questions. Nobody knows everything but everybody knows more than just one. For posting pictures I used IMGUR. It’s easy. Just post the pictures on imgur then copy and paste the link for each one into your tread. They show as pictures not links. Easy Peezy . Please enjoy the thread read and enjoy your build. Hope to see you trooping in the best kit ever. Are you sitting comfortably? Then we’ll begin… Ok, building an ANH Stunt kit. The armour is from Victor Matts of AM ARMOUR. It’s BBB day and all the parts are laid out. Got some sizing, trimming and fitting to do. My profile pic is a kit I bought before ever hearing of the 501st. I worked the heck out of it to get it reasonably decent but I want a better kit to submit for approval. I might just chrome the old one and have a decent radtrooper kit from it.
