
Easy
-
Posts
80 -
Joined
-
Last visited
Content Type
Profiles
Forums
Gallery
Articles
Everything posted by Easy
-

We want your Troop photos for our 15th anniversary project
Easy replied to Sly11's topic in Announcements
POST 22 1. 2. 3. 4. 5. 6. 7. 8. -
Now I’m making some changes to work toward centurion. To reach that I’m told I need to close the gap in the shoulder bells and get the shins lower. To do that I’m trimming the shoulder bells shorten the top and follow the contours of the chest and back plates. Next day: Trimmed out the tops and contoured them a little. This is with the straps reattached ANH hung in place. Once I test fit it to me I’ll know if any more trimming is needed. I put a piece of Velcro on the boots and inside the shins to keep them down and centered. I also trimmed out the top rear area like the screen used stunt kits. Next day: Both done now. I also trimmed a higher arc I’ve the heels. They don’t get pushed up when walking now. Pushing up sometimes made the backs open up as the narrow bottom area was pushed over the wider calf area. That takes care care of the gaps that were there (below picture). I’ll be trimming the thighs the same way. This will increase mobility and lessen the stress on the kit when moving I neatened up the vocoder paint as well. Before
-
After some tweaking and tidying up I achieved EIB. Here’s some of the things I did to get there. I cleaned up the frown paint paint to keep it only on the teeth. Replaced the damaged and short brow with a new one from Trooperbay. I built a 3D printed E-11 blaster.
-
TK 46165 requesting ANH Stunt EIB status [920]
Easy replied to Easy's topic in Request Expert Infantry Status
I took the teeth paint down some to remove the excess area covered. I also replaced my brow with a new Trooperbay brow. The blaster that I’m submitting is the 3D print I built. -
TK 46165 requesting ANH Stunt EIB status [920]
Easy replied to Easy's topic in Request Expert Infantry Status
Here is my main blaster. -
TK 46165 requesting ANH Stunt EIB status [920]
Easy replied to Easy's topic in Request Expert Infantry Status
This one seems slightly lighter. Both good trooping weight though. This one is ready for paint now. -
TK 46165 requesting ANH Stunt EIB status [920]
Easy replied to Easy's topic in Request Expert Infantry Status
There are two blasters I’ll be using depending on the event. The complete prop and I’m including my current project that has lights and sound. This is the prop: This is the more functional unit still in progress. This is a kit from Raymond Hebert BlasterMaster. -
TK 46165 requesting ANH Stunt EIB status [920]
Easy replied to Easy's topic in Request Expert Infantry Status
On my to do list. -
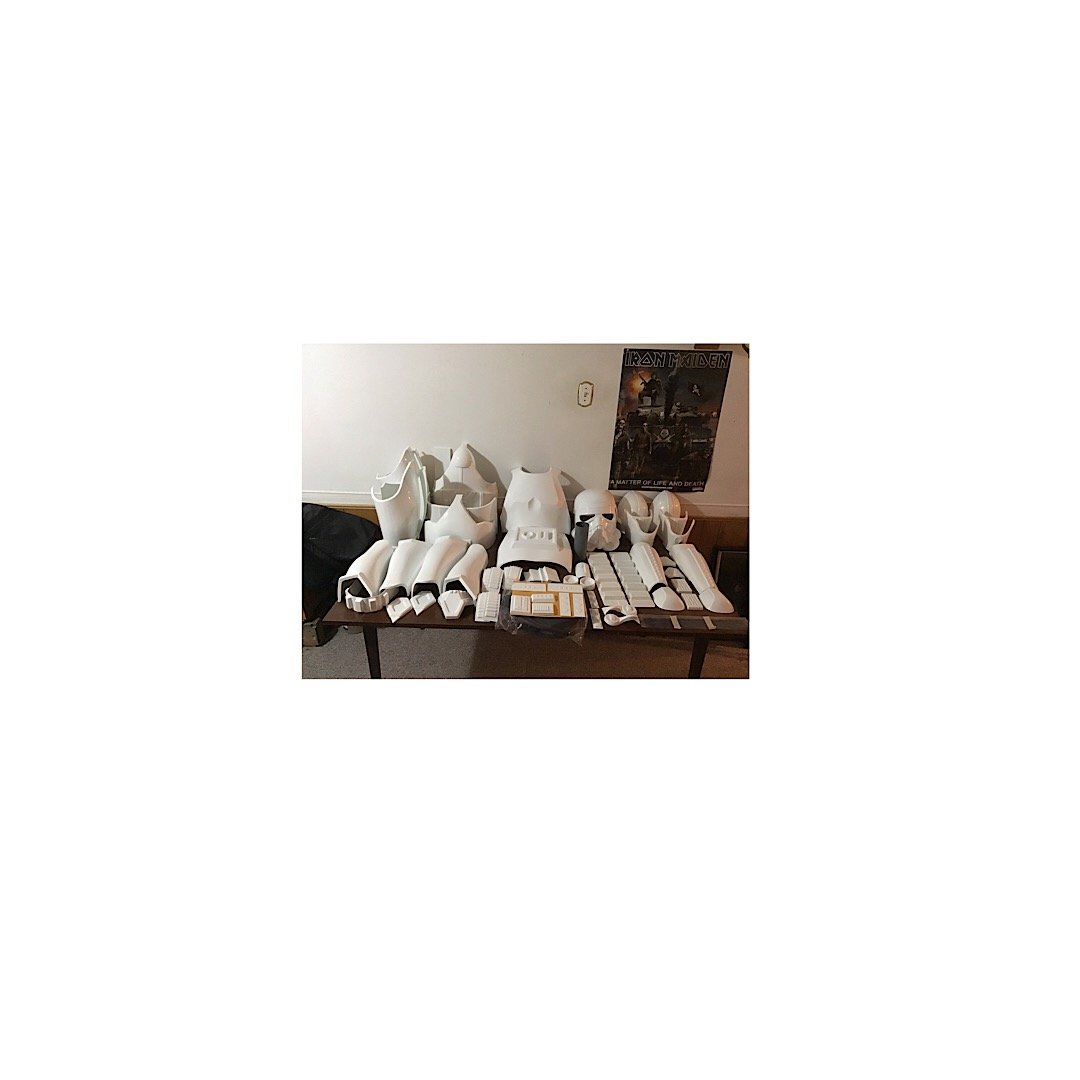
They came with my AM Armor kit.
-
TK 46165 requesting ANH Stunt EIB status [920]
Easy replied to Easy's topic in Request Expert Infantry Status
I added the pics as requested. I thought the Aurebesh would be a nice touch, thanks. I have a few compliments on it now. I also added a pic of the chest/ab bracket screws since they are required to be painted as well. The magnetic kidney/ab was possible because of your shins setup, I did it and it’s great. The main difference is that they actually slide but don’t lock. The Han snap holds the top together and the ammo belt holds the bottom, like the movie kits. The magnets slide out when bending or breathing deep then return everything to proper alignment every time. I can can imagine how trying it can be to walk newbs through this process. I appreciate your patience with me as well. Let me know if there’s anything else you need. -
TK 46165 requesting ANH Stunt EIB status [920]
Easy replied to Easy's topic in Request Expert Infantry Status
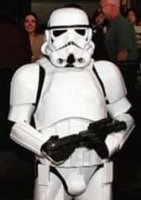
Ok. Hope I get this right. I included the left ab/kidney hinge and right ab/kidney magnetic latch. Armour: AM Armor 2.0 Helmet: AM Armor 4.5 Blaster: Blastpro Holster: Darmans Props Neckseal: Geeky Pink’s Phantastic Gaskets Thanks for looking. -
It came with mine.
-
TK 46165 requesting ANH Stunt EIB status [920]
Easy replied to Easy's topic in Request Expert Infantry Status
I have to say…I used your magnetic shins build. Absolutely love it. Great idea. Thanks. -
TK 46165 requesting ANH Stunt EIB status [920]
Easy replied to Easy's topic in Request Expert Infantry Status
Thanks Cricket. Looks like I’ll be waiting a bit to get all the pics. The Blaster should be here soon and I’m waiting on my replacement neckseal from Teresa (Geeky Pink). My armour and helmet come from AM Armor. The Blaster is from Charles Craig of Blasterpro. -
TK 46165 requesting access. https://www.501st.com/members/displaymemberdetails.php?userID=30442
-
TK 46165 requesting ANH Stunt EIB status [920]
Easy replied to Easy's topic in Request Expert Infantry Status
Forgot about that. Might be my project for tonight. Turns out its cut cut on the other side too. I remember cutting it while trimming for the brow gap. -
TK 46165 requesting ANH Stunt EIB status [920]
Easy posted a topic in Request Expert Infantry Status
I hope these pics cover what you’re looking for and meet the EIB level requirements. Let me know if I need to add or change anything. https://www.501st.com/members/displaymemberdetails.php?userID=30442 Name: Dave Araujo TK 46165 Forum name: Easy Canadian Garrison Split rivet Before trimming ends, split rivets in New blasterpro blaster should be in this week. -
TK 46165 reporting for duty. Theres so many to thank for helping me get here. I’ll try to get to each of you.
-
So I made some adjustments and took some new pics. Hoping I’m ready to submit.
-
This is my first time in the full kit. It’s as comfortable as I expected. You'd think he’d have centered the TD.
-
THAT’s what is bugging me about the knee. Just couldn’t put my finger on it. Thanks. i need to trim this off the inside… and this off the outside. That’s what I’m looking for. Much cleaner look now. Thank you gmrhodes13. Sometimes a detached eye sees clearer.
-
A few little touchups. I removed the Chicago screws and replaced them with split rivets. A few dabs of white paint and these are perfect. I also touched up the bracket screws to be screen accurate. Nice and neat. Did all of them to make me happy
-
Yes I did. They were too tall for me. At some point I’m going to heat and roll them in.
-
Thanks Tony. I fixed it last night. Did the button and screws paint as well. Except for the neckseal I think it’s ready. All my adjustments and things I’ve changed because of the good support in here are posted in the thread sections that cover those specific build processes. Still considering trimming behind the knees. Going up stairs is tough, down is easy. This is a long build thread. Hopefully it is good and will help future builders. I’m going to spend Friday working on fitting it just right and taking some pics. I’ll use an older neck seal but it’s tight. If everything looks good I’m posting pics here and in the FB groups for feedback.
-
Going to cover a bunch of stuff in this section. More trimming, strapping for the arms and legs. To start with I trimmed the return edges off the cod piece. It was quite large and very uncomfortable. I also cut the trailing piece down to the right size. The pic isn’t a great angle but you can see it’s neatened up. Better angles. This won’t dig in like it was when I walk. The The butt plate is trimmed nicely too. Seen from above looking down through the shoulder straps…I made and installed the strap that joins them. Two snaps in the back and in the front I used a split rivet and washer like movie worn kits. To do this I folded the elastic strap over once and ran my soldering iron through to make a hole for the rivet. Because I have the clamshell closed and latched I measured the length I need to the back, cut it and put holes in for the snaps. I used those to mark the hole st drill. Then I installed the snaps and put it in. To hang the thighs I’m using a belt made from a weed whacker shoulder strap. I have several so I’m doing suspenders for to attach to the ab and kidney plates as well. For the thighs I cut pieces to the width of the inner cover strip, one for each piece. I drilled holes for rivets. I’m using two on each for better holding power. I then burned holes in some 2” black elastic strapping, lined up to the drilled holes. I measured and marked both thighs like this. This is where the bottom of the rivet plate will go. I picked a lower mark to make a longer strap. This will allow a little more flexibility for bending and sitting. E6000 and a few magnets again. The elastic straps are looped around the belt. You can make out a couple of rivets in the belt. This is an extra piece of strapping riveted on the inside that limit the travel of the loop so they won’t constantly try to move inward to the center. They are about 5” long so the loop can travel outward if needed. This is the suspenders left front buckle. The buckle strap is attached to the ab plate and the hanging straps cross over in the back then join to the kidney plate. The crossover is riveted. A little better lighting. It’s hard to see the crossover but it’s there. I’ll have to take some pics of it opened up and post them here. Mark strapping time. I’m using 1” black elastic and snaps with plates. Plates have the male snaps, straps have the female with button tops. This is what I hammer them together with. Shouldlook like this when done. This is the top of the shoulder bell. Pic is upside down. I like lots of E6000 because this will be taking lots of stress while moving. I marked the lower bell snap locations with the length of my middle finger then applied lots of glue. Be sure to push it in and wiggle it to set it right in. Some glue cows up through the snap so I smear it around the inside to simulate a glue rivet. I makes the left and right pieces in Aurebesh. I just thought it would be cool. GEEK!! Right and left bells marked. They differ slightly on the bottom. I set them so the fronts are equal and the short back on one is on my trigger arm (right). For the shoulder to biceps I cut 5” straps and measured how far the snaps are when they are where I want them while wearing. To do that I held them in place and my wife marked the bicep piece at the bottom of the bell. I found the snaps centers at 3-1/4” apart so 7/8” in from the ends worked well. When marked at 7/8” on both ends, 3-1/4” spacing is exactly as planned. Now, remember that hole I made in the table for the snap to make the ammo belt button covers? I also use it to burn snap and rivet holes in elastic straps and webbing with the soldering iron. It makes installing them snap… You can use may things as a support for hammering snaps and rivets. I sometimes use this scrap of 4x4 wood block. Ready to make the second one. With the bell strap glued in. The shoulder and bicep are ready. The shoulder attachment is 3” ( or just under) and the snap spacing is 2”. This works for me to keep the gap nice and tight. Follow the steps above and make two. I used 2” elastic lined up with the forward edges of the cover strips as shown in the locations reference. My dog Trooper (bottom of pic) is getting big, 9 months old now. Benson is not very flexible so it’s a chore to position the armour on him, but with some work I made it stay as it will hang on me. I fill it out a bit better so the alignment here is generally ok but much better on me because it doesn’t flop around. A shot from the rear. The bicep is sort of jammed to stay in position under the bell and the forearm hangs freely. It stays lined up properly. Considering it’s a mannequin, and much thinner than me, the pieces look good together. I didn’t trim the snap area enough so I redid it. After trimming and drilling it to fit the rivets I check the fit of the rivets. I drill the hole so the rivet fits snugly. A bigger hole would let it sit flat but I don’t want any movement. I use an oversized bit to taper the hole… and then a Dremel bit to finish it. Both are done by hand, not with tools. Then the snap base sits nice and flat and still snugly. This is the split rivet in the front. This is how they were fastened in the movies. It’s little details that will help reach L3 Centurion. I may not get it but it won’t be for lack of effort. I’ll contin to make the touch ups needed to reach it. This will be much more comfortable than the way it was. Note: i screwed up my sizing on my neckseal and am getting a new one. Teresa at Geeky Pink’s Phantastic Gaskets is replacing it at no charge even though it’s my mistake. (Didn’t account for my long hair going through it). Her stuff is the best and her customer care is like family care. You don’t get better anywhere. If you take nothing else from my build thread, take the suppliers and support I’ve mentioned throughout it, and the advice such as is seen throughout my build.
