SgtGarand
-
Posts
200 -
Joined
-
Last visited
Content Type
Profiles
Forums
Gallery
Articles
Everything posted by SgtGarand
-
Guess the fix isn't as original of an idea as I had thought.
-
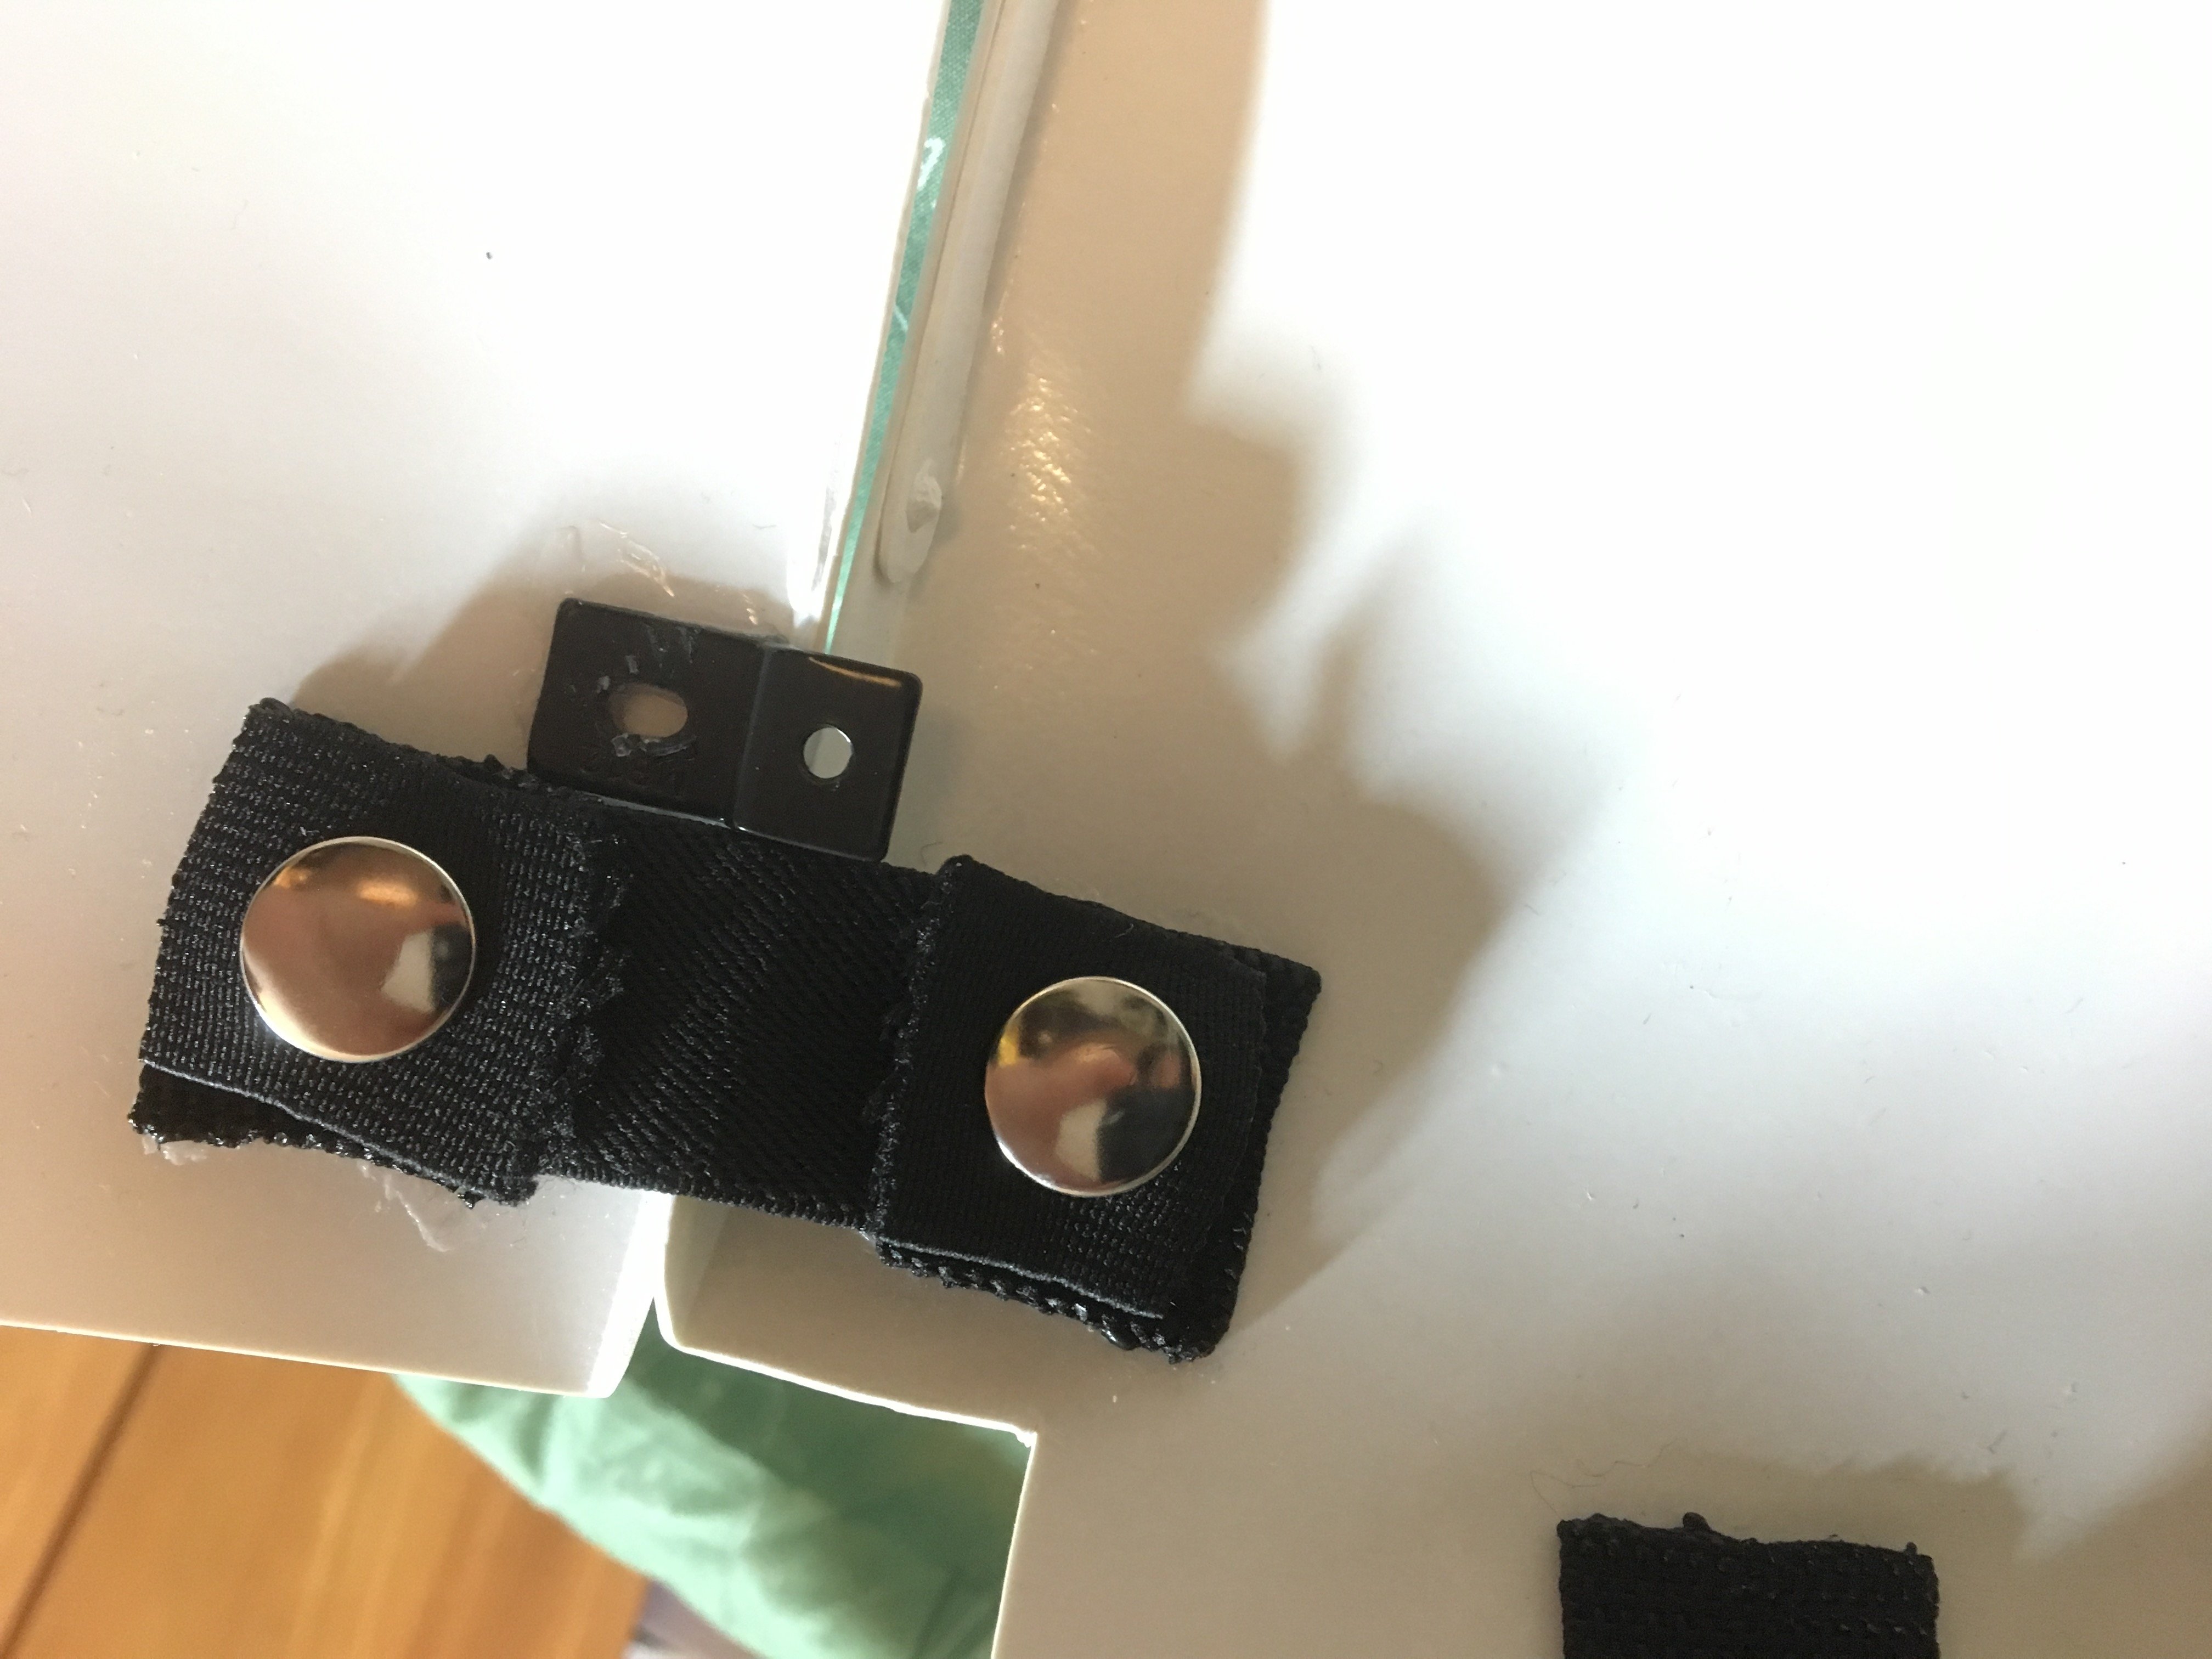
Howdy troopers! I just wanted to share a fix I used for my armor to keep my butt plate from slipping and overlapping the kidney plate. Basically, I went to a hardware store and found these small brackets that ended up being a perfect fit. I glued one on each side of the butt plate close to the elastic; since that's where the tension is coming from that causes them to overlap. The lip of the bracket that sticks out will hit the return edge of the kidney plate and prevents the butt plate from moving rearward any further. During my troop after installing the brackets I had no problems with it slipping free and overlapping. Hopefully this can help fellow troopers struggling with the same issue. Happy trooping!

-

RSMORIN Requesting Pre Approval Review (RS)
SgtGarand replied to Megaphone's topic in Request TK Pre-Approval
Hello Robyn, great looking armor you have there! I honestly can't see any reason why you wouldn't be approved by your GML. If you are aiming for the higher ranks then I can suggest moving the tops of your shoulder bells so that they touch your shoulder straps. -
That's great to hear! And I will take mine out later and make a post in the build section for it. It definitely helped keep it in place on troops that require a lot of walking.
-
TK-12124 Requesting ANH Stunt Centurion Status (405)
SgtGarand replied to IBSkyde's topic in Request Centurion Status
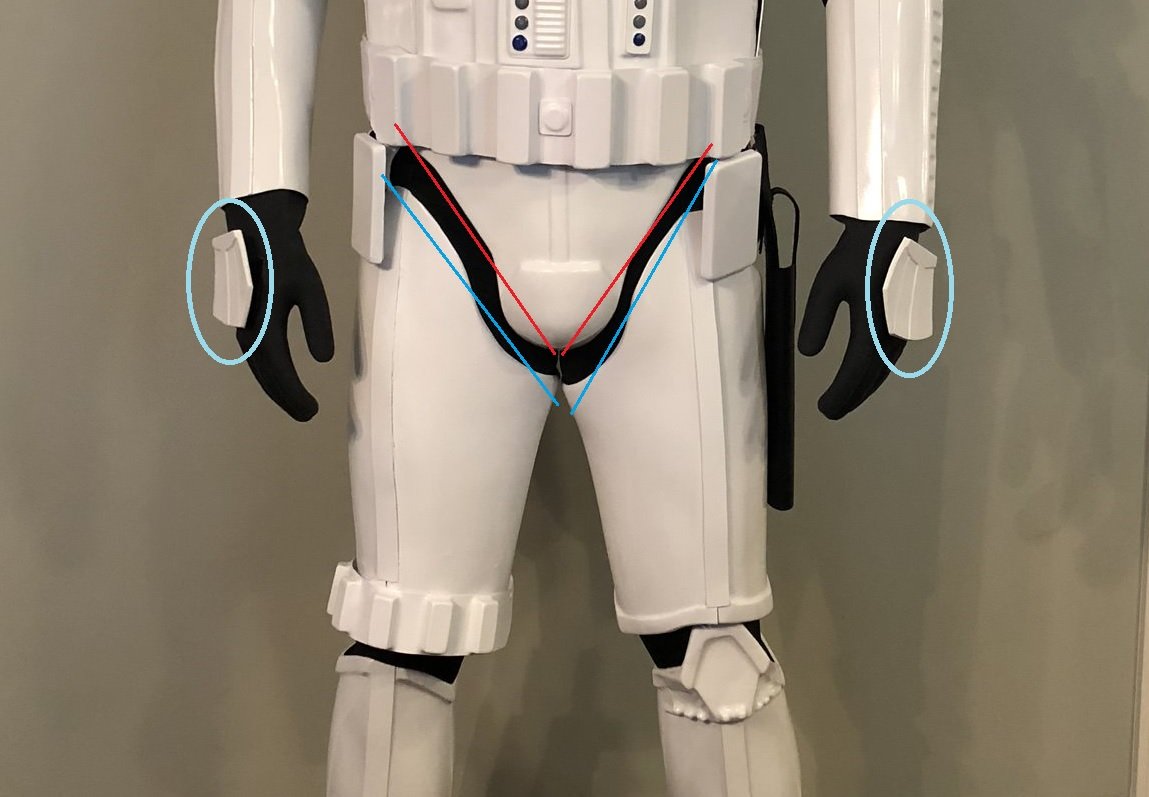
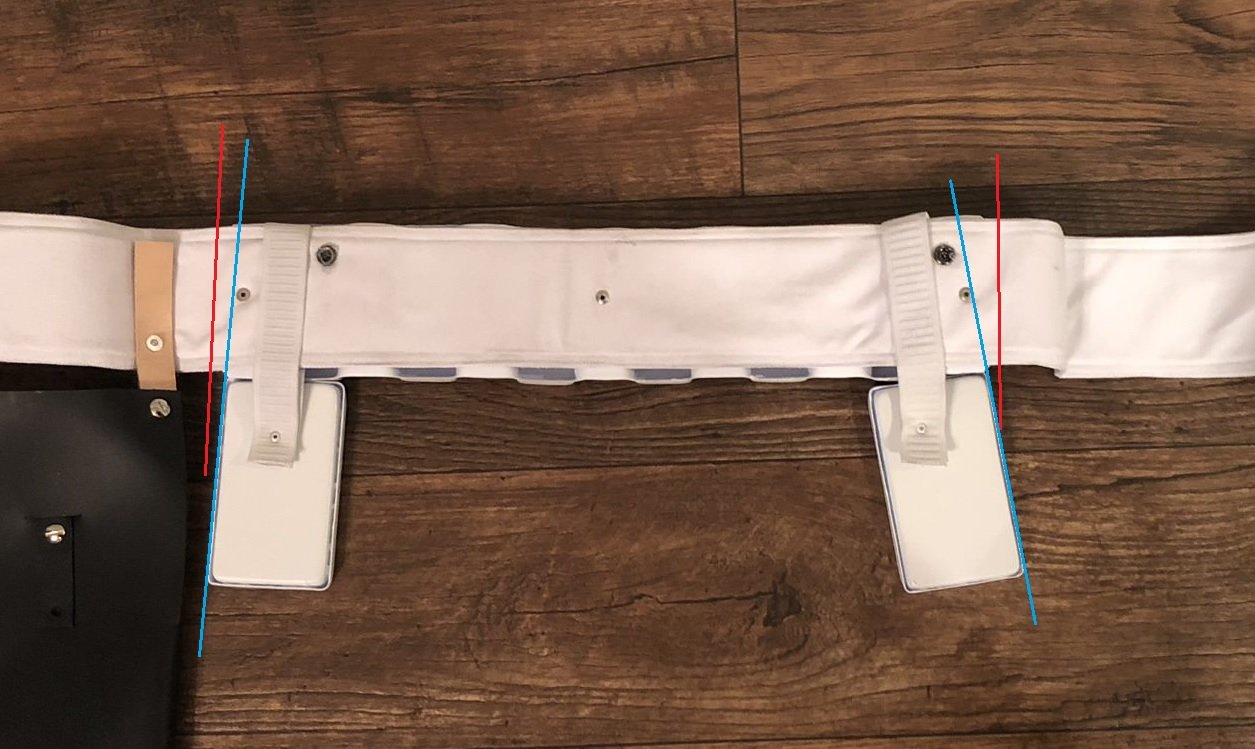
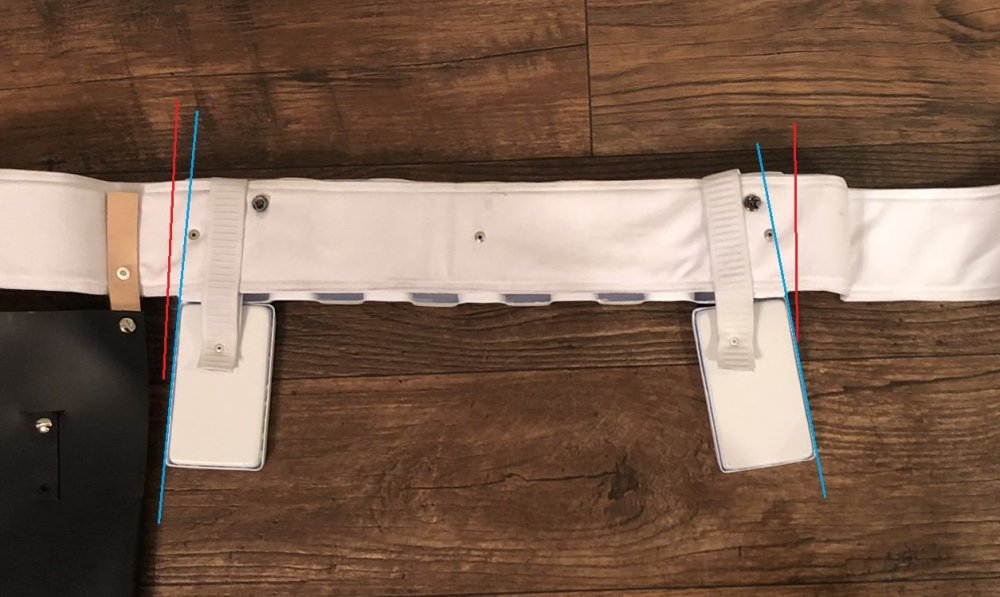
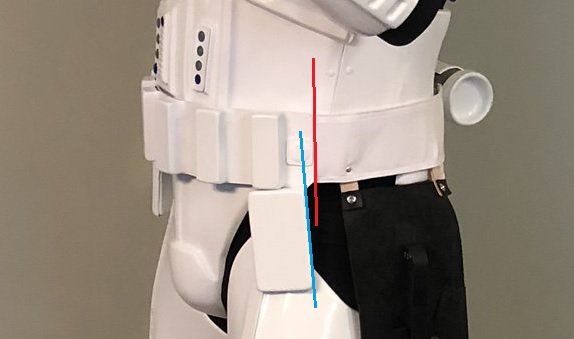
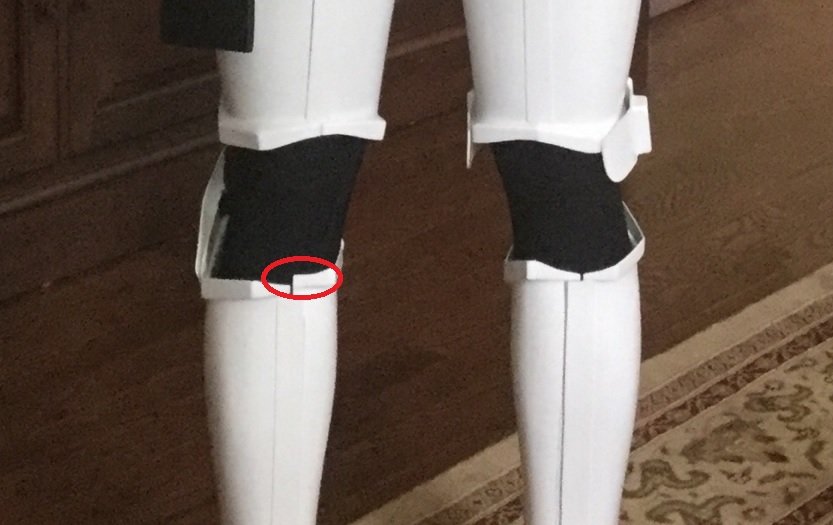
Hey Jon, great looking build you have going! Are you 100% sure it's a recast? Could try to contact the seller and ask the maker of the armor, if known. I too made the mistake of buying my armor off eBay in a rush of excitement and eagerness to start trooping. Luckily it was a seller who was prior 501st and was getting rid of his TK. I was able to ask who made the armor and both makers for the armor and the helmet are on the vetted list; NE and ATA. I'm going to let the experts suggest what you should fix, if anything, for your application. But as an observation here are a few things I noticed and offer as a suggestion. Firstly for me the hand plates on your gloves need to be glued down better so the edges aren't pulling away. E6000 worked great for mine. Also, you could probably raise your thigh armor a little bit more to give yourself more clearance for the sniper knee. Nothing worse than it getting caught and being pulled off, or worse; being cracked. My only other observation is the alignment of your drop boxes to the edges of the ammo belt. While you are standing it appears that gravity pulls them away from the edges, but in your static pictures you are either holding them to the edge or pulled them to rest at the edge. A possible solution would be to attach them to the belt using snaps rather than the looped elastic, since the rivets holding on the abs belt will prevent the loop from being able to slide as far as you may need it to go. You can see what I mean with the snaps in my Centurion application. Lastly the only other thing I can see is that you may be asked to re-take a photo of yourself in full armor to show that the belt is resting just below the ab button plates. It's great to see you making the changes so quickly, but the reviewers may want to be sure that the belt will rest properly while in full gear. Again, these are just suggestions and I wish you the best of luck on your application.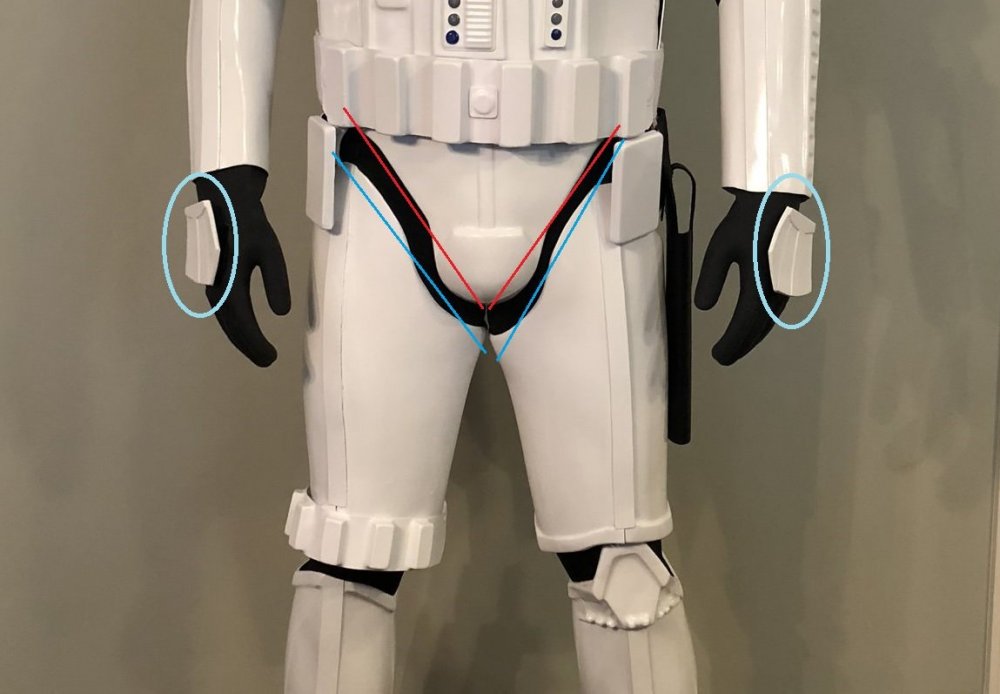
-
Looking good Jonathan! Good to see another NE armor build like mine. I can't spot anything that would keep you from EI. There does seem to be a stray corner on the back of your calf armor. Trimming that down to match the right side would give a more uniformed look as well as keeping you from getting poked by it as you walked.
-
Congrats trooper! Just a few quick fixes and you'll get the Centurion badge in no time. I actually had the same problem with my butt plate wanting to overlap the kidney plate. Having tight elastic made it worse actually. So I went to a local hardware store and bought two brackets that I glued to the inside of the butt plate to keep it from being able to move and overlap.
-
Also, save all your plastic trimmings. You can turn it into ABS paste to use to fill any holes if you make a mistake during the riveting process.
-
TK 11250 Reporting for Duty
SgtGarand replied to dyops's topic in Newly Approved Members - Sound Off!
Congrats! Hopefully the FOTK armor has been upgraded so that you can sit down in it. -
The flat surfaces on your biceps are mostly return edges and are there to help you trim and fit pieces to make them work for you. The seams between the two pieces are going to be hidden by cover strips that will also join them together. You can also include a strip on the inside for added security. E-6000 adhesive is also highly recommended because you can pull it apart, carefully, if adjustments are needed. If needed you could trim and remove the flat areas completely. When you add the cover strip, having a good set of clamps, and even rare earth magnets, will help hold it all together and the plastic should be flexible enough to bend and be held in place between an inner and outer strip. So you definitely have room to work with. For trimming I recommend using tape to hold the parts together at different lengths to find the fit that's right for you. Mark the edges at the tops and bottoms, roughly at a center point where the two halves meet. Then draw a line between the marks once you take them a part. This will give a guide for your cut. Once the cut is made they should mate back together without all the excess and can be joined with your cover strip. Easy way for clean trimming is to take a straight razor and score your line, and then flex the plastic. Should cause it to snap cleanly at the line. I also noticed your bucket is a three piece design and should be exactly like the NE armor bucket. May be a bit of a pain to build in comparison to the more traditional two piece. All comes down to personal choice.
-
You can trim down the pieces, such as the biceps, and will then join them using the cover strip method. You should be able to remove a decent amount of gap and then use foam to keep the parts in place or to fill in the gaps completely, as Frank suggested. If you would prefer not to attach lots of foam to your armor, then perhaps you could wear padding beneath your under suit. Also, I noticed the pauldron. Going to build a sandy or sticking to the clean white armor?
-
I'm already half way there!
-
Looking good! The only thing I could suggest with the drop boxes is that they don't need to be moveable. I secured mine via snaps to keep them aligned with the ends. As for the application photos, your GML should contact you with the list of shots they want. You already have the basic idea taking the photos for this post. Just will need to include one of you with the helmet off. Good luck!
-
FarEast Pre-Approval Request ANH TK Stunt (SDS)
SgtGarand replied to FarEast's topic in Request TK Pre-Approval
Awesome and congrats on the approval! If you're in Japan then you can sign up for the garrison forums as well to see any events taking place near you One parting thing I noticed is the cover strip on your right thigh seems a bit taller and pointed at the top. May not feel so great if that ever decided to poke you. lol Have fun trooper -
Requesting Pre-Approval (walt) TK
SgtGarand replied to Patrick Zapata's topic in Request TK Pre-Approval
Oh I agree. GMLs can be a lot pickier than the basic approval standards. It happened with me and my friend when we joined. My approval photos were taken by myself and was before I even had a chance to fit the armor to myself and re-do all the strapping. Some strapping was missing completely and yet I was approved. For my friend submitting his TB photos they wanted him to change some things to level 2 standards. I helped him with that and eventually got him approved. So is why I say it's best to play it safe and look your best. For Patrick it mostly seems to be fitting adjustments which are a quick fix -
Requesting Pre-Approval (walt) TK
SgtGarand replied to Patrick Zapata's topic in Request TK Pre-Approval
Hey Patrick, I'd say you are close to submitting approval photos. You could probably submit them as is and potential be approved, but always better to cover as many bases as possible to save yourself some time and get that approval on the first try. I think most of the suggestion will be based on EIB and Centurion standards that most of us here try to guide to. But for the sake of the overall look; adjusting your forearms and bicep pieces would work wonders on giving a better appearance. Bring them closer together towards your elbow and try to maintain an equal spacing. Also it looks like your chest piece sits pretty high on the abdomen and stops overlapping, or comes close to it, when you raise your arms. Try to work on that as well if you can, possibly moving the abdomen higher. Raising the shoulder bells to touch the shoulder traps isn't a basic approval requirement, but it definitely gives a nicer look overall. Good luck! Feel free to keep updating with photos and asking questions you may have. -
Welcome and best of luck on your build. You're in great hands amongst a wealth of knowledge and experience. It would appear that most of the flaws have been identified that would prevent you from basic approval. It would be a good idea to look through the build posts and even the Expert Infantry and Centurion approval posts to get good detailed photos of how a properly built suit should look. This will give you all the details listed in the CRL so that you will know exactly what it is asking. Also, if you are able to get in contact with members of your local garrison; it may be beneficial to ask if they could host an armor party to help you out with your build once you get the necessary replacements. Above all else, don't give up. The hard work and time spent making your armor up to standards will be completely worth it when you get the approval and your TK ID.
-
Blaster Master E-11 Build (With Pics)
SgtGarand replied to SgtGarand's topic in General Weapons Discussion
I used a rustoleum brand spray paint. i chose to go with a satin finish overall to keep with a metallic look and then for weathering i used a silver model paint (such as Testors) with a dry brushing technique, except for areas i wanted to show more wear. -
Request your Centurion Certificate here:
SgtGarand replied to justjoseph63's topic in Request Centurion Status
Asa Pittman 83042 Letter Andrew Thanks! http://www.whitearmor.net/eib/certificates/83042-centurion.png -
TK-83042 Requesting ANH Stunt Centurion Status [NE] [357]
SgtGarand replied to SgtGarand's topic in Request Centurion Status
Oh wow, awesome! And thanks! -
Looking good! Only thing I noticed was for your S-trim, they will need a pic of one of the ends showing that it's actually "S" shaped.
-
Blaster Master E-11 Build (With Pics)
SgtGarand replied to SgtGarand's topic in General Weapons Discussion
Thanks! For the tracks I used a Rustoleum brand undercoating. And I forget the exact epoxy brand. Just found one that was for plastic. E6000 could have worked too if I had some at the time. -
Congrats!
-
TK-83042 Requesting ANH Stunt Centurion Status [NE] [357]
SgtGarand replied to SgtGarand's topic in Request Centurion Status
Thanks for the confidence boost! -
Being able to submit this request has been my goal since before I even received my armor. Even after making EI and making the changes suggested, I still find myself nervous. lol I adjusted the elastic to correct the shoulders and bring in the gap between the bicep and forearm pieces. I also trimmed the areas mentioned to remove the excess return edges and could already feel the difference while taking new pictures. Time to put my time and effort to the test. General Information Name: Asa Pittman FISD Name: SgtGarand Legion ID#: 83042 Garrison: Japanese Garrison (Member Page) Mandatory Information Armor Maker: NE (Build) Helmet Maker: ATA Blaster Type: Blaster Master (Build) Additional Information Height: 5' 10" Weight: 203 lbs Canvas Belt: Imperial Issue Electronics: iComm and Aker amp Centurion Level Rivets and Screws: justjoseph63 Full Body Front: Back: Left: Right: Action Shot: Without Helmet: Armor Details Abdomen Detail: Rivets: Corner Snap: (Upper pointed corner trimmed off AB plate as suggested) Cod and Butt Plate: Interior Strapping: Shoulders: Left and Right Forearm: Sniper Knee: Shin armor back: Knee Ammo Pack: Helmet Details Front: Left: Back: Right: Hovi Tip: Lens: S-Trim: Blaster Details Left: Right: Folding Stock: D-Ring: Accessory Details Neck Seal: Thermal Detonator: Holster Attachment: Boots: Belt: Gloves: