

StrmTRPR85
-
Posts
699 -
Joined
-
Last visited
-
Days Won
2
Content Type
Profiles
Forums
Gallery
Articles
Everything posted by StrmTRPR85
-
So I was having some issues with the thermal detonator assembly Even after a hot water bath and a heat gun I could not get the end caps installed for the lift of me. Here is one the end cap that did not get the heat gun treatment. It sits right on top of the pipe. I went ahead and ordered the caps and pipe from Trooperbay and the end caps slide on with minimal effort After trimming the end caps I believe I still need to go a bit further to remove the bend from the vacuum pull. For comparison WTF end caps fit inside Trooperbays end caps so not sure what happened where or who (I can provide that picture later)
-
Thanks Dan! I only glanced over the screenshots and should have gone into the RS suit gallery. To be updated pulling that button off later today and removing the edge
-
Other Ab buttons as requested Here is what is the buttons come as before trimming out from the ABS sheet We will be using the four button piece for our ANH Stunt TK. Notice how close the vacuum pull parts are to the piece. My belief is this allows for a vert tight pull and gives great detail with the thicker ABS sheets that WTF uses, hence why they need to be so close to the actual part. Just like before there will not be much of a lip but this is no concern to me. Rough trimmed and cut out parts: Notice how close the pull lines are to the button edge after rough trimming I cleaned this up close to the edge and sanded down the back to be uniform (sorry I missed a picture after all cleaned up). I glued to the Ab plate and magnet in place.
-
Sorry my I slept through my alarm and was not able to start the other ab buttons. Although I did get my thigh strapping glued on. I got my thigh garter system here from Pencap510 If you looked very closely I have a slight bend in the middle between the two snaps. This was done to allow the two snaps on the thigh to align with the snaps on the garter belt. I may cut this so it lays flat but I will determine once it is dried and trial fit.
-
That's my next step is report soon
-
I got mine here from justjoseph63
-
Holster attached to the belt! Same holes as I had marked in above picture, used soldering iron to create the holes than I riveted using a 3mm washer in the back for extra strength. Also tightened the velcro on the belt which allowed the belt to sit correctly on the bottom Ab button
-
I thought that was the butt plate on the table,.... Now I see the buttons
-
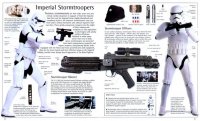
That's because we are iconic Fun fact because I have the stormtrooper book, most of what you see in ESB are ANH TKs. They were running behind on the mark 2 TKs and only had a handful completed.
-
How much of the cod do people remove? Not many screen reference of that part for some reason
-
Getting ready to put my holster on my belt. Does this look approximately right? I measured 3/4 inch from the end of the waist ammo and another 15 mm from the bottom of the belt
-
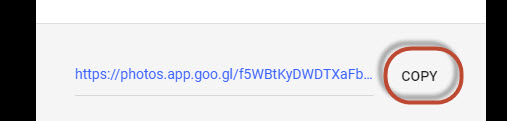
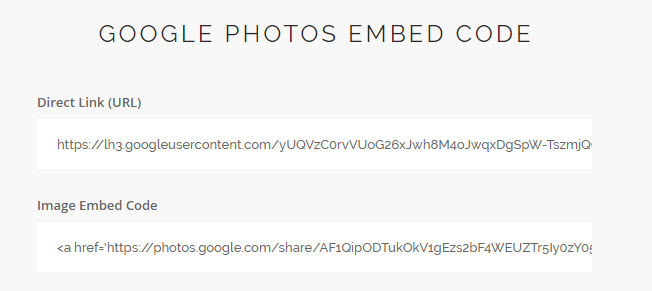
Hi Troopers. Thought I would share how I have been adding my photos from Google Photo if anyone wants to use google photos as there image hub. First you find your photo that you want to use and click the share icon (circled in red) Than click get link And click copy From there go to https://ctrlq.org/google/photos/ and paste the link where it states paste google link here and click on generate code The webpage will perform its internet magic and provide you with a link below Copy and paste into the direct link into whitearmor forum of your choice and you have your picture! <a Hope this helps everyone!


- 1 reply
-
- 3
-

-
Congrats on your BBB day. Ask tons of questions and post lots of pics! Don't think that just because there are a lot of threads that there are pictures of what you are seeing. We all have had different experiences in our builds and are more than welcome to share our knowledge. Anything in particular you have questions on what to source?
-

Jenny's First Build - TK ANH Stunt (AP kit)
StrmTRPR85 replied to JenEcho's topic in ANH Build Threads
1) I plan on glueing some parts of the trim on my helmet where it may be sticking out a bit more than I would like 2) I would at least get the Ab and kidney strapped together before sizing the belt. You can tape these in place on your body and measure for the belt than but only after you have them sized pretty close to you. That is what I did before I ordered my belt from Imperial Issue -
Rebel Scum!
-
Here is what the buttons look untrimmed It could be possible to get close to the vacuum pull holes and have some edge but could be difficult on some I'm sure.
-
Aint that the truth of it all? I have had to tell myself during my build to stop sweating over the really small stuff as only I and who ever reads my forum post will know
-
I thought that too but much easier to take more off later than add more later on. That might be where the 3-5 mm comes into play that I took from the image. Those are measured out to 4-5 mm. Once the completed kit is assembled ("Troopers Assemble!") I'll determine if a bit more should come off.
-
Thigh ammo pack time! I trimmed the bottom corners of the ammo pack and made them rounded. I drilled the holes about 1/2 inch from the edges and I lined up the center with the cover strip. I have seen some reference pics where it was lined up in the middle and others with the 3 block so I went with the third block. Put in the rivets and pressed them in place. Although I need to find my channel locks to give it a bit more clamping but I don't think they are going any where currently
-
That was before I realized my belt was just loose. Just a stream of unfiltered thoughts coming from my keyboard
-
Sorry Walt Didn't mean for you to make deeper bells. Outstanding service though! Hence since I caught the bug i'll need to save up for a scout, pilot or inferno from you next!
-
Nevermind it's just loose. Maybe some velcro or tighten the belt will keep it in place more
-
I'm wondering if I want to move my belt up should I just add two extra snaps so than I have the option of high belt and low belt..... thoughts?
-
Oh yes who could forget that one lol
-
First I reopen the shingate conspiracy, now I start Unsolved Ab buttons.......