Erice3339
-
Posts
235 -
Joined
-
Last visited
Content Type
Profiles
Forums
Gallery
Articles
Everything posted by Erice3339
-
 Thank you, Joseph! I have even gotten started already by replacing the lower ear screws. I very much appreciate your help with that. I’ll get around to including those pictures in the Centurion application eventually after starting on these other fixes.
 -
Revised TD screws. Let me know if there’s any further alterations needed for approval please.
-
Thank for the suggestion, guys. I will remove the top padding and replace it with a much thinner foam layer.
-
Sure thing, here you are: Right Left
-
Your thigh garter system. In the diagram, I presume Joseph's colleague is building his own; however, I purchased mine from Pencap's sale thread here: I highly recommend it. If nothing else, you can go to this thread to see how a thigh garter system looks/works (he has pictures). Prior to costume building (PCB), I had no idea what a garter system was, so I think the thread might shed some light on it for you. In short, it is a belt that you put on over your soft parts but beneath your armor that has two pieces of fabric/nylon looped around the belt. On the ends of these loops are two snaps (male) which will connect to two strips of material that have the other snaps (female) on the inside of your thigh armor pieces. This system holds up your thighs when you wear the armor (which is crucial). I am still a new builder myself, but let me know if you have any other questions!
-
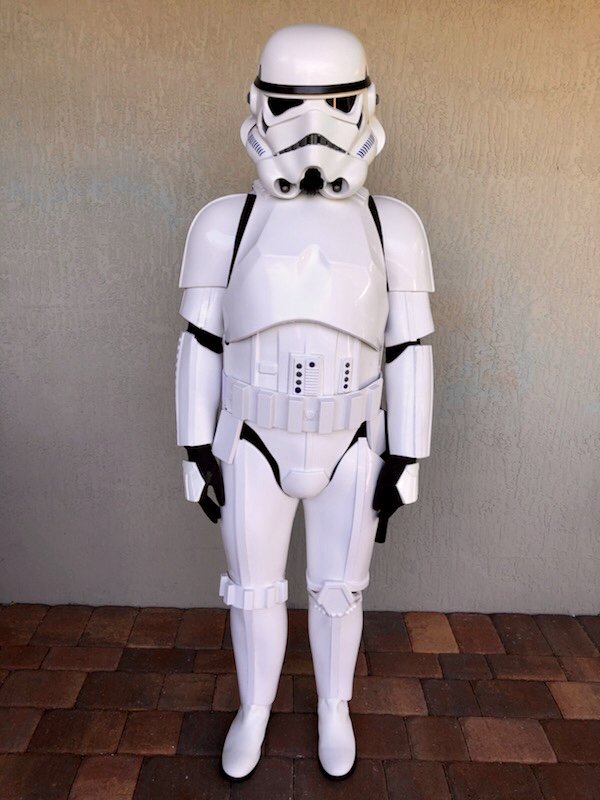
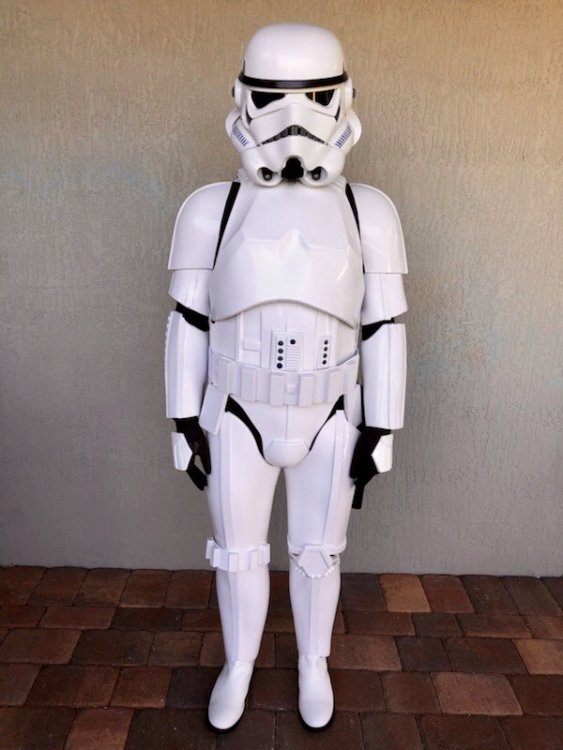
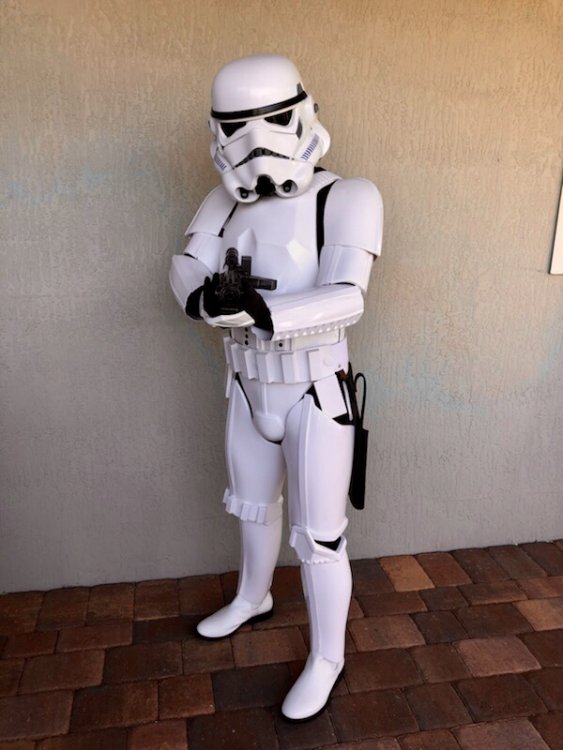
Eric E. TK-14056 Florida Garrison Armor: ANOVOS Helmet: ANOVOS Blaster: Hfx Productions E-11 (Elite model) Height: 5’8 Weight: 142 lbs. Boots: TK Boots Belt: Kittel Belt Hand Plates: Joseph’s Handguards Electronics: TrooperTalk with Akers amp, Bluetooth microphone, and iPhone 7 Neckseal: ANOVOS Holster: ANOVOS To preface this application, I would just like to state that this costume is my first-ever build of any Star Wars costume hence why it may exhibit a few issues. Thank you. Front Action Shot Back Abdomen Details (Wearing) Left Side Left Side (Arms Raised) Right Side Right Side (Arms Raised) Holster Attachment & Thermal Detonator Belt (Front) Thermal Detonator (Back) Cod and Posterior Plate Attachment Abdomen Details (Not wearing) Interior Strapping D-Ring Blaster Right Blaster Left Neck Seal (Rear) Neck Seal (Front) Helmet Front Helmet Left Helmet Rear Helmet Right Hovi Tips Lens Color (Backlit)
-
TK-14056 Reporting for Duty
Erice3339 replied to Erice3339's topic in Newly Approved Members - Sound Off!
Of course, your ABS paste tutorial was/is a godsend. Thank you! -
TK-14056 Reporting for Duty
Erice3339 replied to Erice3339's topic in Newly Approved Members - Sound Off!
Thanks for the congrats, Joseph. It might be some time before I am able to set aside the time necessary to apply for EIB, but I intend to eventually. My work schedule has me away from home often and working frequently. Anyways, appreciate the encouragement! -
Hello everyone, Referencing the pinned post in this thread, I'll start out by offering some advice that I wish I had known myself when I first purchased my first TK kit: The price you see on the ANOVOS website is not the price of the kit. There have been a lot of purchases since then that were needed to complete my build. Next, a top five list of things I have learned: There will always be something that can be improved on the kit. Especially as a first build, no kit is perfect and relentlessly striving for perfection, although admirable, can sometimes create unnecessary stress that soils what should be a fun experience. Plus, sometimes being madly driven by a desire for perfection can actually have the opposite result (i.e. maybe you took a bit too much off an edge that didn't really need trimming in the first place. Buy these Du-Bro scissors: Amazon I cannot iterate enough just how much of a luxury these scissors are. They are designed for cutting plastic and, to me, offer an advantage to first-time builders who may be wary of the score and snap method. It is unlikely that, especially if a TK is your first costume build, you'll be approved in the first go when you submit for basic approval. There probably will be changes that need to be made. Maybe others will dispute this one or had an easier time getting approved. I had to resubmit once myself and rebuild the thighs. Measure thrice, cut once. Enough said. Wear PPE! Despite yet another cost, it is worth it to get a respirator like this. I was hesitant to get one myself because of the price tag, but, reading of some of the symptoms and long-term complications of E6000, I am glad I did. Most come with the organic vapor cartridges which is what you need. And one extra thing I learned: Accuracy isn't everything. Yes, I said it. I am an accuracy hag myself, but if getting that belt rivet cover just right or aligning the belt takes a toll on your happiness while building, take a breather and realize that, at the end of the day, enjoyment comes first. As for challenges, I've already mentioned the thighs. My legs still continue to give me problems despite being approved. I am 5' 8" at ~145 lbs., so I have had some difficulty getting the thighs to not only close in the rear with no gaps (I used ABS paste; shoutout to Kalani for his tutorial here: https://www.whitearmor.net/forum/topic/42866-how-to-make-abs-paste/), but also some difficulty to keep them from hitting my posterior plate. More work to be done. Like I said, always something you can improve somewhere on the armor. I received countless warnings while building, so please simply consider all my acknowledgements later on as thanks for said innumerable warnings. To give some anecdotes, I'll provide just two to keep this short of a master's thesis. Firstly, my most embarrassing one stems from an acetone accident. I did not attempt to intentionally clean or even touch the armor with acetone, but I was cleaning some paintbrushes with my ab plate nearby and, unfortunately, splashed some on the armor after the lid came off surprisingly fast causing acetone to splash out of the top, in the air, and then down onto the surface of the armor. Long story short, I have managed to restore the finish using Novus products, sanding, and extensive buffing, but it was still a setback/scare nonetheless. To close my post, I'll offer my inspiration for joining the 501st and offer thanks to everyone who helped me get here. Upon attending my first Star Wars celebration with my father, I was fascinated with the atmosphere. The franchise of which I had been a lifelong fan of, albeit only being seven years old at the time, was literally standing in front of me on the show floor manifested in armor-clad people that seemed to have jumped right off the screen. So when my dad purchased a child's Jango Fett costume (nothing fancy; probably ripped off honestly) from a vendor, I was proud to wear it and walk among those who I quite literally looked up to. And then I found it. The 501st room full of costumes and members, and, ever since then, I've been dead set on joining once I mustered enough savings that I could spend on a kit without jeopardizing my financial integrity. This story is not even to mention the time when Marvel superheroes visited my younger brother in an oncology ward at a Florida children's hospital. The way terminally ill children light up when they see their heroes in front of them, despite all their adversity, is enough to even bring a grown man to tears. It was at this time that I knew I'd be joining the 501st sooner than later. A year later and here I am. I would definitely like to thank @justjoseph63 and @ukswrath for all their help with the latter providing an amazing build thread suited for beginners. I would also like to thank @Commander Gree @menschie @BrinkHouse and @kman to name just a few in addition to the countless members who made a dream a reality. And a huge shoutout to members of the Florida Garrison Everglades Squad who are a joy to be around and have provided invaluable pointers and recommendations. I know I could not have made it here without them. Thanks for reading. For the Empire!, Eric
-
TK 14056 requesting access. Link: https://www.501st.com/members/displaymemberdetails.php?userID=28741 Please notify me of any issues; thanks!
-
After 6 days, 21 hours, and 12 minutes since BBB day, I have completed my first 501st costume. I’m already thinking about the next kit (Scout Trooper). For the moment, that’s neither here nor there. As for this kit, it took alot of careful research, handling, and assembly. I’m pretty proud of it. Thank you to all of those here who contributed to the build. It truly would not have been possible without you all. For the Empire! Note: In this photo, the hand guards aren’t glued. I just put some velcro on them temporarily. I have other plans for them.
-
I've been looking around for an E-11 that will pass for Centurion. I would prefer one that is ready-to-use, but, if no such options exist, then I am willing to give building one a shot. After having spent much vacation time assembling a stormtrooper kit, I do not think I'll have the time to assemble an E-11 in the near future, and I am eager to start trooping as a Centurion-- or trooping period. I've linked one I found on Etsy below; the seller does not seem all that credible given a low number of reviews, but the blaster looks well-made and seems to pass most of the CRL items for an E-11. Thank you all in advance! https://www.etsy.com/listing/612603891/e-11-blaster-rifle-anh?ga_order=most_relevant&ga_search_type=all&ga_view_type=gallery&ga_search_query=e-11&ref=sr_gallery-1-5&organic_search_click=1
-
Good to know. The damaged area is pretty smooth (since I’ve sanded already). I’ll just apply the levels of Novus and hope for the best. Like I said, I’ll probably take a scrap piece, splash some acetone on it, and practice a little bit.
-
I'll end up getting a polishing cloth. I ordered the Novus product you recommended earlier today. Thank you for your input. Bought the full set for the three different bottles/levels of polish. I am glad to hear that it generally produces good results. I'll probably practice on a scrap piece first. Since I do not have much experience with polish, will the polish contradict/damage/remove the finish that comes with Anovos plastic? In other words, when I polish the damaged area, do I need to be careful not to get any on the surrounding, undamaged area? I wouldn't think so but better safe than sorry. Thanks!
-
Thanks for the reply Christian; sorry I did not reply sooner (hadn't seen it). I would definitely like to polish, but I simply do not know what kind of polish to use for ABS plastic. I've been looking into it. Do you reckon that I would have to remove the paint if I were to polish or could I leave what I have on and still polish? Also, if you have any brand suggestions or home remedies, I'd really appreciate it.
-
Good to know; thank you again
-
Thanks, didn’t catch that. I’ll do it later today. Yes, that threw me for a loop too. I agree that it looks better aligned, but, as Daniel pointed out, it’s accurate. They seem to line up when I put the belt on. The nuisance is that, because my belt is a little too far to the armor’s left, it seems like the boxes do not fall where it’d be accurate. It’s close, just not exact. I probably won’t shift the belt by installing more snaps unless absolutely necessary for Centurion; I did not see anything in the CRL’s about it. I will post pictures later once my strapping system on the ab piece finishes drying.
-
Also, relative to other users here, I’ve not been using my build thread as much. Apologies for not keeping you guys up-to-date and posting regularly. Fortunately, using Tony’s build thread, I’ve not had many pressing issues. In fact, if anyone is willing to offer some advice, the only two I’ve encountered (thus far) are as follows: 1) I did my best to align the belt exactly as seen in the Uswrath build thread; however, as pictured below, my belt is positioned slightly (?) too far to the right. In short, will this be an issue in achieving Centurion? 2) Now, this mistake is maybe more noticeable and equally more embarrasing to admit. It was a very stupid mistake. A portion of my ab plate was splashed with 100% acetone while I was cleaning paintbrushes nearby. What’s worse is that it came directly from the bottle (i.e. it wasn’t a small amount). I’ve done my best to sand down the damage and paint over it with Humbrol gloss white paint. Fortunately for me, most of the damage is hidden by the belt. Let me know if anything else can be done:
-
Hey Dan, Appreciate the suggestion. I’ve since removed most of the paint. Let me know what you think:
-
Using Tandy Snaps instead for all Line 24 snap locations; thank you again for the help, Tony. Invaluable work you have done here.
-
Just one more question. Thank you for your patience with me. The Popper snaps you used are only for accuracy, no? If so, will the male snaps Anovos provides be acceptable to use, namely in the top right abdomen snap (non-functional)?
-
Understood, thank you sir.
-
Are you referring to this one? If so, is it no different when using Kittel's belt? If that is again the case, how do I account for the flex/stifness of the Kittel belt? I suppose that is the part I do not understand too well. Thank you for your reply and time, Tony.
-
I'm using Kittel's belt for the build and am having trouble (or maybe I'm just too nervous) determining where exactly I should drill into the abdomen to mount the snaps. Since the belt is unassembled (i.e. corresponding snaps are not in the Kittel belt yet), I cannot use the width between the snaps on the belt to discern the width between the snaps on the armor. Likewise, I cannot add the snaps to the belt, atleast if I am to use the new Kittel tutorial on page 6 of this thread, because I do not have the male snaps mounted in the armor yet (since Tony marks the snaps in the armor with a pencil and presses the belt against them to produce the location of the snaps on the Kittel belt. Does anyone have the measurements that will specify the location of the mounting snaps on the armor when using a Kittel belt? Otherwise, what advice might help to enable me to find the proper location of the snaps on the abdomen armor, so that I can mount them and have the belt in the correct position? Apologies if this question is redundant.
-
Thanks for the encouragement; I’ll get right on removing the paint between the teeth. I have to wait for parts to dry for 24 hours anyways. As you pointed out, I’ve already faced some of the bigger issues, especially plastic wanting to overlap. Paint removal, fortunately, is not all that difficult for me to do.