

ireachy
-
Posts
50 -
Joined
-
Last visited
About ireachy

Recent Profile Visitors
2,103 profile views
.thumb.JPEG.090a51d263498dd94183c8dca58c9ff4.JPEG)


-
The belt is one of the most complex parts of the R1 TK armour. Not only does it have projections that key it to the ab plate - as per Jimmiroquai's posts - but it also has that difficult two-part construction, with the overlaps at the sides. In some pics from the SWCE display the back part of the belt even angles up slightly to the det pack attachment area. It is also probably worth looking at the shoretrooper belt and compare the way that the belt boxes (on the actual belt itself) are constructed. I also think that the hanging belt boxes attach to the belt in a similar way as the shoretrooper ones do. They attach 'into' the belt box detail above them.
-
Will pluck up the courage soon for the tube stripe cut away. Superglue gel is a useful tip thanks. I'll stream through plenty of ref material before I tackle the jaw seamline. Thanks for the pointers. If any help then here's a link to the pics I took at Celebration Europe last year. There are many tighter / better pics out there than these, but I did try and get some unusual angles for a few of the shots. Feel free to use if you'd like. http://s1146.photobucket.com/user/Ian_Reach/library/SWCE%20-%20RO%20-%20Stormtrooper?sort=3&page=1 ireachy
-
Par_, I followed your method regarding use of black electrical tape for the brow. If you pull / stretch the tape as you lay it down along the brow it tends to stick better and conform to the curve. I applied a single strip of the tape aligned with the top front edge and then tucked the reminder along the underside of the brow - the part that is white and inaccurate on the BS helmet. Using the rounded end of a wooden coffee stirrer I then pressed along the under edge to make sure the tape adhered fully. Some of the tape ran over onto the faceplate under the brow. I also pressed this into place. I then used a scalpel blade and cut the excess tape from the faceplate, aligning the blade along the underneath edge of the brow. Using fine pointed tweezers I then removed the excess tape very carefully. Finally, I noticed that I has two very small air bubbles on the front of the brow. Using the scalpel blade I punctured a very tiny hole in the bubble and then smoothed away the bubble. Worked a charm. I haven't added any tape to the upper surface of the brow. The taught electrical tape has blended perfectly with the helmet's original rubber plastic and you cannot see any seam.
-
Par_, good to see the neck trim trick. I have looked at using some OT S-shaped trim but it looks a tad too bulky, so will have a play with your weather excluder idea. Also have some excess trim from X-wing helmet so that may be a go-er too. The cheek tubes are looking great. That is the part that I am likely going to leave to last as it scares the heck out of me - too much opportunity for a catastrophic slip with the Dremel!!! Good spot on recreating the nose / jaw separation line. Something that I will now look to do on mine. I may post some WiP pics of my lid here, but don't want to clutter your build thread. Best, ireachy
-
 Great work sir - as ever. As you and others have said the detail is in the amount of weathering, and having the restraint to dial it back a tad to reflect the SWCE 2016 buckets. Just under a month and I get to see this helmet in person. Can't wait to get my grubby mitts on it and have a real close-up look at your skills. Fab. Next will be the armour!
 -
Hi Riva, just an obs, but the frown mesh - as seen on the helmets at Celebration Europe 2016 - is aligned vertical / horizontal, and not on the diagonal. A very small detail, but easy to mod to get screen accurate if that is your intention. Will enjoy watching your thread as in the process of modding my BS helmet too. Great to see how folks are tackling the mods and tweaks. Keep it coming... ireachy
-
ScouseTrooper, that image is actually concept art for the film - it is not from the film itself. It can be seen in the 'Art of Rogue One' book - although interestingly the image in the book is horizontally flipped - you can tell as the Type 4 pack is a mirror image of the one seen in the trailer long shot and on the Hot Toys etc. ireachy
-
Rogue One Stormtrooper Back Pack part found
ireachy replied to Sly11's topic in Build Threads Requireing Maintenance
Marv, check the R1 back pack build thread in the R1 part of this site. There is an entire section in there about the correct A.L.I.C.E. pack to use and way of distinguishing between medium and large pack - incl. pics for comparison. Aside from the size difference between the centre pocket and the two outer pockets - as per Bulldog's comment above - the easiest way is to look at the number of webbing details on the side of the pack. The medium pack does not have a bottom single webbing patch Whereas the large pack - the one used on the prop seen at Celebration Europe 2016 - does have the extra bottom single webbing patch Hope this helps. ireachy -
Par_, I think that whilst the R1 TK helmet had the mesh under the grill, I am sure that the attached reference shows that it was not 'backed' i.e. there is just the mesh in place. You can see the light or white of the helmet inside showing through. The fantastic hi res image is available here: https://c1.staticflickr.com/9/8604/28089834910_019dda3a55_o.jpg I also believe that the image shows that there is a black tram line running around the cheek and brow rhomboid. But, there is no doubt that these also have a greater 3D 'pop' than is present on the BS helmet. Hope that this is helpful. ireachy
-
Rogue One Stormtrooper Back Pack part found
ireachy replied to Sly11's topic in Build Threads Requireing Maintenance
Sithpiper, when pulling over and down the A.L.I.C.E. pack flap over the centre pocket make sure that you tuck in and under the sides (of the flap) so that the edge aligns with the two webbing guides (on the flap). The total area / width of the flap shouldn't show. In effect the flap is layed out so that the webbing guides align with the edges of the stuffed centre pocket. That will help give the CE shape. When you come to using the polyprop webbing and slider buckles to tie-down down the flap, and also attach A.L.I.C.E. pack to the frame, they should fall / align into the gap between the centre pocket outer edges and the inner edges of the other two pockets. The polyprop webbing actually runs down through and then back up the webbing guides on the flap. When tensioned this also helps give the CE shape to the pack. Also remember to add some stuffing onto the top of the centre pocket - before - pulling over the flap. On the CE pack there is a slight 'hump' to the flap as it pulls down over the centre pocket - ireachy -
Keep it coming - looking to mod my BS now that I have the Jedha pack sorted. Really interested to see what you are looking at regarding replacing the rubber seal / trim for the bottom edge - but waiting patiently so don't let me derail your build :-)
-
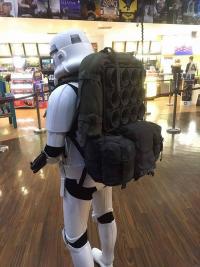
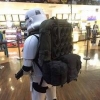
Pic of mr paul's and my packs side-by-side before the midnight launch troop. Both built separately by us and the first time they had been in the same place. Came out fairly close, and we're both happy with the results. Thanks to all on the forum for prompts, questions, demos, input, observations etc. Best, ireachy
-
Great to see so many Jedha patrol troopers with packs. Fab work guys
-
Sithpiper, is that silicon tubing or surgical tubing? I've managed to get 6mm OD / 4mm ID silicone tubing through fairly easy. I did thread up from 3rd to 4th then up to the top eye. Then took the lower part of the tubing and added the wraps 3rd eye down to 2nd eye, then through 1st eye and out with no problem. Just cut point to the end of the tubing to assist the threading through - as illustrated by mr paul above. The silicone tubing has enough stretch in it to help pull through the small diam. top 3 eyes. As mr paul indicates this is achievable with either silicone tubing or the surgical tubing. The key is slow and even pulling whilst holding the eye very firmly between thumb and forefinger - i actually bruised inside of my thumb nail as I locked the eyes in tight under my thumb nail. But that technique meant that I reduced the risk of the eye snapping. Have you managed to get the whole rod threaded with tubing now? ireachy
-
Phillthy, great to see the post of your pack. Been great to see you develop the build from v1.0 to your v2.0. The change in the overall look of the pack is fab. Also, great tip regarding the use of the textured paint and your application tip. The final component of the prop - the canvass roll, webbing, and buckles, plus mr paul's weathering - will be posted imminently. Hoping that others will start to post up their packs as we approach the premiere. ireachy
