

Tee-Kay Fisto
-
Posts
295 -
Joined
-
Last visited
Content Type
Profiles
Forums
Gallery
Articles
Everything posted by Tee-Kay Fisto
-

Brian's Anovos ANH Stunt TK Slow Build
Tee-Kay Fisto replied to Tee-Kay Fisto's topic in ANH Build Threads
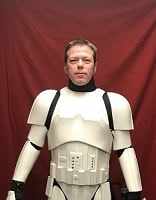
Hey All I Got my garrison clearance through this afternoon Here are my clearance photos Front by brian.mcdavid, on Flickr Back by brian.mcdavid, on Flickr Right by brian.mcdavid, on Flickr Left by brian.mcdavid, on Flickr Right Arm Up by brian.mcdavid, on Flickr Left Arm Up by brian.mcdavid, on Flickr Action Shot by brian.mcdavid, on Flickr Bucket Off by brian.mcdavid, on Flickr The only comment from my armourer was to paint the knee ammo pack rivets. I overlooked them as I was in a rush to get it finished. Added the shoulder strap elastic bands too. Knee rivets painted by brian.mcdavid, on Flickr Shoulder elastics by brian.mcdavid, on Flickr I want to thank everyone for the help, advice and above all the support given through this long process. Now I need to start the journey to EIB and Centurion. Thanks again Brian -
Brian's Anovos ANH Stunt TK Slow Build
Tee-Kay Fisto replied to Tee-Kay Fisto's topic in ANH Build Threads
Thanks Mark Looking forward to getting out and meeting my new brothers and sisters. Sent from my iPhone using Tapatalk -
Armour Bin for strapped torso.
Tee-Kay Fisto replied to Tee-Kay Fisto's topic in Boots, Soft Parts, and other Accessories
Thanks for the feedback guys. This gives me a somewhere to start searching. I forgot to mention my other problem and that is the actual transportation of the armour bin. I've got an Audi TT coupe so fitting anything too large in the back is going to be a struggle. The 110 litre fat max suggested by TK73511 above looks like it it not as tall so I'll have a better look at that when I get home from work. Cheers Brian Sent from my iPhone using Tapatalk -
Hi All I've seen loads of posts about storage/transport bins for armour but never found the answer to my question What size of storage bin is needed for armour which is connected with the bracket system front and back, and connected at the side with webbing riveted on. This means I can't take the armour apart for storage or transport. Obviously this makes if a fair size as I gather a lot of you guys and girls can disconnect snaps and stack the pieces inside each other therefore taking up a lot less room. Hopefully someone has encountered this problem in the past and found a suitable solution. I'm in the UK so a lot of the bins I've seen aren't available this side of the pond but an idea of what size to look for would be great. Just waiting on clearance for my armour then I hope to join my trooper brothers and sisters doing good. Cheers Brian Sent from my iPhone using Tapatalk
-
Brian's Anovos ANH Stunt TK Slow Build
Tee-Kay Fisto replied to Tee-Kay Fisto's topic in ANH Build Threads
Got the go ahead from one of the garrison armourers to submit my photos for clearance last night. Just waiting to hear back about that now. Applied to the 501st for my TK designation number too. Hope they don't take too long. I'll post my clearance photos here later once I'm at my pc. Sent from my iPhone using Tapatalk -
Brian's Anovos ANH Stunt TK Slow Build
Tee-Kay Fisto replied to Tee-Kay Fisto's topic in ANH Build Threads
Figured it was time to do this Front test by brian.mcdavid, on Flickr First full suit up and I think it's looking pretty sweet. Fits really well with only a couple of points which are rubbing a little. Still got the protective film and some bits of painters tape on it but took the obligatory all round photos to get a better idea of how it looks. Not having the belt on means the right hand side is opened up a little bit but it will pull together easily. Back test by brian.mcdavid, on Flickr Right test by brian.mcdavid, on Flickr Left test by brian.mcdavid, on Flickr Left up test by brian.mcdavid, on Flickr Right up test by brian.mcdavid, on Flickr Bucket off test by brian.mcdavid, on Flickr I don't know why I look so serious in the bucket off photo as I was grinning like the joker all the time the bucket was on my head After I got the armour off I realised that Manny was feeling a bit left out Untitled by brian.mcdavid, on Flickr Sooooo .... I let him play plastic spaceman too Untitled by brian.mcdavid, on Flickr Any thoughts or comments on how it's looking would be gladly received as I'd like to try and get approval photos in to the UKG as soon as I can, and if I can sort out any issues first it should save time in the long run. Thanks for stopping by again Brian -
Brian's Anovos ANH Stunt TK Slow Build
Tee-Kay Fisto replied to Tee-Kay Fisto's topic in ANH Build Threads
Hi All I'm back again already. Got stuck in over the past couple of days and got loads done. Started with the belt. As most of you will know the Anovos belt is garbage so replaced it with a Kittle belt (sweet). Removind the rivet covers was a complete clusterf*** due to that pink gunk the were glued on with, much swearing! I wasn't one of the lucky ones and ended up with damage to all 3 rivet holes. Repaired with ABS patches fixed on with ABS cement (not seen so no point in waiting 24 hours for E6000 to set) Once that was done put the new belt together and glued the rivet covers on with E6000 Belt damage by brian.mcdavid, on Flickr Belt repaired by brian.mcdavid, on Flickr Ammo pack fitted by brian.mcdavid, on Flickr Rear view by brian.mcdavid, on Flickr With appropriate accessories by brian.mcdavid, on Flickr I know that I still have to trim the top hole off the holster straps but no rush. After the belt was done and put to the side to allow the E6000 to cure I moved onto strapping. Got the thigh support system finished. Thigh support by brian.mcdavid, on Flickr Made and fitted bicep hooks, again used ABS cement to fix them in then strapped the biceps to forearms. Bicep to forearm by brian.mcdavid, on Flickr Arm strapped with bicep hook by brian.mcdavid, on Flickr Last bit of strapping work was the right hand chest snap plate, again fitted with ABS cement. Chest snap plate by brian.mcdavid, on Flickr After spending ages fixing my shins with a hot water bath got the closure velcro fitted. Velcro closure on shins by brian.mcdavid, on Flickr Next up was to finish the TD. I assembled the detonator not long after I got the kit and it's been lying in a box since then. Drilled and tapped the screw holes and put a little E6000 under the clips for strength. TD front by brian.mcdavid, on Flickr TD clips by brian.mcdavid, on Flickr Notice how Manny is kindly holding my freshly finished belt Removed the screws from the TD and painted them black TD screws painted by brian.mcdavid, on Flickr After all my hard work it was time for the fun to start ..... -
Thanks Mark. Actually hoping to have it all together by the end of the weekend. Only thing I really need to do is reshape the shins for better closure which I'm just about to start. Then it's a couple of wee bits and we're away. Sent from my iPhone using Tapatalk
-
Congratulations Mark. This is what I'm aiming for if I can just get my armour finished already. Sent from my iPhone using Tapatalk
-
Hey Bryn Looks like there will be a few good builds going on around the same time I'm using aluminium as I heard of a couple of people who had their plastic pipe collapse on them after drilling them. Probably depends on the type of pipe you use as Robert sells plastic pipe so must be good stuff he uses and you get the drilling template with it according to Darthcue in an earlier post here. I'm hoping for one of Brian's resin scopes for the pipe build and my real one will go on a sterling once I get it ordered (soon I hope) Hope you get all your parts sorted soon. I look forward to watching your blaster come together Cheers Brian
-
Brian's Anovos ANH Stunt TK Slow Build
Tee-Kay Fisto replied to Tee-Kay Fisto's topic in ANH Build Threads
Thanks Brad. Just needed a little bit of guidance to get closer to finishing. Hopefully be done by the end of the weekend Cheers Brian -
Brian's Anovos ANH Stunt TK Slow Build
Tee-Kay Fisto replied to Tee-Kay Fisto's topic in ANH Build Threads
Hey Troopers More progress to show for a few hours working before my nightshifts this week. Started putting bits of armour together. A greatly satisfying process. Got elastic glued into thighs and shoulder bells Thigh and shouldel bell strapping by brian.mcdavid, on Flickr Snaps fitted to torso where required and bracket and strapping fitted front and rear. Strapping rear by brian.mcdavid, on Flickr Strapping front by brian.mcdavid, on Flickr Split rivets for abdomen to kidney strapping done and elastic strap from kidney to abdomen solo snap done Internal strapping left side by brian.mcdavid, on Flickr Internal strapping right side by brian.mcdavid, on Flickr Chest to back elastic fitted. Glued front and back left hand side and only at the back at the ight hand side. Need to glue in snap plate for right hand side chest fixing. Hopefully get that fitted tomorrow. Chest to back Elastic by brian.mcdavid, on Flickr Now I need some help and advice. I'm struggling to get my shins to close well at the rear. I'll let these photos tell the story Right shin gap by brian.mcdavid, on Flickr Right shin alignment by brian.mcdavid, on Flickr Left shin alignment by brian.mcdavid, on Flickr The left shin is much better than the right with just an alignment issue i.e. the tapering gap. The right shin is a totally different story. The gap is much larger which makes me think I am going to have to reshape the shin. I was planning on using velcro for my closures. Not the anovos stuff but good industrial stuff. Is a hot water bath the way to go with this? Thanks for looking and any advice you can give Cheers Brian -
This is a crazy amount of work going into this project Brian. Between your packaging and manuals I'm surprised you have time to make the scopes at all. Can't wait for these. [emoji106][emoji106] I'm definitely in for one of these (ok maybe two) Sent from my iPhone using Tapatalk
-
You won't be disappointed with the parts you have ordered. I can't compliment the workmanship enough. Both guys are a pleasure to do business with too which really matters. At the rate I'm going you will have a build thread going before I do as I'm on a final push to get my armour finished. Sent from my iPhone using Tapatalk
-
Thanks Brian. I hope you are a patient man as the build is still a bit away as still to source the rest of the parts. From everything I have heard your scopes are the very best quality which is more pressure on me trying to put everyone's great work together in a blaster which does them justice. I'll keep my eyes peeled for your kits going live. Sent from my iPhone using Tapatalk
-
Hello again my friends All my lovely parts arrived over the past couple of days so I thought it was time to post photos First a group shot then a bit more detail Blaster parts by brian.mcdavid, on Flickr Magazine well assembly by brian.mcdavid, on Flickr Small blaster bits by brian.mcdavid, on Flickr T-Tracks by brian.mcdavid, on Flickr Hengstlers by brian.mcdavid, on Flickr Hengstler counters by brian.mcdavid, on Flickr I couldn't be happier with all of the parts. Roberts plastic parts are amazing again. The t-tracks look great and seem to sit very well on the 38mm pipe (just a quick try). The hengstlers from Dennis are Fantastic. The replica is an amazing piece of work. This cuts down my list of parts to buy a little bit. That's probably just wishful thinking after deciding to try a sterling conversion. I think my next big purchase is going to need some serious research. Power Cylinders. I've been looking at a couple of options, either Andy - PlayfulWolfCub, or Chris - FieldMarshall as both of these guys are offering amazing kit. As I'm hopefully doing two builds maybe I should get one from each of them? Anyone got comments on which to go for and advice on the many different shapes available. I'm sorry but I can't see much different between the various shapes available from both of these guys Thanks for looking and any advice you may have Brian
-
E-11 Bayonet lug, Rear end cap lock & Folding stock
Tee-Kay Fisto replied to nDreaZ's topic in General Weapons Discussion
There are people who do the folding stock but the ones I've been looking at are functional folding stocks and are obviously more expensive. Perhaps too expensive for a hasbro mod? The other parts you are looking for are readily available via sites like shapeways.com as many people have created the designs and made them available to 3D print and buy online. Sent from my iPhone using Tapatalk -
Hope this works out for you. Hate that you have all that hard work to eventually get back to where you are now. Fingers crossed mate Sent from my iPhone using Tapatalk
-
Brian's Anovos ANH Stunt TK Slow Build
Tee-Kay Fisto replied to Tee-Kay Fisto's topic in ANH Build Threads
Hi Again A bit more progress yesterday and today. Stripped the torso and gave all the parts a good smooth finish sanding. Will probably need to remove some more returns at the neck/shoulder area once I get to the point of trying it all on. I'm not sure just how much can be removed around the neck. I'm probably just going to follow what my wife suggests and just go for comfort. Nothing to see for a couple of hours work so no picture. Painted the ab buttons last night and got them glued on today. Got the top returns on the biceps almost totally removed and sized, cut and glued them up. Untitled by brian.mcdavid, on Flickr Next step is to move on to the strapping, but that is for another day Cheers Brian -
Brian's Anovos ANH Stunt TK Slow Build
Tee-Kay Fisto replied to Tee-Kay Fisto's topic in ANH Build Threads
No problem brother Sent from my iPhone using Tapatalk -
Brian's Anovos ANH Stunt TK Slow Build
Tee-Kay Fisto replied to Tee-Kay Fisto's topic in ANH Build Threads
I must admit that I have not had any of the problems with customer support. My only issue was when I was missing some of the strapping they took forever to answer due to the fact that they have a known issue with hotmail accounts so I had eventually to use my work email to contact them. Once I did that my issue got dealt with. My armour arrived in the U.K. With no defects but I have heard others talking about the problems they had. As for the long waiting times I was one of the lucky ones. I didn't preorder my armour. At the end of the first run last year Anovos had 300 kits left and put them up for sale. I had my kit about 3 weeks after ordering it. I like my kit and there is a great community of builders doing kits so help is never far away and as a first time builder that is brilliant. I did think about other makers but thought that one box with everything was the way to go. Turns out I have replaced a good many of the bits as I am aiming for centurion. All I can say is read lots before you make your mind up. It's a very personal thing to build your own armour so take your time to decide. If you do decide to go for Anovos then don't buy the kit with soft goods as they are not worth the money and you will replace them with better. Sent from my iPhone using Tapatalk -
That's a shame about your paint adhesion. I'll need to do some research on that as I'm gearing up for an aluminium pipe build in the near future. I know a guy who can do shot/sand blasting so I might hit him up to try it gently on the pipe. Sent from my iPhone using Tapatalk
-
Brian's Anovos ANH Stunt TK Slow Build
Tee-Kay Fisto replied to Tee-Kay Fisto's topic in ANH Build Threads
Luckily Anovos actually fitted s-trim as standard so good to go there. Probably about the only thing I haven't had to replace. Sent from my iPhone using Tapatalk -
Brian's Anovos ANH Stunt TK Slow Build
Tee-Kay Fisto replied to Tee-Kay Fisto's topic in ANH Build Threads
Thanks for the support. Just never find the time but trying to make a big push to get finished for May the 4th [emoji6] Failing that aiming for May 25th Sent from my iPhone using Tapatalk -
This is a fantastic build thread you have here. I wish I had found and followed you earlier in this project. Loving the electronics you have as I have no idea where to start mine. Thinking of robbing from a Disney blaster to keep it easy. Keep up the great work. Sent from my iPhone using Tapatalk
