

ticopowell
-
Posts
198 -
Joined
-
Last visited
-
Days Won
1
Content Type
Profiles
Forums
Gallery
Articles
Media Demo
Posts posted by ticopowell
-
-
I had a similar issue with my forearms, one of them had a funny angle on the flat areas under the cover strips, so I glued the funny areas first, it left a very wide forearm that had no chance of connecting without some good force. I let the E6000 dry, then I glued the other half. With both sides dry and set the forearm looked a lot better. After they had been fully set I did a hot water bath for 20-30 seconds to remove any tension on the parts, normally the bath is to mold the parts, in this case it was to just let the plastic relax a little. Not sure if that helps, but it worked for my forearm.
-
 2
2
-
-
Thanks! I'll check it outWell, in this video(from TK1636) there are several tips on how to do it...
I used the option of trimming little by little with sheet metal scissors...
-
@Jeklynhyde has a good RS thread as well,
I'm building an RS set, idk how helpful it is yet but there might be some useful info.
Ill post if I get an EIB or Centurion request thread someday

-
1
-
-
Question, my screens for the hovi tips came in a rectangle, any recommended cutting techniques? I have multiple tools, dremel, snips, dikes, etc, just wondering if anyone has any recommendations.
The other option is to buy @ukswrath hovi tip speakers, then I don't have to worry about it :D... but if I'm doing that I might as well buy his whole setup and with current finances the wifey wouldn't be happy...

-
On 5/30/2020 at 5:53 AM, CableGuy said:
Excellent job. The helmet alignment is looking really good.

As you mentioned, there’s quite a bit of excess left on the ears that could be removed.
These are only approximate...
Kinda like this picture as well... Don't you love it when you find a new picture you don't remember seeing before?
I wondered why my ears looked so weird, I didn't think I had that much to trim, but that's good to see.
I am afraid I might have to bend the plastic a bit to get the ears smaller, eh... it happens.


the lines are nice and tight on most of those, but shrinking them a bit won't be too difficult. The ones that aren't tight still have plenty of material to trim to tighten them up. Obviously they won't be perfect though. Gotta ask the wife if she has a compass hanging around
-
1
-
-
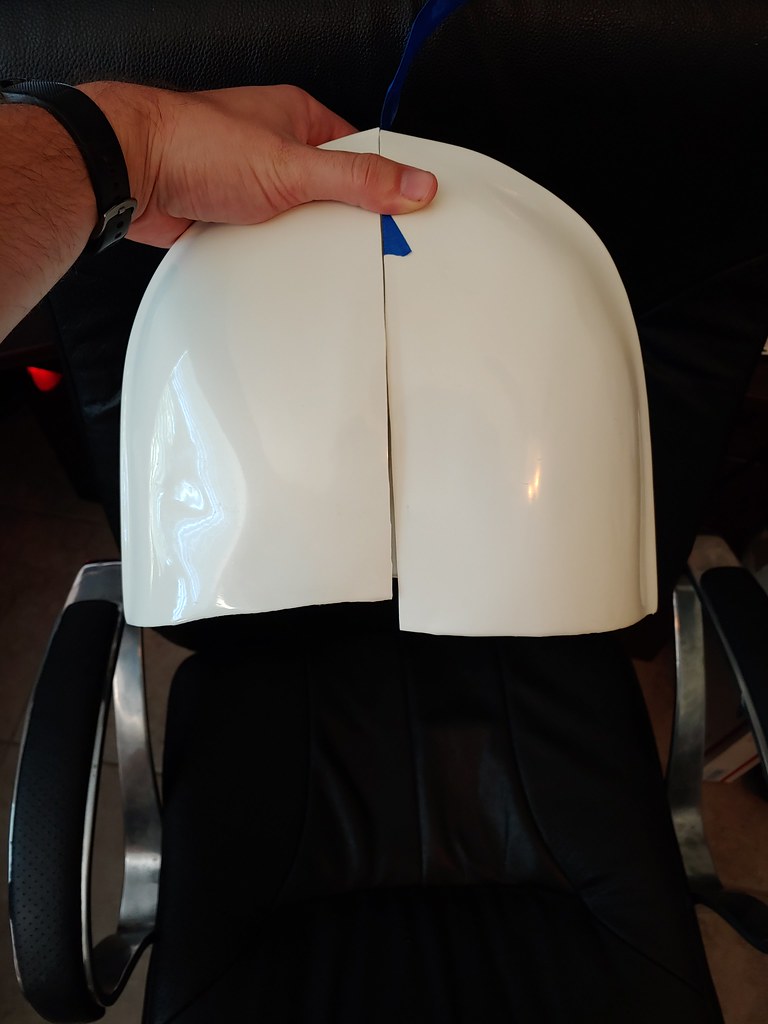
Jumping back to the helmet, here's its current state.


There are a few spots on the ears that I will trim when I pull them off, but overall I think it looks pretty good for how wonky it was

I started with the belt boxes, glued the elastic to the back but I didn't want to glue them together yet because I want the belt more finished before attaching them. The belt has the button covers installed now, so I can measure and glue them a little more accurately. I almost used chicago screws for them but I figured glue would be easier to adjust if needed.
Back to my personal checklist:
trim excess return edge of body pieces
Fix weak shoulder elastic
Remove excess glue from all appendage pieces
chicago screw holster onto belt
Install snaps for holster retainer
finish attaching belt boxes
Add shims and rivets to kidneys and abdomen including crotch strap
Paint all the rivets that need paint (6 ab-kidney, helmet ears, thigh ammo box rivets)
paint the screw heads around the torso pieces
Attach button panels to abdomen
finish helmet.
Talk to the GML
My list is getting shorter, so that's good. I removed a lot of excess glue, but I don't think I got everything yet.
When I wore the armor last time I realized that if I can bend the ab and kidney plates a bit it will make life easier. Also I only have about an inch on either side that needs to be shimmed so that's going to be helpful. Ill likely make the shims 1.5" wide to keep them comfortable and in case I don't keep my present weight.
That's it for now, back to work

-
3
-
-
I still need to add the elastics, so that should helpThere are also different tension elastic available but doubling up should help.
You will also need to adjust your shoulder straps on the rear, on the left it doesn't appear to be in the right position, also need them both to sit down on the back plate
-
Here are the promised shoulder pictures.


They are really close now, I see that they are pulling the white shoulder elastic slightly, but I'm not sure how to fix that without leaving a gap.
-
3 hours ago, TKSpartan said:
for the Shoulder , could you please, post some pictures?

I will once the glue dries again, I think there was 1/2" to 3/4" gap.
Ive been studying the build portion of both those threads, haven't read much of the commentary yet but that seems to help
") 3 hours ago, PhilBobTheFish said:
3 hours ago, PhilBobTheFish said:Hooks in on the shins.
Thanks!
3 hours ago, gmrhodes13 said:Here is another nice helmet build
I've read that one probably 5 times, I'm going through the comments now to see what other information I can find.
Thanks again guys!
-
3
-
-
Mario, that's helpful. I definitely have a lot of tweaking on the ears, gonna try and do most of that after the helmet is screwed together.
My question today, the bra hooks for the shin closure, do you do hooks in, or hooks out?
I did have all the shoulder bells attached, but they were too far away from the shoulder bridges. I looked at the strap and apparently they both stretched more than expected while hooked up, so they are being reglued at 1/2" instead of 1".
Still looking for helmet feedback on face plate vs dome positioning, I think Ill drill it tomorrow and hope it looks alright, but anything that helps calm my nerves about drilling the plastic would be great
-
I'm mainly comparing my helmet to these RS photos from the gallery.
-
Here are the ears attached with my tiny clamps.


What do you think?
Front and back of each ear need a bit of trimming still, I'm waiting on the helmet to be connected before I trim more.
-
1
-
-
Just make sure your ears will cover any openings, also make sure you can fit your head inside, (fyi they don't go straight on, put on sideways then twist)
Adjusting the angle on the sides makes the opening larger and smaller and also adjusts the brow trim height.
A couple of test screws to hold together first then check all the alignments.
Thanks,
The ears do cover the seams, I could trim a little more if I wanted but I figure I can always trim more later. I'll take a picture with the current ear shape/location, that might help.
I've tried it on like this, it fits fine as far as I can tell, but I wouldn't know if it didn't.
I guess test screws won't hurt anything (that's what she said?) So I'll try that. As long as they aren't blocking the ear holes I guess it wouldn't matter much.
-
2
-
-
Helmet question time!
Here is my helmet, I plan on placing the front and back here, I just want to make sure I'm not missing anything and that this placement is ok. Let me know if you need other pictures.


If I get good responses Ill likely drill the holes today and start really working on the ears.
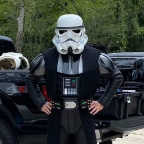
I did get the thigh straps connected, so those are completed and ready for wear. I am about to glue the straps to the shoulder bells to get them wearable, and that's all I've done lately. Family, work, and painting the house has taken over the past week or so, so ive been slacking on my stormtrooper build.
I did get larger boots, so those should help with comfort, the size 11's were just too small. The 12's I have will work great I think, and they fit a set of insoles I had laying around so that will also help
-
IDK who Chad is, or really anyone else on here (but thanks for all the good threads and help I've received), but I see his point but I think it is an incomplete thought. If we are just talking about staff showing preference to a specific vendor it can set a bad precedent. I know some staff members are vendors and will obviously support and promote themselves, but if a staff member heavily promotes/supports a single vendor (as in they only promote that vendor no matter the quality, and ignores the existence of others) then that would not be acceptable in my mind. In that case I would be suspicious of some type of foul play, under the table deals, bribes, or other shenanigans. I am not accusing anyone of this nor do I expect to, but if it happens I would expect that member to step down from their position or to change their ways and to support all approved vendors equally.
On the other hand, if a staff member guides newcomers like myself toward vendors who have a good reputation and deliver accurate and timely products, while not showing undue preference, that would be acceptable by my interpretation of the charter. Hence the approved vendor list. Once a vendor, 501st member or not, shows bad intent, is unable to deliver quality parts, or is shown to marginalize and degrade others work then they should be publicly removed from the vendor list. Their accusations should be laid out, and then forum members should easily be able to find why they aren't a good person to buy from. Nobody has control over what armor anyone buys, or what they do with it on the own time, except the person who bought it. If they want to paint it pink, or rainbow, or blue, or turn it inside out and wear it to walmart then that's impressive, but just fine. The legion, and the detachments, should make the accusations known, and if they are valid they should remove said vendor, and that's it.
I have watched a recaster in the SLD get called out, get help, and is now back on the "approved list" for vendors (I think there is a list somewhere there, but it's a smaller detachments so they may not have an actual list, just recommendations). So it is possible, but in this case I don't see that happening.
Now, back to the subject at hand. I really hope my comments aren't controversial, I just followed 40+ comments and figured I would summarize a little of what a lot of people are feeling, and also help get the thread back on subject.
To sskunky, That totally sucks. I can only see a few minor differences (not been looking at white armor long, but I can spot a vader version from 100 feet away haha), but the ears and a few other tells makes me believe your accusations. Ive seen your work over the past few years since I started this hobby and I really wish this hadn't happened to you. I wish the best for you and your family. If able, I would find it easier to spot the similarities if you compared both of the helmets in the pictures to another vendor's helmet. The shadows and other small details you mention are just not visible to me yet. But I understand if you don't have the time/patience/desire/ability to do that.
To TM (assuming you read this), I would be interested in what you have to say about the accusations, and I would like to see if you have any proof that sskunky's accusations are incorrect. If you can prove that you didn't recast this or any other items that you sell then I will happily refer people to your quality products and I hope others will follow. If there is no proof, or no response then me and (most of) the rest of the legion will assume you are a recaster and will try to keep current and future members from purchasing from you. The ball is in your court, I hope you don't drop it.
To everyone else, HI!
Thanks for all the help, I'm getting close to finished on my TK and the forum has been invaluable, as expected. Sorry if I sound uneducated in TK stuff, it's because I am ") , if you have any questions about Vader, R2D2 building, or MSE building there is a good chance I can answer them (or at least direct you to a good source) so please don't hesitate to ask. Keep up the good work, don't get the Rona, and I hope to see you trooping soon!
, if you have any questions about Vader, R2D2 building, or MSE building there is a good chance I can answer them (or at least direct you to a good source) so please don't hesitate to ask. Keep up the good work, don't get the Rona, and I hope to see you trooping soon!
LLAP (oh wait, wrong forum) MTFBWY (uhhh... nevermind, how about) Long Live the Emperor!
-
8
-
-
I know about the curve on the sides, just seems nobody mentions the curve on the bottomYes the originals were trimmed with a curve. Left is movie bell and right is SDS (sheperton design studios) during the courtcase.
-
Here is the rear of the shoulder bells.
I'm thinking I have 2 options, I can either cut them flat, horizontal, perpendicular to the current vertical line, or I can cut the right to match the left.
I'm going through reference photos in the gallery, I don't know if the bottom of the bells is straight on the back, or the front. A lot look like they are angled up slightly. IE:
I know this is a funny angle, but it proves my point a little bit. There is also this one.
Obviously some are angled more than others, But to me it looks like all the bells have a curve on the inside, and they have an angle on the bottom edge. If you count the outside where the ridge is as vertical, none of them are perpendicular to it.
Based on that research I think I want to leave the left rear as is and modify the right rear to match. Probably the front too, idk why it would be any different.
Am I crazy? has this been discussed before? would it be wrong?
I also have noticed that most of the time the detail on the back plates looks slightly askew, not as bad as mine, but it's still noticeable in the photos.
Thoughts?
-
Also, It might help when I get the shims and ab to kidney connections in place, that will hold the front and back together better and it might straighten the top back plate with the O II. might... ill play with it, see what I can do.
Well I didn't make my goal of finishing before going back to work, I head back tomorrow, and that also means I have to shave my beard off... it was actually getting to be quite the nice little beard. It was only a month old, and it's the best I've ever grown haha.
-
2
-
-
8 hours ago, justjoseph63 said:
It may just be a strange camera angle, but are the bells the same length? The tops are pretty close to being level, but the right one looks a bit longer (at least in the photo) even taking that into consideration. I realize that this is just a temporary fit for now, but having the back plate level will really help determine this. The tops are touching the shoulder bridges (perfect) and the gaps between the bells and chest/back plate are excellent!. Nice work!!


I measured the green lines below, from the edge of the return edge to the closest corner of the square. The left is 2 1/2", the right is 2 1/4"

I think the kidney to back seam isn't level, I'll check that next time I don the armor.
-
The left shoulder bell is slightly shorter in the back, about a half inch. I never noticed the crooked back plate, the bottom edge might need to be re worked. I'll look at that when I get home.
-
1
-
-
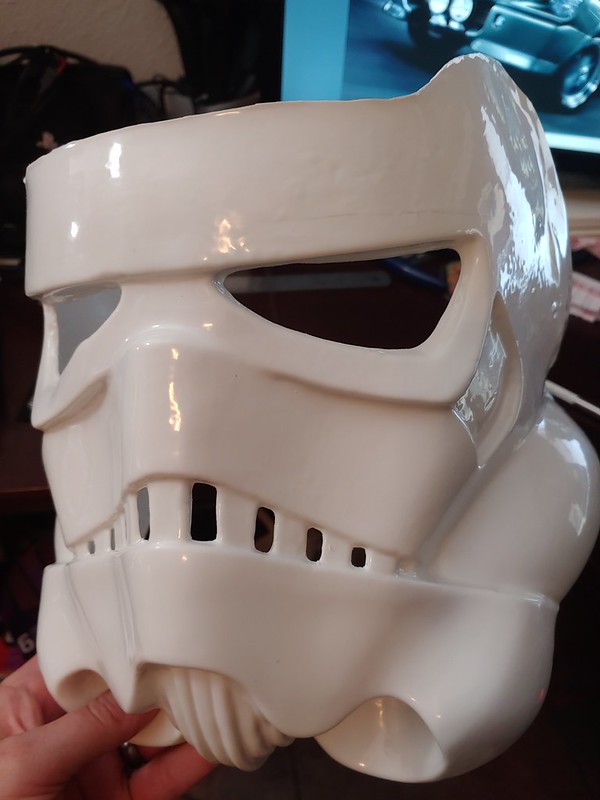
I've never really noticed this wonkiness before...

The facemask is warped, the right side as I'm wearing it sticks out more than the left. This could be my fault, but I expect that it's just the standard TK helmet shape. I don't really recall seeing a helmet from this angle before so maybe that's why I didn't notice it until now... well... that and I've now spend a month studying stormtroopers and hadn't paid much attention to them before.
-
If a buyer doesn't know, care, or understand what recasting is they will support sellers who recast. As a group we care, the general public might not. I saw someone comment that we are all copying from Lucasfilm/Disney anyways. And if nobody buys, then nobody would recast.Why the buyers?-
3
-
-
What about the shoulder bells, do they need more removed?
-
I trimmed more of the helmet, I think it looks pretty good. I did draw a pencil line on it to show me about where the 2 shells line up.
Here it is before trimming, I like this positioning, but idk how close it is to how it should be.


Then I disassembled them.


Then I trimmed eyes and teeth.


I think they still need a bit of trimming, any tips as to where? I plan on filing the teeth a bit to make them straighter, and the eyes seem ok, but not quite perfect. There really isn't much of a lip around the eyes, I'm used to a good half inch with Vader haha.
Tico's RS Props build
in ANH (Stunt and Hero)
Posted
Just a small update, The belt rivet covers are on finally, took 2 tries because one popped halfway off when glueing and I guess I didn't notice.
I have my shims cut out, I'm going to use superglue because I really want them to stick. I plan on glueing the back piece first, then the front, and being very careful with how much I use while still using enough to get a strong bond. Here are where the shims are at, and where I started today.
Cutting them out of the leftover plastic, I have plent left if I need it for other shims... I dont know where but it's there lol.
Test fitting the shim
Taped up
and the back side
Not sure if I mentioned it, but I have the belt boxes partially finished. I glued one elastic, and now that the belt is finished I can size them to the correct spot, then glue the strap, then glue the front to the back. Maybe tomorrow I can get that done.