

CrookKnight
-
Posts
1,335 -
Joined
-
Last visited
-
Days Won
5
Content Type
Profiles
Forums
Gallery
Articles
Everything posted by CrookKnight
-

Battlefront Magma Trooper Pack Build V2
CrookKnight replied to CrookKnight's topic in Build Threads Requireing Maintenance
Now that we have got the bottom panel / plates glued together, it is time to work on the upper portion. I started with a template created from cardboard. I then traced the template, confirmed the measurements, and cut out the piece from the PVC Foamboard. I again used the heat gun to bend the plate (panel) where I needed to. At this point, I measured and traced out the 2 side pieces that go with this face plate. Use this template for both plates. Only need the notch in 1 plate. I am waiting to cut the notch until I can confirm placement. Next cut out 2 identical pieces that will go on the face plate. At some point, I will label the pack and reference the pieces so this is easire to follow. Measurements will also be clarified and added to all drawings and text. Since this is a work in progress, I am having to do things, via trial and error. These 2 pieces will be bent 90 degrees to allow for the proper sizing. Next time, I will not bend these and just create 3 separate pieces, in lieu of 2. Bending is made possible by applying heat to the PVC Foam board via heat gun. I then slid these onto the face plate and allowed for 15 mm around the edges.. Glued, taped, etc.... Once the glue dried. I sanded it down and prepared it for painting. For now, I applied 2 coats of gray primer paint (flat). Ok. I have spent the last couple of days working hard on this thing. First thing I noticed was that I put the side panels on backwards. The part with the notch needs to be on the left side of the pack. Below is the corrected version. After I corrected that mistake (this happens when working on a prototype for future builds). I cut out the back plate 500 mm x 250 mm. I then cut out the 215 mm x 58 mm section at the bottom right. Then glued the finished portions to the back plate. I then glued the previously cut top angles to the back plate. (only 1 shown below) When I test fit the top plate over these, it appeared they were too long. Therefore I had to remove them and cut them down. At the same time, I shortened the back plate by 75 mm and glued the two angle pieces back on. You will notice the fins and some other pieces are on the left side of the photo. These will be discussed in another section. For what I am calling the access hatch on the face plate, I created this out of the 1/8" PVC board and cut out a 14 cm x 13 cm rectangle. I had actually cut out a hole on the face plate at 13cm x 12cm, however, I could not get it to function correctly. So for this prototype I am going to keep the access hatch on top of the plate instead of flush. I will see if I can make an operational hatch for Version 3. For the upper small "Name Plate" on the face plate, I cut a 4 cm x 6 cm rectangle out of the same 1/8 pvc board. These are the 2 plates after 2 coats of the flat gray spray paint. Here is a picture with the plates attached. -
Looking great. Once you get it painted, please post some pics Sent from my SM-G930P using Tapatalk
-
Looks good. Sent from my SM-G930P using Tapatalk
-
BTW, great job on the drawings and guidelines. I am finishing up 3 HWT packs right now that will match exactly. Sent from my SM-G930P using Tapatalk
-
One issue I see is the upper left box is very narrow. Also, are you adding the 6 vent.strips on the upper right box? Sent from my SM-G930P using Tapatalk
-
This is not a difficult build. I recommend following this build thread for the HWT pack build. This is Tony's (Ukswrath's) build in 3 parts. This is what I used when I built my first pack. http://www.whitearmor.net/forum/topic/30034-hwt-backpack-build-part-1/ Again, if you have trouble finding any materials, just post here. I can get you a link pretty quick.
-
I have finally had a chance to really review everything, as a result, I have 2 more questions. 1. Upper left box: The original picture in the CRL shows 4 screws (or pop rivets) at the corners of the box. The picture on this thread does not show any. I currently put these on all HWT packs I build. Is this going away or will it be added to the updated CRL pack picture? 2. Same thing for the bottom right box. Thank you. I am building 6 of these right now, so I want to make sure I am good with the future requirements, also.
-
I will send send you some links to a good thread and reference photos. If you cannot locate any of the pieces, let us know and we can point you in the tight direction. I order stuff about every day. Sent from my SM-G930P using Tapatalk
-
Ukswrath has one of the best build threads out there. Sent from my SM-G930P using Tapatalk
-
If you need help building or buying a pack let me know. Sent from my SM-G930P using Tapatalk
-
I like. Sent from my SM-G930P using Tapatalk
-
Thank you for the response. This clarifies things for me.
-
First and foremost, I am glad we are doing this. It will make life a lot easier and reduce some of the confusion on a few of the elements of the HWT pack. However, as a builder of these packs, I need to make sure I have a few things straight, expecially since I am currently building 5 HWT packs. I will need to update all of my sales sites and make sure I build the correct version. Also, does this affect the ones I am currently building? Antenna - the diagram shows it. Some on this thread say no and yes. I am personally for it. However, I will go with whatever the decision is. If I go with the current diagram, then then antenna is allowed. I just ordered 4 more antenna's and would hate to lose my money on them. Please clarify. Base thickness - my standard HWT pack is the normal base (one shown in diagram) and that is the base I use. I do offer the option of the thicker base. Will a pack be approved with a thicker base? I am currently building some with this base. After, I have no problem not having the option, just would hate to lose money on these. I am excited that we have a standard. I just need to make sure I am clear on things, so I do not falsely advertise. Thank you.
-
Cool. Sent from my SM-G930P using Tapatalk
-
Good idea. I can add to this discussion as i have been constantly researching the products that can be used. I can make a diagram of the pack and we can call out the components and what common materials were used. Unless th i s b as already been done. Just let me know if i can help. Sent from my SM-G930P using Tapatalk
-
What accessories are we talking about? Sent from my SM-G930P using Tapatalk
-
Great idea Sent from my SM-G930P using Tapatalk
-
Yes. Please post pictures and we will review for you. Feel free to ask as many questions as you need.
-
First HWT, almost complete, few questions
CrookKnight replied to Cbass59's topic in Build Threads Requireing Maintenance
Already have, based on your HWT EIB comments. Getting ready for Centurion HWT application. Also colored all of the stitching on the pouches black. This is an old picture. Many issues that would prevent Centurion on this picture. -
First HWT, almost complete, few questions
CrookKnight replied to Cbass59's topic in Build Threads Requireing Maintenance
Here is how mine looked. -
First HWT, almost complete, few questions
CrookKnight replied to Cbass59's topic in Build Threads Requireing Maintenance
I do not have your email, so I sent you a PM on this site. -
First HWT, almost complete, few questions
CrookKnight replied to Cbass59's topic in Build Threads Requireing Maintenance
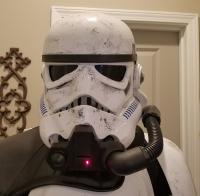
It is just a typical black washable paint you can get at a craft store such as Michael's or Hobby Lobby. The procedure I used was as follows: 1. Applied to armor using a larger brush so I could get alot on it. 2. It dries pretty quick, so you can immediately follow up with a damp cloth or paper towel. I used that to "blotch" off the paint so I ended up with more white than black. I made it look like gun powder residue. Remember, you are creating battle damage, so it does not have to be alot. The photos below show what I ended up with. (looks like photobucket is currently down, so I will post when it is back online) -
First HWT, almost complete, few questions
CrookKnight replied to Cbass59's topic in Build Threads Requireing Maintenance
Yeah. I used black washable paint. Came out great. -
First HWT, almost complete, few questions
CrookKnight replied to Cbass59's topic in Build Threads Requireing Maintenance
I will send you a PM. -
I have started on this variant of the sandtrooper pack. Should be cool. Sent from my SM-G930P using Tapatalk
