

CrookKnight
-
Posts
1,335 -
Joined
-
Last visited
-
Days Won
5
Content Type
Profiles
Forums
Gallery
Articles
Everything posted by CrookKnight
-

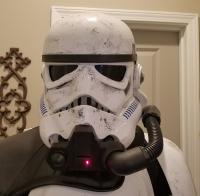
TK-10204 Requesting HWT Centurion Status [AP] [6]
CrookKnight replied to CrookKnight's topic in Request Centurion Status
I posted new pictures. -
TK-10204 Requesting HWT Centurion Status [AP] [6]
CrookKnight replied to CrookKnight's topic in Request Centurion Status
Below are 2 pictures showing the completely redone shims connecting my ab plate to my kidneys. ABS paste was used to smooth out the seams. I have added the battle damage. I should have done this a long time ago. It is a much more comfortable fit. Also, I uploaded these pictures from facebook (I figured out a way to completely bypass photobucket using facebook). -
TK-10204 Requesting HWT Centurion Status [AP] [6]
CrookKnight replied to CrookKnight's topic in Request Centurion Status
I just finished redoing the shims and using the ABS paste and I have added the battle damage. Going to try to take pictures tonight. Sent from my SM-G930P using Tapatalk -
CrookKnight's Battlefront Jump Pack Build
CrookKnight replied to CrookKnight's topic in The Foundry - Armor and Prop Making
This is my first attempt at the Template for the Jump Pack. What do you guys think? -
CrookKnight's Battlefront Jump Pack Build
CrookKnight replied to CrookKnight's topic in The Foundry - Armor and Prop Making
Here are some additional reference pictures I am using. It appears there are at least 3 types of Jump Packs: 1. Shadow Trooper Jump Pack - Black 2. Storm Trooper Jump Pack - White 3. Rebel jump Pack - Green - the pack itself is different. (Obviously I will not be building this one). Additional Reference Pictures: -
Battlefront Magma Trooper Pack Build V2
CrookKnight replied to CrookKnight's topic in Build Threads Requireing Maintenance
Thanks. Can't wait to finish this beast. On another note, I have redone my shims on my HWT armor and should be able to resubmit tonight. -
How is it going? Have not seen any pictures in a while. Did you finish your pack build?
-
Battlefront Magma Trooper Pack Build V2
CrookKnight replied to CrookKnight's topic in Build Threads Requireing Maintenance
Thank you. Can't wait to finish this thing and start on the Jump Pack. Sent from my SM-G930P using Tapatalk -
Battlefront Magma Trooper Pack Build V2
CrookKnight replied to CrookKnight's topic in Build Threads Requireing Maintenance
Getting very close. I have added the tubing, reinforced the back, added the shoulder straps, completed the copper work, attached the exhaust port, and many other items. I still have to correct the imperfections, weather the pack, add the vertical details on the fins, connect the tubing to the helmet and add the respirator. Below are some more pictures of the progress: -
Any of the vendors on our approved lists provided quality TK armor. As for the packs, you can either build (via kit) or purchase.
-
Battlefront Magma Trooper Pack Build V2
CrookKnight replied to CrookKnight's topic in Build Threads Requireing Maintenance
CONSTRUCTION SECTION 3: In order to keep each post to a reasonable length, I will be breaking the remaining portions of the builds into additional sections. Below is my latest progress. I know I am currently jumping around a little bit, however, I only have time at night to work on the build, so I have to work on different items at the same time. Once I am 100% complete, I will go back and make final revisions. I am currently working on the copper piping on both the left side and right side of the pack. For this I am using 2 cm diameter copper pipe and elbows. I cut the pipe to 5.5 cm in length. I cut 6 pieces and used 4 elbows for the left side. This is for the top section: Bottom section: Glued the 4 pieces onto the Fins and Pack. For the 2 exhaust ports (bottom right of the pack), I started with 2 plastic drink bottles: I then removed the labeling and cleaned them: I then cut off the bottoms of the bottles and painted them flat black. While I was waiting for them to dry, I worked on the angled portion of the exhaust ports. I decided to use a cardboard tube container. It is very thick and durable. I cut the pieces at a 45 degree angle. In order for them to fit properly over the bottle, I had to cut a slit in the back.. I then added many coats of white primer and gloss paint to these pieces. Once dry, I glued them to the bottles. You will notice that one of the bottles, I cut shorter to match the reference pictures. Next I worked on the box that is on the bottom right of the pack, directly adjacent to the exhaust ports. Below are the photos. I will add the text, later. -
Battlefront Magma Trooper Pack Build V2
CrookKnight replied to CrookKnight's topic in Build Threads Requireing Maintenance
Thanks for the comments. I do agree that the fins need to be thicker. For my next pack, I am going to make them a bit thicker and make them proportionally larger to the rest of the pack. So I can reproduce these faster, I am going to make molds for these and either PVC vac form them or use a resin cast. The paint job is only a primer. When I am all done, I will dirty it up some. The respirator has been designed by a fellow member and I will cast it out of resin when it is complete. I will also use magnets to hold it in place. Since I will be mass producing these, I will most likely make improvements on every pack. -
Thanks for the option. Sent from my SM-G930P using Tapatalk
-
TK-10204 Requesting HWT Centurion Status [AP] [6]
CrookKnight replied to CrookKnight's topic in Request Centurion Status
Thanks. Going to try to finish up tonight. Ready to get this over with. -
Great. I am going to see if I have time to do this, tonight and work on the Magma Pack at the same time.
-
Thank you for this information. I will give it a try. Sent from my SM-G930P using Tapatalk
-
Who knows how to make ABS paste? I need to redo my shims and use paste to seal the seam.
-
TK-10204 Requesting HWT Centurion Status [AP] [6]
CrookKnight replied to CrookKnight's topic in Request Centurion Status
I will go ahead and alter them. Is there a thread showing how to make it? Sent from my SM-G930P using Tapatalk -
TK-10204 Requesting HWT Centurion Status [AP] [6]
CrookKnight replied to CrookKnight's topic in Request Centurion Status
Andrew, I have made the corrections. See the post above. -
TK-10204 Requesting HWT Centurion Status [AP] [6]
CrookKnight replied to CrookKnight's topic in Request Centurion Status
I have removed and reinstalled the thigh ammo pack to the proper location and angle. I had no idea it was so off. I have also replaced the Pop Rivets with SPLIT RIVETS provideded by Justjoseph63 . Below are the pictures: -
Have you contacted your local Garrison? They should really be able to help you in many ways.
-
Battlefront Magma Trooper Pack Build V2
CrookKnight replied to CrookKnight's topic in Build Threads Requireing Maintenance
Made some good progress on the Fins / Valves.....Here are some of the pictures. I will add details and more photos tomorrow. -
Battlefront Magma Trooper Pack Build V2
CrookKnight replied to CrookKnight's topic in Build Threads Requireing Maintenance
Ok. I have spent the last couple of days working hard on this thing. First thing I noticed was that I put the side panels on backwards. The part with the notch needs to be on the left side of the pack. Below is the corrected version. After I corrected that mistake (this happens when working on a prototype for future builds). I cut out the back plate 500 mm x 250 mm. I then cut out the 215 mm x 58 mm section at the bottom right. Then glued the finished portions to the back plate. I then glued the previously cut top angles to the back plate. (only 1 shown below) When I test fit the top plate over these, it appeared they were too long. Therefore I had to remove them and cut them down. At the same time, I shortened the back plate by 75 mm and glued the two angle pieces back on. You will notice the fins and some other pieces are on the left side of the photo. These will be discussed in another section. For what I am calling the access hatch on the face plate, I created this out of the 1/8" PVC board and cut out a 14 cm x 13 cm rectangle. I had actually cut out a hole on the face plate at 13cm x 12cm, however, I could not get it to function correctly. So for this prototype I am going to keep the access hatch on top of the plate instead of flush. I will see if I can make an operational hatch for Version 3. For the upper small "Name Plate" on the face plate, I cut a 4 cm x 6 cm rectangle out of the same 1/8 pvc board. These are the 2 plates after 2 coats of the flat gray spray paint. Here is a picture with the plates attached. -
TK-10204 Requesting HWT Centurion Status [AP] [6]
CrookKnight replied to CrookKnight's topic in Request Centurion Status
Thank you Sent from my SM-G930P using Tapatalk -
So what are youre thoughts.....
CrookKnight replied to scottdm62's topic in Hard Armor (General Discussion)
Run fast from it. Sent from my SM-G930P using Tapatalk
