
Squimspickle
-
Posts
172 -
Joined
-
Last visited
Content Type
Profiles
Forums
Gallery
Articles
Everything posted by Squimspickle
-

ATA armor build in progress
Squimspickle replied to Squimspickle's topic in Build Threads Requireing Maintenance
I am TK-19513! Just got the email a couple hours ago! Great way to start out the year! -
ATA armor build in progress
Squimspickle replied to Squimspickle's topic in Build Threads Requireing Maintenance
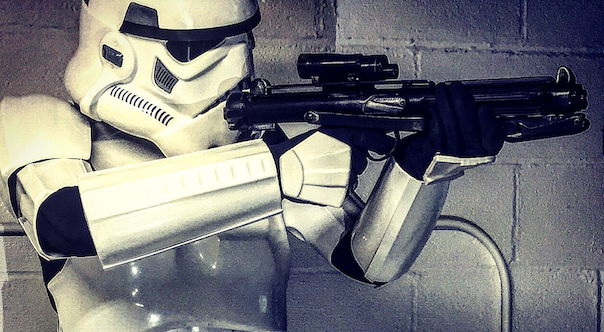
Finished up my build on New Years Eve! Did some tweaks over the last couple of days after walking around in it for awhile. Today I filled out my 501st app and sent my pics off to my local Garrison. Looking forward to joining the ranks that you all deservedly serve in! Happy New Year!!! (yes, my TD/O2 canister is off centered) -
ATA armor build in progress
Squimspickle replied to Squimspickle's topic in Build Threads Requireing Maintenance
Getting more and more excited to submit my pics! When I started this whole build I didn't even know how I was going to tackle this intimidating project. But working one section at a time it's been coming together. I started working on the shins. Back to trimming plastic. I'm going with the hooks and elastic to hold my shins closed. Right one is done left one to go. I just have to remember to do everything opposite for the left one. I want the opening seam to face the inside of my legs. The pic below is a weird angle because the ankle isn't that small. I'm happy with how it closes. -
ATA armor build in progress
Squimspickle replied to Squimspickle's topic in Build Threads Requireing Maintenance
Thanks Tony! Much appreciated. -
ATA armor build in progress
Squimspickle replied to Squimspickle's topic in Build Threads Requireing Maintenance
I hope everyone had an enjoyable Xmas! This morning I finished up my thighs. So this evening I pulled out the sewing machine again and assembled the thigh armor garter. I'm happy with how it turned out. I need to get the rest of my chicken legs covered! The end is so close. -
ATA armor build in progress
Squimspickle replied to Squimspickle's topic in Build Threads Requireing Maintenance
I finished my ATA thermal detonator. I might have cut off a little more then I should have on the control panel part. But all in all I'm satisfied. Then I painted the slotted screws on the detonator black. Thermal detonator...done. I went to The Force Awakens yesterday and thoroughly enjoyed it. It motivated me to tackle the belt. I had been putting off the belt for awhile. After I trimmed out all the parts and pieces I was on a role and it was easier to see what I needed to do to get this completed. Oops! Needed to change the placement of a snap. It landed under a ridge of the plastic ammo clips. I could have left it, but it did make the belt push out a bit in that area. I also had to remind myself how long I waited for this kit so taking a little extra time and move a snap on the canvas belt and abdominal armor would make it right. I'm glad I stopped and took the time to make that fix. Part of this building process is a great lesson in patience! Completed Stormtrooper belt... check! All I have left to do is the thighs and shins!!! -
ATA armor build in progress
Squimspickle replied to Squimspickle's topic in Build Threads Requireing Maintenance
I finished painting the buttons and decided to start on the thermal detonator. My day job keeps getting in the way!! -
ATA armor build in progress
Squimspickle replied to Squimspickle's topic in Build Threads Requireing Maintenance
Thanks Tony! Thanks for pointing that out. I didn't notice that in the pic until now. I will def keep that in mind. -
ATA armor build in progress
Squimspickle replied to Squimspickle's topic in Build Threads Requireing Maintenance
So I finished up bracketing and strapping the torso of my armor. That was a lot of putting on and taking off of the torso pieces! I attached the shoulder bridges and the ab buttons. I ended up moving the shoulder bells closer to the shoulder bridges. I'm starting to paint the exposed screws and rivets. My next project will be the belt. -
ATA armor build in progress
Squimspickle replied to Squimspickle's topic in Build Threads Requireing Maintenance
Thanks Steve! Thank you for placing this into the appropriate forum as well. Much appreciated. -
ATA armor build in progress
Squimspickle replied to Squimspickle's topic in Build Threads Requireing Maintenance
I'll post some more pics of my progress as I continue. I have been having the best time building this armor. -
Thought I'd share some pics of my ATA ANH Stunt build. I started off with the helmet first. Needless to say I was terrified with every cut and trim I made, lol! Seriously though, I was. I'm really happy that ATA Works sends a set of spare ears. I ended up using one. I followed Gazmosis's ATA helmet build (I highly recommend for your 1st ATA helmet). I'm really happy with the cheesecloth Plasti-Dip interior. I've completed the helmet (and blaster during the long ATA wait). I have also built up more confidence working with the material. I've trimmed most of the parts and I'm currently in the process of creating my bracket system for the torso. I pulled out my wife's sewing machine, read through the instructions and started sewing the elastic loops. It was easier then I was anticipating. I got some great tips from RainTrooper with placing the brackets on the ATA armor. ATA has some very small return edges so some of the screws face outwards but they will be covered by the belt. I did a test fit of the armor and found that I will need to trim 1 inch off of each side of the kidney to get a much better fit. It was like wearing a loose plastic barrel before I made the adjustments. I'm 5' 10" and 160 lbs. The pics below show the ab and kidney taped to where I'll be making the cut on the kidney. I love the fit of this much better. I might need to trim the butt a bit so it lines up, but I'm going to wait and see on that. I'm happy to hear comments and suggestions.
-
I don't want to be at work right now, I just want to be in my basement building my ATA armor.
-
I don't know if this has been posted before but it was a solution I found while building my ATA helmet. I had black Shoo Goo on hand, which I use to reinforce lexan bodies on RC cars. I thought I would use it on the thin areas inside of the back of the mic tip recess. I used 3 layers waiting 3-4 hours in between each coat. The Shoo Goo binds perfectly to the ABS plastic and creates a very rigid surface. After 24 hours I was able to drill my my mic tip holes right through. I ordered my Shoo Goo online but I believe it is also sold in major hardware stores. I would assume if you couldn't get black that it should be paintable (not sure though). The pic is the inside of the helmet. Hope that tip can help!
- 1 reply
-
- 1
-

-
I finally got back to my build after this past summer. Here are some pics of my finished ANH Blaster! I just need to fill/paint the screws in the folding stock. Oh yeah, and add some modded resin power cylinders.
-
No you wouldn't have to do it. Pros - scope weighs less - light passes through for added realism - It gave me a sense of accomplishment. I decided to give it a shot and it worked Cons - none I did a Hasbro mod where I used the CD method to reflect light back out so you can't actually see through and that looks pretty cool too. So I have gone both routes and am pleased with both results. If you feel the urge to try then go for it! If not then there is plenty of other ways to do it. I hope I inspire people to do cool and fun things with their builds which will in turn inspire me to do fun things with mine. Below is a pic of my Hasbro mods scope with the CD method. I added a reticule to that one. Have fun with whatever route you take.
-
Front Sight Mod on a Doopy Doo's resin kit - added realism
Squimspickle replied to Squimspickle's topic in ANH BlasTech E11
Just checked out your build thread. Your doing a fantastic job! My build has been on hold lately. I need to get back to it! -
I was also excited to see how it would work but it's just blurry and you mostly see a glimpse of light and an upside down blurry image. The lenses on the scope don't line up so the smaller lens is actually lower so you only see the top of it. I assume that the real scope has a series of mirrors in it to redirect the image so it's right side up and clear. Thank's for the kind words!
-
1- A thin coping saw 2- Cutting the ends off helped me do a more thorough job of hollowing it out. The small lens side and the large lens side don't line up on the scope so it would be very difficult to hollow out and angle down with out the front and back pieces removed. 3- You wouldn't have to hollow all the way through. I did it so that you could get a glimpse of light all the way through for added realism. More then likely nobody would notice unless they are inspecting it. You could still use the lenses with it being hollowed out only an inch or so in. Some people cut out a circle from a cd and use that on the inside to create a reflective area behind the lens. Hope that helps! Thanks for the kind words!
-
Chrome or brass could have been cool. I debated on what I was going to do. When I test fit everything together the large amber lens magnified everything in the inside and made any imperfections stand out big time! So I decided to go with a flat black so that it wouldn't be noticeable. It also cut down on random reflections. If you were to hollow out the inside super smooth I'm thinking chrome or brass could look really cool!
-
Sorry I haven't responded sooner! My blaster build has been on hold as of late. I used a thin coping saw and worked my way through. The cuts were not perfect but I was able to glue them back together and then fill the edges with plastic epoxy and sanded it down so you could no longer see the joints. I hope it's going well! Thanks for the nice comments!
-
Thanks again, man! I've been following the best.
-
I would like to share my Droopy Doo's resin scope build. It ended up being a bigger project then I thought it would. I am happy with the results. I wanted to hollow out the entire scope so I cut the front and back end of the scope off. This made it much easier to hollow out with drill bits, Forstner bits and sandpaper. It also made it easier to create insets for lenses. I got this tip from Dark CMF's build (thank you) . It's a $10 monocular off of Amazon. Both lenses fit perfectly. It is fairly easy to take apart to remove the lenses. Each lens has a retaining ring that I saved and used to hold the lenses in place in the resin scope. The larger lens was coated with a amberish/reddish anti-reflective coating which was perfect for the blaster. I painted the inside of the scope black and sealed it all up with Zap-a-Gap. I drilled out the resin screws and replaced them with the appropriate sized slotted steel screws. I then masked off the lenses with painters tape and I was ready for painting. I used Krylon's Metallic Brass spray paint. The lid of the can is a really fakey looking bright brass, so I wasn't sure about it. I sprayed on 2 coats and was really happy with how it actually looked. I wrapped a piece of thread around the inset of the front section of scope so that it would end up looking like 2 separate pieces. I saw this on T-Jay's (thank you) build and loved how it looked. Then I spray painted it a satin black. I weathered it using fine grit sandpaper and a few emery boards. The key is to not overdo it, which is easy to do when your working on one small part of a bigger build. When you think you haven't done enough weathering you should probably stop, lol! I did the crayon trick on the inset lettering. I found that if I slightly heated the scope up with my heat gun that the crayon was easier to work with and wipe off. I then sealed the entire scope with a satin finish clear coat. Below is the finished project! This became a mini project itself , but it was a lot of fun to do.