

Waxy
-
Posts
16 -
Joined
-
Last visited
Content Type
Profiles
Forums
Gallery
Articles
Everything posted by Waxy
-
Many Thanks Joseph. Cheers from the Southern Dewbacks in Aus. Waxy
-
Hi All, My TK has seen a lot of use and the original gasket I had for this costume has deteriorated to the point it needs replacing. Can anyone let me know where to buy this gasket? I am heading off to the USA next week so if there is a common supplier there that would be preferred, alternatively a supplier that can ship to Australia would be my next option. Thanks in advance for your help. Waxy
-
New idea for helmet padding
Waxy replied to Waxy's topic in Boots, Soft Parts, and other Accessories
Thanks Joseph, the added benefit for me is because the helmet is adjustable- I can let my kids put it on and I can fit it to them without it wobbling all over the place lol. Plus at our armouring parties I can let anyone try it and it will fit them all- unless they have a HUGE head -
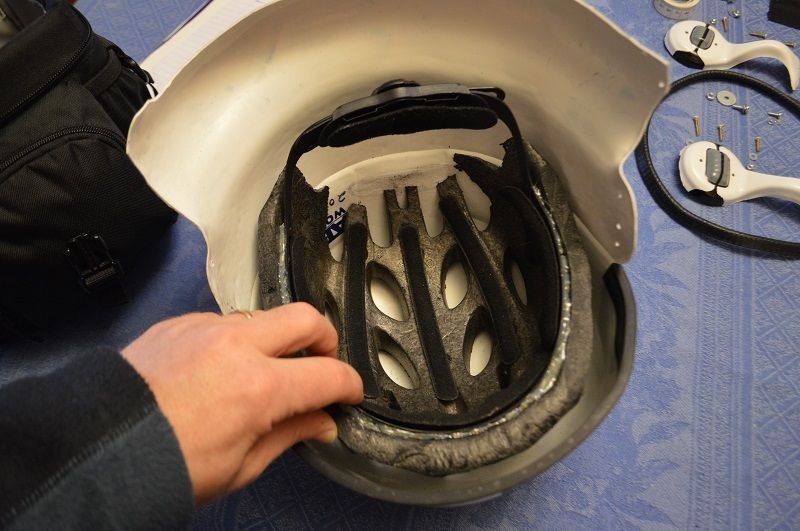
So after starting on my second suit of armour I came to the bucket. In my first suit (TD) I used a construction helmet inner harness glued to the bucket- works well enough and is moderately comfortable even in Australia's hot climate. However I wasn't fully happy with the result. Still a bit of lateral 'play' when you turn your head. Read the forums here- tried the foam and wasn't too pleased with the result, took it out and after a couple of days had the idea of using a bicycle helmet! This has by far been the best choice ever. You'll need a belt sander to carve up the outside of the helmet and do it in a well ventilated area as the fumes are terrible. Shape to fit your bucket and simply hot glue it in. It works fantastic. Solid comfortable and adjustable. Works for me hope it helps someone else
-
There's a bloke here is Australia who does the resin kits (cost was US$ 220 plus shipping I think). Email him at: [email protected] Cheers
-
No worries. Sorry it took a bit to explain.
-
Yes I think so- the thought process is along the lines of- if it isn't ready to fire then it's not ready. For the MG34/ DLT19 to be loaded and ready to go it has to be forward (ie ammo locked into the barrel. Will try and upload photos again. Cheers Okay its just not working for me- I have loaded them onto photobucket, try http://s1291.photobucket.com/user/Waxyblah/media/t%20tracks_zpsz3zkhaen.jpg.html?sort=3&o=0 hope that works
-
Sorry Felice, are you talking about the TK BOOTS from Imperial boots or from TK boots?? Not confusing- much! Lol
-
Yeah no probs fully understand- I noticed the cocking handle on Aaron's was at the rear also! I had to sand mine slightly to fit in the forward position- it was more if you were going for level 2 certification that the cocking handle would have to be shifted and the t tracks wired in. I can't post photos for some reason so hard to explain. Cheers Hans
-
Thoroughly recommend imperial boots. Posted within 24 hours of my Paypal deposit via trackable postage. Boot quality - EXCELLENT. After 5 months of waiting for TK boots- I got sick of the wait, plus it would have been nice if they could keep their customers updated with what was happening. Glad I switched.
-
Just got mine from zhongvador (imperial boots) and am very happy with the quality of the boots and the customer service. A big thumbs up from one very happy Aussie
-
Hi Hans, not trying to be picky but noticed a few things you may or may not want to tweak. The T tracks the small ones should have wire threaded around through the cooling holes to join them onto the barrel. Check out Aarons photobucket: http://s900.photobucket.com/albums/ac207/theplasticempire/ and click on the DLT-19. Also some advice from the MEPD is that the cocking handle should actually be forward (ready to fire) not glued in the rear position above the hand grip. As stated earlier I'm not trying to make you feel bad about your build- it just depends on how much accuracy you wanted on the blaster. Looks great either way. Cheers
-
a question for the wire- on the picture I couldn't see where your connections were or how you did it- can you please explain and show a close up of how you secured the wire? Thanks
-
Cut it off (the thread) but leave the hex bolt part and sand it flat to that part- then drill a 22mm hole with a spade bit to glue at the end of the barrel. Don't drill right the way through with the 22mm bit probably about 1- 1.5 inches is fine depending on how much of the pvc pipe is at the end. Have fun
-
Great idea about the bolt!
-
Hey there guys, just putting together my DLT-19 and I have a suggestion. If you are going for the Alum tube in the centre but you're worried about the drilling position in the main stock then may I suggest you cut off the PVC at the end of the barrel that connects to the stock so that it sits flush and then drill the hole to suit the alum tube only. This can be accurately determined by turning the alum tube and pushing against the stock which should easily mark the resin and create a nice template- then drill about an inch at a time and recheck to make sure everything remains straight and flush. NOTE: This must be done BEFORE the flash suppressor is glued to the barrel! Cheers
