


ukswrath
-
Posts
14,622 -
Joined
-
Last visited
-
Days Won
180
Content Type
Profiles
Forums
Gallery
Articles
Everything posted by ukswrath
-
Is there a reason why the thigh halves are offset?
-
Jenny's First Build - TK ANH Stunt (AP kit)
ukswrath replied to JenEcho's topic in ANH Build Threads
Canon thigh connections were roughly 3" wide elastic. Looped over or connected to a separate waist belt they make for a comfy fit and easy to adjust if you use velcro at the ends. The wider material definitely helps to stabilize the armor and is relatively comfortable. The torso and arm armor are supported by the shoulders and armor waist belt, essentially floating. -
If you want to leave it, reinforcing the area from the inside as you said should do the trick. Conceal it or remove it, both will work
-
TK-12124 Requesting ANH Stunt Centurion Status (405)
ukswrath replied to IBSkyde's topic in Request Centurion Status
Congrats Jon -
Have any photos from a few feet away?
-
5'10" is about right for that armor without trimming. If fitted correctly the top of your thighs would contact your upper groin not your hip, unless you were referring to the sides of the thighs. Do you have average or shorter than average legs?
-
Troopertony's ANH stunt build thread (ATA)
ukswrath replied to troopertony's topic in ANH Build Threads
Looking good tony, you can square out the teeth a little more when you're ready. Here's a reference photo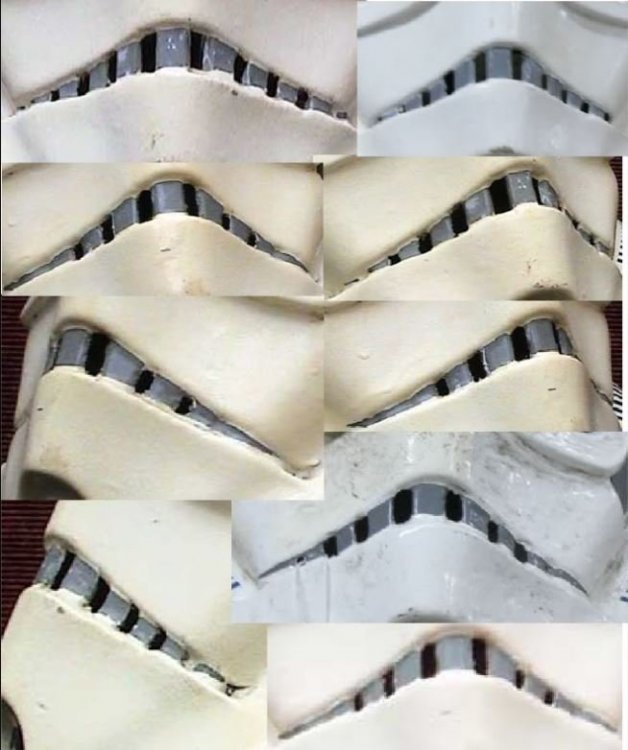
-
How tall are you?
-
If you can tighten them so they dig into the plastic further (without cracking the armor of course) than do so (looks cleaner). Other than that yes they're acceptable.
-
You can also trim the back of the thigh for movement if you wish, that's canon also.
-
TK-12124 Requesting ANH Stunt Centurion Status (405)
ukswrath replied to IBSkyde's topic in Request Centurion Status
Hey Jon before we get started please post a link to your EIB application at the top of the page. -
Looking good Daniel, see you on the other side
-
MichMalo ANH Stunt Build
ukswrath replied to michmalo's topic in Build Threads Requireing Maintenance
Glad to be of assistance, please take at look at other build threads as well. We have a multitude of talented builders here on whitearmor. -
MichMalo ANH Stunt Build
ukswrath replied to michmalo's topic in Build Threads Requireing Maintenance
As stated by your fellow troopers, this stuff happens and we've all been there. You can do it. -
Fudgepop's AM 2.0 ANH stunt build(First Build)
ukswrath replied to Fudgepop74's topic in ANH Build Threads
SWEET! -
Easy fix
-
For the record, the #1 correction suggestions we have during approvals are the bells. They're either positioned too far from the chest and back plates when assembled, the applicant trimmed off too much material or they're too small for the applicant. We encourage all builders take a look at the EIB and Centurion application pages to get an idea of what we're looking for. Keep up the good work Martijn
-
Adding to Daniel's suggestion the drop boxes should reside under the ammo belt. Hard to tell much with the photos being blurry but looking good Rat
-
TK-12124 Requesting ANH Stunt Centurion Status (405)
ukswrath replied to IBSkyde's topic in Request Centurion Status
Hey Jon welcome, Joseph or myself will be with your momentarily. While you;re waiting could you please post a link to your EIB application page. -
Yet another forearm question (Anovos)
ukswrath replied to inv8r's topic in Build Threads Requireing Maintenance
You'll be fine, just let the glue cure for 48 hours before forcing your hand through the wrist end. -
Coming along nicely Darrell
-
ANOVOS (DENUO NOVO) FOTK Armor Delivery Possibility
ukswrath replied to JonnieBear's topic in TFA Stormtrooper
Fingers crossed Copy that -
ANH AM 2.0 build... Finally
ukswrath replied to DBGrip's topic in Build Threads Requireing Maintenance
For the record the cut does not need to be perfect. We will not make you pull out a protractor to prove straight lines lol. Regarding the 22mm kidney notch, though it is screen accurate it is NOT a requirement to create if the armor did not come with it. As stated in the CRL: Level three certification (if applicable): Cut-out notches at the bottom of right and left sides of the Kidney Armor are optional. If present, each notch is approximately 22 mm tall and the back of the notch ideally is aligned with the front edges of the Posterior Armor plate.. -
Yet another forearm question (Anovos)
ukswrath replied to inv8r's topic in Build Threads Requireing Maintenance
If using neoprene (rubber) gloves they'll take up a good portion of the slack or gap between the armor and wrist. -
ANH AM 2.0 build... Finally
ukswrath replied to DBGrip's topic in Build Threads Requireing Maintenance
As mentioned above a vertical edge on both Ab and Kidney is a must. If you need to take a square edge or hard back book and align it with the top of the kidney then draw your vertical line from there. NOTE: Using a square edge doesn't work with all armor, AM edges are pretty square so the concept should work here.

