camprandall
-
Posts
657 -
Joined
-
Last visited
-
Days Won
11
Content Type
Profiles
Forums
Gallery
Articles
Everything posted by camprandall
-

Force Awakens Heavy Gunner cannon build
camprandall replied to camprandall's topic in Weapons of the First Order
No, I didn't. Two reasons - one is that the dumb thing comes out well after I'm done, and two - I couldn't afford the big gun if I bought the little one. -
Force Awakens Heavy Gunner cannon build
camprandall replied to camprandall's topic in Weapons of the First Order
So this is pretty awesome (and not helpful). I try once again Googling "Force Awakens Heavy Gunner" - you know, because sometimes new photos show up - and my build thread is on the first page. That is a clear sign of building something with inadequate available sources. -
Force Awakens Heavy Gunner cannon build
camprandall replied to camprandall's topic in Weapons of the First Order
Thanks bud! I'm seeing some light at the end of the barrel. -
WIP: First Order Stormtrooper - Bean Builds
camprandall replied to SandmanAU's topic in Build Threads Requireing Maintenance
Plastic clamps is a good idea with the gaskets. The other methods we tried were a bit tricky. -
Force Awakens Heavy Gunner cannon build
camprandall replied to camprandall's topic in Weapons of the First Order
Finished updating the stock to more closely match the schematic pic. I'm pretty happy with it! The next step is to wrap it in hard wood. I'm attempting a wood soak and bend, which I've never done before. About the only thing I haven't tried on this thing so far is sewing, but who knows. I'm using thin Birch paneling for the wrapper. -
Force Awakens Heavy Gunner cannon build
camprandall replied to camprandall's topic in Weapons of the First Order
Thanks Todd! It's my pleasure to build something likely wrong so that someone later can build it correctly. Ok, on to more stuff. Finished up the scope (for the most part). Just need to glaze over a few imperfections. -
Force Awakens Heavy Gunner cannon build
camprandall replied to camprandall's topic in Weapons of the First Order
Ok, didn't do a ton yesterday, but made progress on the stock and the scope. Cut out my wrapper pieces and glued them in place. I cut a separate insert to fill the gap in the middle at the back of the stock and I'll cut another to fill the gap in the bottom butt end of the stock. The scope was also too small - and I didn't really like the middle section anyways - so I redid it. It think it's proportionally better now and also cleaner. A bit of bondo to make the joint much more rounded and some glazing putty for sanding defects. [/img] -
Force Awakens Heavy Gunner cannon build
camprandall replied to camprandall's topic in Weapons of the First Order
Wow, you're really expanding the scope of my project! I'm already not making the stand for it, now I have to grow a beard, sew some robes, build a meth factory, etc. Oh FISD... -
Force Awakens Heavy Gunner cannon build
camprandall replied to camprandall's topic in Weapons of the First Order
Thanks Evan! The support is helpful on these tricky projects. So another discovery I made from the file that Germain fetched for me is that my 3D models are about 20% too small. Luckily they aren't printed yet so I'm hopeful that my 3D printing source can scale it for me. The question will be if my scope is too small, but we'll see. -
Force Awakens Heavy Gunner cannon build
camprandall replied to camprandall's topic in Weapons of the First Order
Ok, now that I have that side angle schematic, I reassessed my stock and made adjustments. Fortunately it's not so far off that I can't work with it and I need to greatly thicken it anyways, so my plan is to cut two 3/8" boards to the right shape and sandwich them around the main stock and then fill in the gaps. I should note that all of my scaling and proportioning is a bit adjusted to fit the fact that I don't have exact tubing/parts I need and need to compromise a bit. -
Force Awakens Heavy Gunner cannon build
camprandall replied to camprandall's topic in Weapons of the First Order
Hmm, I am in the Dune Sea Garrison... -
Force Awakens Heavy Gunner cannon build
camprandall replied to camprandall's topic in Weapons of the First Order
Hee hee, hah hah. Um, this would stink to have to do again. It's glazing putty. Not good for thick applications, but great for smoothing out little problems and filling tiny cracks! -
Force Awakens Heavy Gunner cannon build
camprandall replied to camprandall's topic in Weapons of the First Order
Ok, here are a few pics of some areas I cleaned up after priming. -
Force Awakens Heavy Gunner cannon build
camprandall replied to camprandall's topic in Weapons of the First Order
I did a lot of stammering before finally committing to making the frame and trigger area for this thing. These were very hard to figure out and luckily I didn't finish it off before getting more useful pics from Germain. Thanks again! Anyways, here's where it's at so far. I will adjust the shape a bit and also thicken the stock since it appears to be pretty wide. The trigger was weird because it tapers from bottom to top AND from front to back! Weird shape. I think I've got a good rough base for it though. And then the rest of the frame... -
Force Awakens Heavy Gunner cannon build
camprandall replied to camprandall's topic in Weapons of the First Order
Thanks! Glad to hear it! I really appreciate it. I think sometimes the build thread is as much to give a boost of encouragement to the builder as it is to help someone else. It's more fun to build something if others enjoy it too. And back to the building... -
Force Awakens Heavy Gunner cannon build
camprandall replied to camprandall's topic in Weapons of the First Order
Wow, I haven't seen that! Thanks! Yeah, it's a little late for length, but the vertical positioning and stock adjustments can still be done. Cool. -
Force Awakens Heavy Gunner cannon build
camprandall replied to camprandall's topic in Weapons of the First Order
Posted in the wrong order. Corrected. -
Force Awakens Heavy Gunner cannon build
camprandall replied to camprandall's topic in Weapons of the First Order
Thanks Brian! Ok, here's some more progress. After a few rounds of cleanup, I finally primered the barrel to see where my remaining issues were. It turns out it was in pretty good shape! Just a few areas to clean up. One in particular was the grooves I cut at the base of the barrel. They looked a little t0o sharp so I bondo'd them. -
Force Awakens Heavy Gunner cannon build
camprandall replied to camprandall's topic in Weapons of the First Order
Ok, back to the barrel. Drilling the holes had me nervous - and if I had to do it again I would have dry fit and measured so that if I screwed up the holes I could get a new pipe. Well, I didn't. And yes, I screwed up a couple holes and had to use bondo to correct. Oh well, it's done! I first tried with a spade bit and found that it just yanked around the barrel too much even when clamped. I also found that 1 1/4" was too big for what I needed so my very first hole had to be completely corrected. I then found out about step bits! While they don't cut perfect circles in a tube (because of the rounding - they come out oblong), a little dremel work rounds it out in no time. They cut through the plastic like butter and it's very easy to use the steps to know how far to drill to hit your mark, which in this case for me was a 1" hole. Holes! Now it's time for bondo up and down the whole thing. I did the first passes with regular bondo and then the second passes with glazing putty. That stuff works great for smoothing and is very easy to sand with 220 grit! You'll notice that I did some bondo in between some of the drilling so these aren't completely chronological. -
Force Awakens Heavy Gunner cannon build
camprandall replied to camprandall's topic in Weapons of the First Order
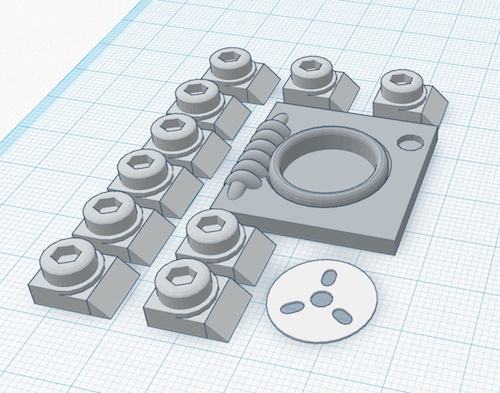
So as I said, designing small parts is good for a first step, but seeing how they all intersect is the most important so I decided to assemble it all in just a few large pieces so that I don't find out after ordering a print that they just don't fit together or require too much modification. After two weeks of this, this is my final result. The only thing missing in the pic is the little weird triangular piece on top, but I'm using a spare from the Nerf TFA pistol for that since it's pretty close. And then pulled apart a little bit for printing. I tried to hollow out what I could to keep the costs down. And this is the little Nerf piece that I plan on sticking on top. -
Force Awakens Heavy Gunner cannon build
camprandall replied to camprandall's topic in Weapons of the First Order
Thanks buddy! It's been a tough project, but the results should be a lot of fun. -
Force Awakens Heavy Gunner cannon build
camprandall replied to camprandall's topic in Weapons of the First Order
-
Force Awakens Heavy Gunner cannon build
camprandall replied to camprandall's topic in Weapons of the First Order
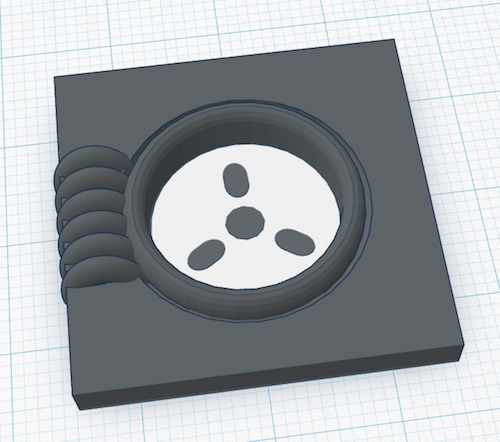
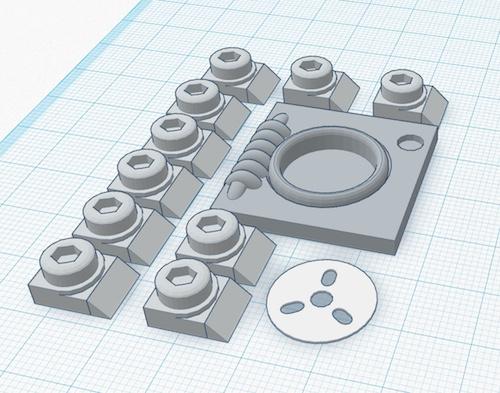
Ok - time for a break. The most daunting part of this whole thing is the back half, which is largely obscured. After doing a ton of drawing and measuring, I realized that building this nasty middle section by hand was just not going to work. I decided it's time I try learning how to do some 3D design so I can print it, which has a much better chance of succeeding. I used Tinkercad as my tool of choice. I started by designing the individual greeblies, intending to assemble them all after printing, but then realized that it was too hard to know that they all intersected appropriately and were in proportion to each other.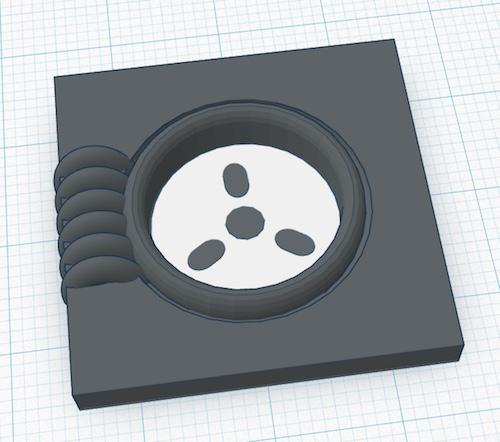
-
Force Awakens Heavy Gunner cannon build
camprandall replied to camprandall's topic in Weapons of the First Order
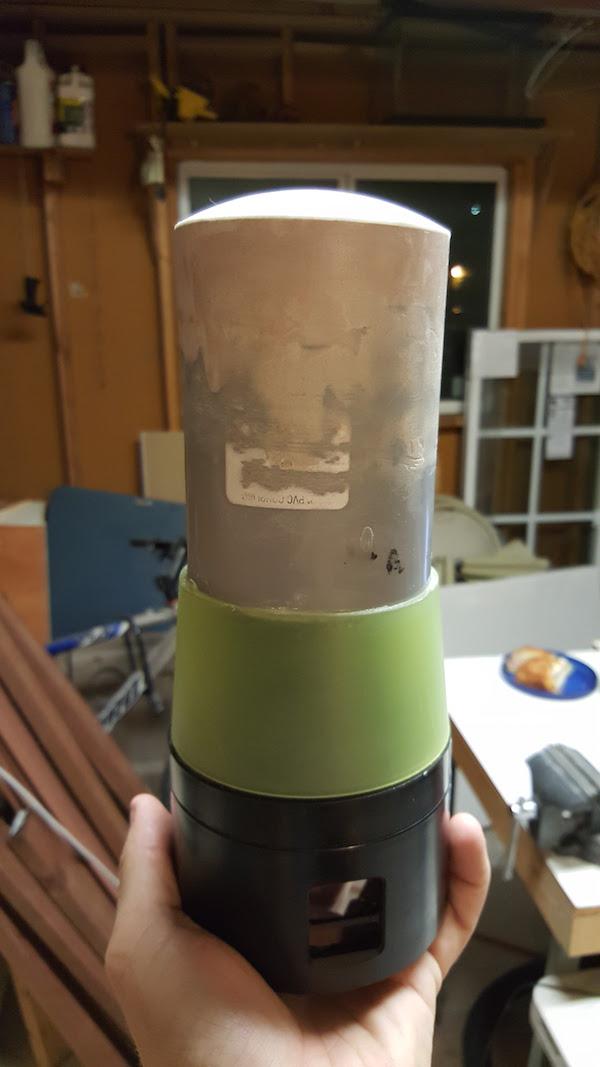
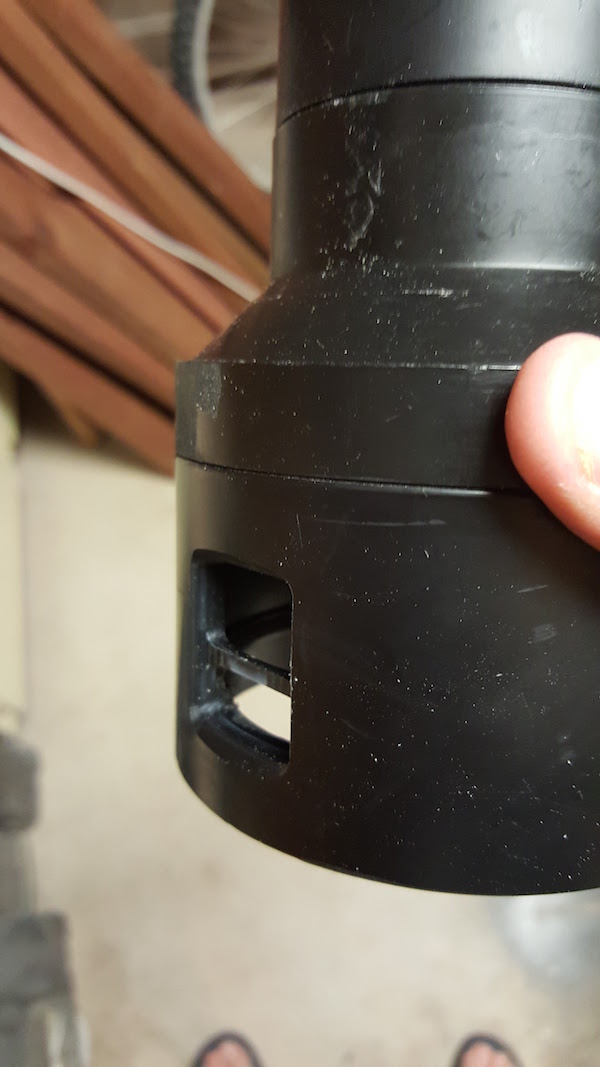
Almost forgot to mention - notice that little window on the transition piece? My buddy Chris Henning machined that for me. It came out great! Those types of details will really help it feel authentic.
-
Force Awakens Heavy Gunner cannon build
camprandall replied to camprandall's topic in Weapons of the First Order
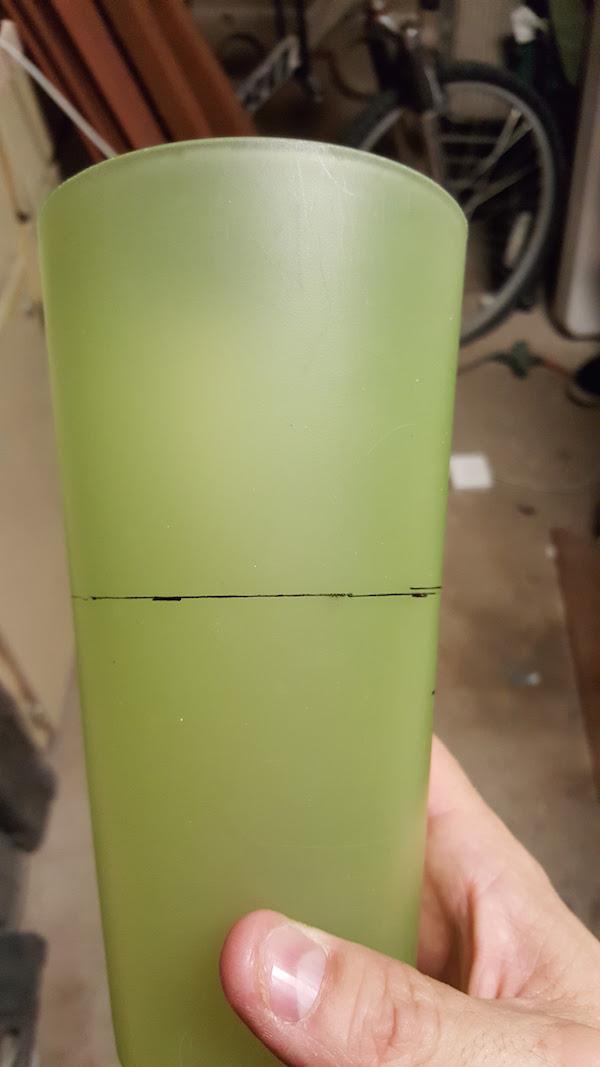
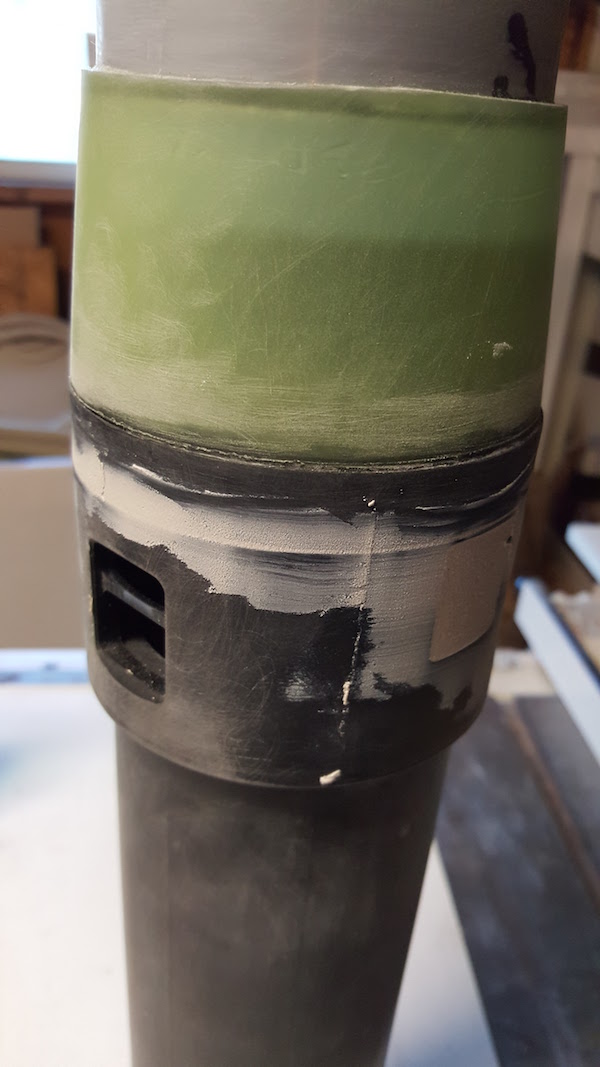
For the transition from the barrel to the cone, I had originally intended to try modifying a reducer part, but that was far too extreme of a transition. That's when my build parter, Chris Henning, suggested cutting a plastic cup, which worked perfectly! I'm very pleased with the results and how close we were able to get to the transition more in proportion with the reference. I leaned heavily on the movie promotional shot for this one. And of course, more bondo...