

Starfox2010
-
Posts
486 -
Joined
-
Last visited
-
Days Won
4
Content Type
Profiles
Forums
Gallery
Articles
Everything posted by Starfox2010
-
 Wohoo!! Thanks for the kind words, Steve! Now to do some trooping soon. Reg the ab buttons, I seen this tutorial when I started working on the build, (http://www.whitearmor.net/fisd/Tutorial-abkidneybutt) I trimmed down the main box to match it, when I should have left it to have that extra flat surface for gluing. at that point I believe I ruined it and just went with the AM ab buttons, I still have them BTW (does it matter if the edges are trimmed as long as it's the molded buttons on them?) The hand guards have been ordered, I'm sure they'll be a lot better having them in place than to keep pulling the elastic back to place every 5 min. Front and back plate will be replaced when TG updates them. I want to keep it all AM , if possible. Just out of curiosity, what's wrong with the chest? I thought he updated that to Centurion standards. Thanks again for reviewing my armor and the kind words!
 -
If you only knew how many pics and how many times I took pics. My wife threatened to kill me if I didn't submit it already, lol
-
Not 501st approved and embarrasing to say the least
Starfox2010 replied to toybiz's topic in Off Topic
Correct me if I'm wrong. It's the belt, right? lol -
Try using suspenders. I think im going to go add them just to stay safe when trooping.
-
Looks good. how does it feel when you bend your leg?
-
Thanks Germain. Ok, here's my request for EIB status. Wish me luck ! http://www.whitearmor.net/forum/topic/29244-tk-12177-requesting-anh-stunt-eib-status-am/ Or learn from my mistakes
-
Name: Rick Maravilla 501st ID: TK-12177 FISD Name: Starfox2010 Garrison: Golden Gate Garrison Armor= AM Helmet= AM Blaster= Doopydoos Height = 6'2 Weight = 192 Boots = TKBoots Canvas belt = TKittell Hand Plates = AM Hand plates Electronics= EvilBoy Helmet Fans, AKER voice amp Neck Seal = Darman Holster = Darman FULL BODY Front Helmet Off Back Full Right Full Left Right Side Detail Full Left Detail ARMOR DETAILS Cod and Butt Plate Attachment Abdomen Details Interior Strapping HELMET DETAILS Helmet Front Helmet Left Helmet Right Helmet Back Hovi Tip Detail Lens Color ACCESSORY PHOTOS Ammo Belt Neck Seal Back of TD BLASTER DETAILS Blaster Left Blaster Right ACTION SHOTS Holding down the fort He did it Long Day at Work
-
Lol, thats how you know you are doing a good job. I cut myself a few times having to clean the blood off my armor.
-
Lookin good! +1 for your wife's sewing skills.
-
If you look at the pic's you and Germain posted, the curved sides are high up. Check ours out: I think depending on your size, you may not want to cut to much to where it will take away from its roundness. I just measured it to my my body, I don't have the exact amount removed because I did it a few times. Mine don't have return edges
-
круто , Ð’ÑÐµÐ»ÐµÐ½Ð½Ð°Ñ Ñ€Ð°ÑширÑетÑÑ ! Hope I wrote this right.
-
Hey Guys, I think i'm done with my blaster. I wan't to re-take some EIB pics, My action, and back shot didn't come out so good.
-
Just be careful with the one we have. The curved sides on the AM armor are longer than the others.
-
Operation: I want to drink too
Starfox2010 replied to Starfox2010's topic in Assembly, Mods, and Painting
By that I guess I ment, without showing my identity if im thursty in public. Yea, I could still see through the teeth gaps a bit especially if the straw is a bright color. Since i'm not use to using the helmet, it's still a bit awkward doing it though. -
Operation: I want to drink too
Starfox2010 replied to Starfox2010's topic in Assembly, Mods, and Painting
Ok so I finally had time to start on it. I found these thin little foam pieces with a sticky back. I'm using one but just wanted to show what the other side looks like. the last piece is the thin magnet you could find on your fridge. I glued 1 foam to the magnet. Hoping this holds together with the E6000 I glued the screen to the ABS plastic and then the hinge to both. Lastly (that's a word right?), I glued the magnet -
Operation: I want to drink too
Starfox2010 replied to Starfox2010's topic in Assembly, Mods, and Painting
Right on, Scott! That's a great idea. -
Operation: I want to drink too
Starfox2010 replied to Starfox2010's topic in Assembly, Mods, and Painting
Or I could do this! hahaha Yea that's something to ponder about. ------- -
Operation: I want to drink too
Starfox2010 replied to Starfox2010's topic in Assembly, Mods, and Painting
Thanks for the good feedback. I will continue with the project and post more pics as I go. -
KY's AM 2.0: ANH Stunt Build (by THXBOY)
Starfox2010 replied to Thxboy's topic in Build Threads Requireing Maintenance
How did the hard hat liner work out? I couldn't figure out how to install it for the life of me. -
KY's AM 2.0: ANH Stunt Build (by THXBOY)
Starfox2010 replied to Thxboy's topic in Build Threads Requireing Maintenance
Ahh too much info! the forearm with the wider dip goes on the right. The bicept pieces, i dont believe the are different. nice work on the helmet. the forearm on the right will feel huge on the back but that is the one side I had less trouble with when butt joining and gluing the cover strips. -
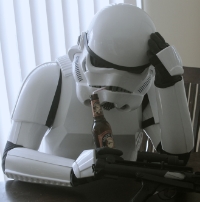
Hey Everyone, Before I start, I want to ask that if anyone has done this already, please send me a link so that I don't re-invent the wheel. I thought it would be cool to be able to take a drink of something while trooping without breaking character. Since i'm working on adding electronics and permanently installing my eye visors etc. Here is my prototype. The pic below shows a rough draft of what I want to do. I want to install a little door (or gate, whatever you call it) on the second tooth gap, since a regular size straw would fit in it without scraping anything. I then added a strong magnet (broken piece from magnet disks used on armor) to the door and a low strenght one (like the thin ones on the fridge) placed on the bottom of the toth gap. Note: If I used 2 strong magnets, there would have to be more pressure on the screen when trying to push in the straw causing it to tear. two low strenght ones wont hold well when the helmet is turning or jerking around. Here is what the frown looks like from the outside Straw from outside Straw from inside ( please remember this is a prototype. Bear with me on the tape ) Door closed What do you guys think .. Should I keep going? Need more pics?
-
I'm starting to help my brother on his AM armor, he waited until I finished before he popped out of no where to ask for help. I need to wait for the weekend to take my application pics though, i've also been looking to find out if the AM ab buttons would allow me to qualify (otherwise im going to "borrow" my brothers ) plus I'm also doing a project on my helmet, I'll post a new topic on that by tomorrow. Sneak peek
-
Hey Peter, To tell you the truth I kinda winged it. Since i'm a tall guy I didn't have to trim the kidney plate like Andrew did. So pretty much what I did was look at EIB applications to see roughly what I needed to cut off and where the [O II ] box was at (and let me tell you, I seen some with little to no top or side flaps on them). I started by looking at my application pictures, I seen how low it was hanging from the kidney and decided to cut half of that and raise the plate the other amount, for example: The plate was 2 inches below the kidney, I picked up the plate 1 inch and I trimmed it 1 inch. Note: doing this, made my plate stick out like superman's cape, so I had to heat bend the top flaps to have it rest properly in order to attach the elastics at the bottom. I hope this helps.
-
Right click the image on Photobucket, click on "Copy image location". come back to the forum, start replying to the topic, it should have a bunch of widgets such as adding emoticons, Bold icon etc. In the middle there's an icon of a tree picture, click on that and paste your image location under "URL" Note: I only see this on Desktop not on mobile phone.
-
Lol, nah i wish. Had to build my precious blaster like everyone else. I would raise that blaster in the air like Rafiki with Simba in the Lion King .
