

2thin
-
Posts
60 -
Joined
-
Last visited
Content Type
Profiles
Forums
Gallery
Articles
Everything posted by 2thin
-
I didn't think the aluminum would be capable enough on its own to support the resin front half, there's a decent amount of weight in the front I think. More surface area = more friction. And yeah that bolt thing should work, I'll be doing that soon myself.
-
Looks awesome! I'll copy that bolt idea for sure now. The way I got the aluminum tube to not rattle around was to drill a hole down the center of the bigger holes on both ends so it would be centered, hot glue should work though if you never plan to remove it.
-
I think the problem with this model is trying to get something inside the stock to actually hold it together. The twist lock method I thought of seems impossible to actually get inside the thing. Remember there's not a lot of space to mess around with. Permanently attaching the aluminum barrel should be just fine. Just make sure its centered into the part of the flash hider end before you glue it on so it sits in right. I think I showed that I drilled a hole further down for the correct size in it. The machined parts does sound a little over the top but if you do it, make an extra set for me! I was considering the screw on method but thats correct, theres no way to make it align correctly every time. Friction seems like the only way. Good luck, I really want to see what can be done.
-
Awesome, thanks! I didn't find a tube that could hold it any more secure then the actual drilled stock could. If you somehow make something that works let me know. I've trooped with it a few times and haven't had any real problems with it slipping out. But I'm also careful with it. Ideally I wanted to makes some sort of interlocking mechanism where I'd push the barrel in and turn it to lock it in place. Yeah, I cut that bolt thing out but also had the same idea. Again, if you can make that work I'd love to see how! I put some velcro in that area which helped a little. As far as barrel holes go they are cut all the way through to expose the inner barrel that the actual bullet would be fired through. This allows it to be cooled faster by the air outside. However since this is rubbery, the integrity of the barrel is compromised and starts to bend. The aluminum barrel fixes that and makes it look more realistic. BUT, if you don't care about electronics you can forego drilling all the way through and adding the inner barrel. It'll look just fine with the pvc and probably save you from some headaches. Trust me I've been confused the whole way through with this gun as well lol
-
TK-12169 Requesting ANH Stunt Centurion Status [TM][143]
2thin replied to TK-Sharp's topic in Request Centurion Status
Great looking set of armor! Congrats!!! -
Sorry I haven't checked this post in a while. John, if you still need the help 1) I used a 5 minute rubber epoxy for big parts and super glue for everything else. I've trooped with it about 20 times now and it's still in perfect condition. 2)The block is the feed cover which was added onto the left side of the blaster. You can see it in the picture where I'm showing the drill hole measurements. 3)Yes, wash everything! 4)It remains tacky until the paint layers are finally applied. Primer, lots of black, clear coat. 5) I think I am the only one haha Andrew, this is where I found the post http://www.501st.com/forum/viewtopic.php?t=24162&postdays=0&postorder=asc&start=0&sid=6b18eb7148a8731f9049462016e47892 I don't know for sure if he is still producing them. Make sure you email instead of PM Niko since he states that he doesn't check PMs often.
-
TK-71940 Requesting ANH Stunt Centurion Status [MTK][139]
2thin replied to 2thin's topic in Request Centurion Status
Thanks again everyone! I replaced them with more accurate ones. The included tips are one solid piece molded in black, which is fine but I wanted to get something more accurate. -
TK-71940 Requesting ANH Stunt Centurion Status [MTK][139]
2thin replied to 2thin's topic in Request Centurion Status
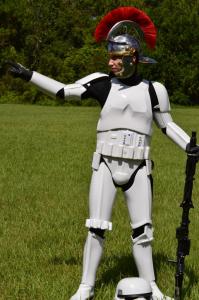
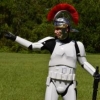
Render unto Caesar! Thank you so much!!! The dream is now a reality. Expect many more EIB and Centurions from me in the future, my goal is to do all of the troopers in the CRL. -
Chance Rohter 71940 Centurion Letter Thanks!
-
TK-71940 Requesting ANH Stunt Centurion Status [MTK][139]
2thin replied to 2thin's topic in Request Centurion Status
Thanks, and I love my "centurion" helmet -
Name= Chance Rohter (2thin) ID= TK-71940 Garrison= Florida Garrison Armor = MTK Helmet = MTK Blaster = Rubber Resin DLT-19 Height = 5'10" Weight = 135 lbs Boots = TK Boots Canvas Belt = Trooperbay Hand plates = Trooperbay Gloves = Rubber chemical gloves Electronics = iComm, Aker voice amp, mp3 player, Echo's helmet fan kit Neck Seal = Ebay Holster = Darman Front: Back: Left: Right: Ab/Kidney Attachment: Butt/Kidney not fixed: Ab Detail: Interior strapping: Hand Plates: Shoulder Bridge Back: Shoulder Bridge Front: Back/Chest connection: Thigh Pack Attachment: Knee Plate: Drop Box back: Cod and Butt Plate Attachment: Forearms without return edge: Helmet Details: Front: Left Side: Right Side: Back: Mic Tips: Lens Color: S-Trim: Blaster Details Right: Left: Accessories: Neck Seal: Thermal Detonator Back: Holster Attachment: Action Shots: Thanks for looking
-
TK-71940 Requesting ANH Stunt EIB Status [MTK][408]
2thin replied to 2thin's topic in Request Expert Infantry Status
Here are the photos I forgot and the upgrades I made. Expect a centurion application sometime this week Cod-butt attachment Ab detail New heat bended left bicep Drop boxes re-sized -
Chance Rohter 71940 EIB Letter
-
TK-71940 Requesting ANH Stunt EIB Status [MTK][408]
2thin replied to 2thin's topic in Request Expert Infantry Status
Thank you so much!!! I did use E6000 so I'll be reshaping that before my centurion application. I will also gladly trim some material off the drop boxes and cut those squares in the kidney plate. When I get a moment (been swamped with schoolwork) I'll post the photos I forgot here, no problem. Not only can I sit, but I can kneel down Erik Bauersfeld (Voice of Ackbar) was at the con this past weekend, and I didn't want to make him stand up for a photo so I tried kneeling down for the first time and it was no problem at all. He was such a nice and funny man. -
TK-71940 Requesting ANH Stunt EIB Status [MTK][408]
2thin replied to 2thin's topic in Request Expert Infantry Status
Here are some retaken photos, with fixed positioning that I got really quick at the con today. And some fun ones -
TK-71940 Requesting ANH Stunt EIB Status [MTK][408]
2thin replied to 2thin's topic in Request Expert Infantry Status
I read through your build thread, thanks for the advice! That's something I'll definitely be doing with the bicep. Also tightening in the ab and kidney closer to my body. -
TK-71940 Requesting ANH Stunt EIB Status [MTK][408]
2thin replied to 2thin's topic in Request Expert Infantry Status
Thanks for the comments and suggestions! I agree with them and will fix if necessary when I get the time. School is kinda crazy right now -
I got this MTK armor last Christmas and think I'm finally ready for EIB and Centurion. I'll be going for centurion with my commander soon and a death trooper as well! Thanks for looking Armor = MTK Helmet = MTK Blaster = Rubber Resin DLT-19 Height = 5'10" Weight = 135 lbs Boots = TK Boots Canvas Belt = Trooperbay Hand plates = Trooperbay Gloves = Rubber chemical gloves Electronics = iComm, Aker voice amp, mp3 player, Echo's helmet fan kit Neck Seal = Ebay Holster = Darman (The photos were taken on a slight incline so the angle is a little off) Let me know if I need to retake or add something. Front: Back: Full Right: Full Left: Left Side Detail Right Side Detail Right Thigh: Sniper Knee: Interior Strapping: Helmet Front: Helmet Left Side: Helmet Right Side: Helmet Back: Hovi Tip Detail: S Trim: Lens Color: Helmet Interior: Belt: Belt back: Neck seal: Blaster Left: Blaster Right: Thermal Detonator Back: Action Shot:
-
Awesome job! I'm actually hoping to start my death trooper soon after I get my other TK to centurion. I will be taking notes
-
Okay, so the blaster is finished! (Except for the electronics and eventual upgrades) I found this wire in the aisle with all the screws and nails at home depot and it worked perfectly and only cost $2. Here is the finished barrel before being weathered. And after And the rest of the shots. Pictures do not do this blaster justice. Besides painting the stock Bakelite, I'd say its pretty much done and I'm very happy with how it turned out. I'll update in the future once i get the funds and figure out how to rig it with a lighting kit.
-
Thanks! I'll be posting up the finished product tomorrow. I know, drilling that out was scary. All i can really say is I got lucky with the placement. And even if it's a little bit off, you can always trim the stock's front end where it's needed. If it helps, I found the center for the hole to drill for me to be about 1 3/4" for the side and about 7/8" for the top of it. I highly encourage the aluminum barrel btw if you're going to drill the holes out, it keeps it from sagging and looks really nice.
-
I got a lot of work done yesterday. I completely finished cutting out all the details and sanded everything. And I figured out how to make the barrel removable. I decided to use a long 3/4" drill bit and drill a hole in the front of the stock about 5" down and another hole in the front muzzle about an inch down. After test fitting the pieces together it stayed in surprisingly well. Since the blaster had an inner barrel, I found a 1/2" aluminum pipe that fit perfectly. In order to keep it centered without permanently gluing it in (because I want to add lights in the future) I drilled a 1/2" wide hole further down both parts of the blaster and made sure the aluminum pipe was a couple inches longer than the barrel of the blaster. Here was the first test fit and I was very happy with the results. After getting that out of the way. I wanted to make the flip up iron sight movable. So I carefully cut it out and will be gluing in a little pin so it can flip up and down. Eventually I'll hopefully get a real metal one as well as a working bipod. Here are the pieces with their first coat of black paint. I should have the basic blaster finished tomorrow.
-
Made a little more progress yesterday. The holes in the barrel were drilled out using a 1/4" drill bit followed by a 1/4" Dremel sanding wheel to completely clean the rest of the resin out. I know it's supposed to have a solid barrel inside so I'll be adding a thin copper tube towards the very end of this build. But it will be temporary until I get electronics installed. I also found this Elmer's wood filler stuff at Home Depot that did a good job at filling in all the air bubbles and imperfections. You just have to wait a couple hours before sanding. I decided to use the Rustoleum High Performance Enamel Spray Paint and so far in the priming stages it's staying on very well. I only primed the T-racks so far. I'm still trying to figure things out with how I'm going to attach the barrel. So far the plan is to drill a deep 1/2" hole down the stock and hope it provides enough friction and support to keep the barrel from falling out, but I have a couple other ideas. Tomorrow I'll try to get that out of the way and finish cleaning up all the details so it's ready for paint.
-
Thanks! There aren't many tutorials for this sort of thing, I eventually gave up looking and decided to just ask for advice directly. I'm bound to mess up on some things so don't follow too closely lol If anyone has this same kit, are the pieces supposed to be kind of sticky? I'm assuming once painted they obviously won't feel that way anymore.
-
This is my first build thread ever so bear with me. I recently received this kit I purchased off the main legion boards. The reason I chose this one over the others is because of the material it's made out of. Since it's made of a rubber-like resin material, it won't shatter like regular resin and still shows good detail. Besides durability and detail, I also wanted a blaster that could eventually be modded with electronics and other things. So after discovering this kit I immediately ordered it. I realized as soon as I got it that I'm in a little over my head. I decided to start a build thread in order to seek help from all of you because I'm new to this sort of thing and don't know much A couple questions... what's the best way to have the blaster be able to split into two parts for transportation without having to worry about the barrel falling off in the middle of a troop? And would a Hyperdyne Labs lighting kit be able to be integrated into this? Any help would be extremely appreciated! Here is what I got straight out of the box And here is my progress so far, basically just cut off most of the excess resin with a hobby knife. I'm going to use a dremel next and then start sanding. If you all want better photos or to see something specific just let me know. I'll be posting more as this comes together. And thanks in advance for any advice!
