

Barcoder
-
Posts
405 -
Joined
-
Last visited
-
Days Won
3
Content Type
Profiles
Forums
Gallery
Articles
Everything posted by Barcoder
-
 Excellent job! I probably would have had an anxiety attack doing that. lol That upgrade is lovely!
 -
Agreed. I built the back section a little high and the flash hider/emitter should be a little longer/bigger. Not bad for under $9.00. Here is the final result (with weathering & details.)
-
Well, painting went as well as I thought it would. Terrible. lol. After a few dumb mistakes & cosmetic surgery, everything has finally been painted & looking super glossy. Took me three tries on the chest piece, but man, does it shine! Glass finish. lol While I am waiting for the last pieces to dry, thought I'd take a stab at creating a mock up/conversion of the new side arm/pistol. As there is not much for reference images yet, (Black series figure & the pic from Celebration) a few us did some brainstorming on Facebook.... Might as well start another TFA project. lol Here are the two toy guns I will using parts from... This involved using the hilt & a section of one....and the top section of another...and a random scope for the emitter. It also involved a lot of construction using ABS to build up the back end and some details.... In progress.... All primed..... Haven't found a scope for the top yet. I've been told it's a variation of a reflex sight scope? The reference photos of the side arm are of no help. It's kinda like a black angular blob... lol Here is where I am at now. (Just quickly mocking up the areas of black & white.)
-
Yes, don't do what I did and cut this detail off. lol. It was not fun trying to recreate it. Excellent thread so far!
-
Right?! it's so exciting. Sucks waiting for the paint to dry. lol Yes, one of my snaps gives me a bit of trouble (just harder to snap in.) In hindsight, I wouldn't have sunk the snaps as low as I did.) Oh well, they still work!
-
Warm & fuzzy?
-
Had a bit of an issue/potential issue come up.... I have discovered a stress point on the Ab Section that has led to a small crack up the bottom edge. The green line represents where the most flexing happens when I put on the Ab Section. When I open up the back section to slip in on, this is were it bends the most. The repeat stress caused a small crack on my left side. Thankfully it was only on the inside return edge & I was able to stop it in it's tracks. lol. I just reinforced the area with a piece of ABS (curved to match the inside.) and some PlasticWeld (Red area on the pic). Seems to be doing the trick. I'll post a real pic once the Ab Section is done being painted. Side note - As I didn't actually remove any part of the back, just split it open, my stress point may be different on those suits that actually cut out the back?
-
So true; armour gets all the love!
-
You're off to a good start. Just remember to relax, take things slow & focus on one thing at a time. Do your research and ask questions. But most of all, enjoy it and have fun.
-
I'll be keeping my eye on your build. Best of luck and have fun! (TFA is next!)
-
Yes, I did use a primer from the same brand. Thanks for the tips!
-
3M sanding sponge 1200-1500 grit.
-
About 23-21 degrees and between 60-33% humidity.
-
Well, the painting nightmare has begun.... I'm not sure if I mentioned this or not but I HATE spray painting.... But I have spent enough money on this suit that going to an autobody shop just wasn't an option.... I can do this... This is what happens when you spray paint in one area for too long or it runs down and pools along an edge.... it globs and then dries with tons of little pin holes. I can't wait to sand this stuff down... <sarcasm> I have no idea why this happens.... but I HATE it. lol I also ran into a problem when the paint left a stucco-like texture all over the entire butt plate. I had to sand the whole thing down and start again. Grrrr. I am not sure, but I wonder if I didn't shake the can enough? I tried the same can again, but shook it for a very long time. No more stucco... Hmmmm... I have also discovered that even though the coat may look gorgeous and shiny like glass, it can sometimes dry with dull areas.... <insert curse word here> Thankfully I have committed to doing two coats on the armour. Once this coat dries (48 hours), a light fine sanding and then on to coat two. Once that is done, I will paint the inside with flat black enamel. (With a brush, no spraying black paint for me!)
-
Clamps Goes All TFA and Stuff
Barcoder replied to Clamps's topic in Build Threads Requireing Maintenance
HAHAHAHAHAHA! "Wonderfulness". I like it. -
Germanys First TFA *First Order Stormtrooper* WIP
Barcoder replied to Sano's topic in Build Threads Requireing Maintenance
Looking awesome Dino!! Nice work on the TD. Have fun painting......I currently am not. I hate spray paint.... -
Honestly? Not really, at all. It's a pain to get suited up. (I need help. No way I can do it myself.) That being said, maybe it's just that I'm not used to it yet? I found my original TK super uncomfortable at first, now it feels great. Thanks! I hope it helps future First Order troopers! I relied on so many peoples build threads when I did my original TK, it's an honour to return the favour. I look forward to seeing your build thread soon.
-
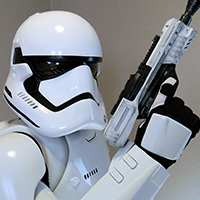
PICTURE TIME!!!! (I forgot to wear my silly neck seal....) (Yes, I am voguing... the song came on the radio and I just had to strike a pose to show the range of movement.) Needless to say, I literally almost wet myself with excitement when I put the helmet on. It looked friggin' AWESOME!!!!!! Now it's time for paint & tweaking/adjustments. (I have not done the holster yet as I am waiting for the hardware.)
-
So far, the TD is working out great. The pressure from the back helps to keep it down. Once I get velcro on there, it will sit nicely. as for the spats, time will tell if they will hold. That is a concern of mine as well. Hence the reason I chose to attach the male snap with a snap plate.Let's hope it holds. lol
-
Thanks! It was my pleasure to post details. Troopers helping Troopers, as they say.
-
Glad you're enjoying it! I won't lie, there were some tough parts to this build but it wasn't as scary and horrible as I excepted. I even did this all by myself; no build crew to help. So yeah, it can be done.
-
Worked on the belt boxes... They are all glued and just got primed... All that is left is figuring out the final length to cut the rubber and then use the Chicago screws to attach. Came up with an idea for the cloth pouches... (Also discovered my phone fits perfectly in the long one!!) To keep the pouches looking full and solid, I cut out blocks of Styrofoam to the estimated dimensions of each. I then covered them in adhesive vinyl. (Sign vinyl.) Turned out perfect! Finally got the spats finished.... I do believe I was procrastinating... As I mentioned, my plan was to follow Clint's idea of using snaps. Turned out great but more work than I expected. Started with figuring out the snap placement and then dremeled out the holes. (I guess you could use the large indent to drill the holes but I figured my placement would ensure a nice flush fit?) The made little boxes to house the snaps.( Same size as the back of the area I dremeled out.) And then added the snaps. I then glued them on and added some PlasticWeld along the sides to ensure they held tight. I couldn't be sure that CA glue would hold the male end of the snap onto to the resin clip... I decided to use a modified, smaller snap plate with ABS instead. As the bottom of the snap sticks out a bit, I dremeled out a little indent on the clip, just so the plate would sit a little more flush. (Still have some sanding to do to clean up the plate.) I am quite happy with how it looks and holds. The clip sits nice and flush; looks very clean. (Thank you Clint, great idea!) And with that, my friends, this suit is basically assembled! All that is left is getting the length on the belt done, velcro on the back of the ab section, final sanding of the primer...and then it's time for paint. (I'm glad I waited to paint last; the armour is covered in fingerprints, pencil marks for placement, dust and marks from the Chicago screws and snaps.) I will take full body pics of me in the suit tomorrow, before we start painting.
-
ALMOST FINISHED!!!! Have attached the knee plates with velcro. I though about using snaps but was concerned about misalignment.... Velcro has been sewn on all the rims of the gaskets and inside each piece. I decided to not do tabs of velcro. I may regret this later as it can be a minor challenge to get everything lined up but it feels very secure. No worries about blowing a tab. lol. Nothing pops out and the edges can't been seen when bending. (I used black velcro as I do intend to paint the inside of my armour black. Not the entire insides, just the areas that might be seen. E.g-along the rim of the thighs, near the wrists on the arms, inside the butt & cod piece, etc...) Figured out the attachment of the detonator. I have glued snaps on white nylon webbing, that attaches to the hook. It will snap in on the inside. I will use velcro on the ab section to keep it in place. (I'll attach the velcro after everything is painted.)
-
These were a total pain in the rump to do. I wish you all the best. As for the fabric, it was a foam backed material. Got it at an upholstery shop. (Wasn't cheap.) As for the fabric I glued over the foam, that was a polyester/spandex blend. Very shiny, like satin and had some stretch to it.
-
So glad you're enjoying it; it has been fun to write as well. Thanks for the compliments; much appreciated! I hope to see your first order build thread someday. And yes, cloth gaskets are the way to go.
