


DroidHunter
-
Posts
570 -
Joined
-
Last visited
-
Days Won
2
Content Type
Profiles
Forums
Gallery
Articles
Media Demo
Posts posted by DroidHunter
-
-
Try building one from scratch and you can make the adjustments for size as you go. ATA has helmet kits in stock usually, ready to ship for much less than you paid for a finished bucket.
-
For all of the Minion fans out there. This was posted over on CBM, and I couldn't resist bringing it here.

-
I'm sorry I can't answer your question, but I have to ask you: With a screen name of mr_speed, can I assume you are a classic KISS fan, or is there some other reason? Just curious.

-
I normally wear a size 9 U.S. For dress shoes, I have size 9 Rockport shoes that lace up. For sneakers, right now I own Asiacs running shoes and they are all size 9. In the TK Boots I have a pair of 9's and they fit perfectly. I can wear either thick socks or put comfort soles in them, but I can also wear them without. If anything, they run just large enough that you could get 1/2 size smaller than your normal fit, but I am quite happy with the regular 9. They also run just slightly narrow. Mine came out of the last batch TK Boots received before things really slowed down for them. Just an FYI.
-
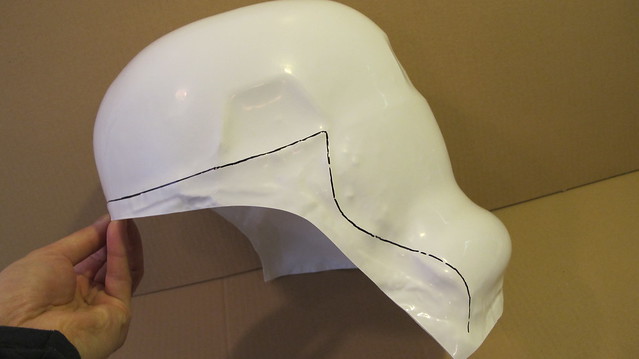
Just a suggestion. If this is something that doesn't concern you, then disregard this. Where you have the brow line cut to now, the brow trim will end up IN the trapezoid exposing the bottom paint line. I have always trimmed it to the end of the trap so the brow covers all the paint. The blue line is where it would end up now and the red is trimmed a little further.
That's really good advice. I wasn't sure on the angle of the trim so I wasn't sure how deep to make that cut. Like I said, easier to take off more than to take off too much. Thanks for the suggestion.
-
Hey brother, I saw your post and was going to forward the information I have been given, but I see you already jumped in on my thread. Good luck with the build!
-
Trimmed out the cap for the most part. I still need to trim away some of the excess along the bottom, but I have been cutting very conservatively based on everybody's advice. I have also left quite a bit on both the right and left side so that I don't have to worry about coming up short. Does this look like too much left behind? I also started trimming out the eyes (which I posted elsewhere so just one pic here). Slow progress is better than none...


-
Steve, I gave your method a shot, and I like the results. It took a while, and I only have one eye done, but I'm happy with the result. I drilled with a small bit around the ridge line perimeter, then connected the dots with an x-acto knife, and used the Dremel to clean it up. I was a little nervous the the bottom return was a little small as I drilled a little closer than I wanted in one spot, but based on pics I have looked at of finished helms, I think this is OK. Thoughts?


-
I like that idea too.

-
I appreciate the quick replies. Steve, even after watching Trooperbay's video, it did not occur to me to use the drill in this manner. I have marked the perimeter of the eye lines as Panda Trooper did in this pic (sorry, never got to take a pic of my faceplate):
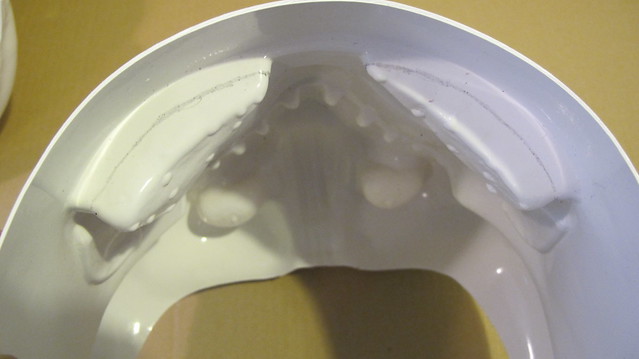
So you drilled all the way around the perimeter of the pencil line with a small drill bit in a manner that was perpendicular to the pencil line (i.e. as if from the top of the head and drilling down in this pic), and then connected the holes with a blade, correct? I really like that idea and will likely give it a try, Thanks for the advice! I have a small Dremel sanding post to smooth it out, just not a good cutting post for that area.
Ron, I have those scissors, but I don't think I want to use them for the eyes. How did you get in there to cut in the first place?
-
 1
1
-
-
I've read post after post on assembly, and I'm getting better at trimming stuff even though I'm still in the early stages. But I am stuck on the eyes. I was going to use a Dremel, but the wheel is big and I'm worried about the curved shape. Scissors are out. I watched the Trooperbay video. Can anybody tell me how they went about it and how it worked out for them? I don't want to mess these up!
-
I'll weigh in on the rookie side of this. I've been wanting to build a TK kit for years, but never thought I could afford one. But low and behold, I now have a kit ready to be assembled. Mind you, I have no experience at all, I have a crazy job and a kids at home (one less than a year old). Time is a rare commodity. And I would be lying if I didn't say that I am totally freaked out about cutting and drilling this set of unassembled armor that I have coveted since I was a child. But I have made that first cut. With my TD behind me, I have started trimming the helmet. And though I know there will be mistakes along the way, I relish the idea of being able to say "I Made this." I like the hands-on experience. I like learning something new. I'd love to troop now, but I know that it will likely take a minimum of 6 to 8 months to get through this process. Getting there seems like half of the fun. I would never fault anyone for buying ready-to-wear. I'd so the same thing if I was in the military, had to travel for work/school, etc. In my situation, I choose to build this S.O.B. and see what comes of it.
-
Those clips a darn nice!!!! Well done!
Thanks!
Alright. Lots of reading and examining pics of people putting together the ATA bucket. Man, I knew the Stormtrooper helmet was wonky and non-symmetrical, but this is crazy! I had no clue until I started messing around with the pieces. Not a single aspect of this monstrosity id symmetrical. I love it. So I trimmed the faceplate somewhat conservatively, and I am about to cut the cap. Having seen all of the posts on this, I am going to cut very conservatively, especially on the right side (left as you look at it) since that seems to be the side that doesn't overlap well. Terrell already cut this one tight so I won't be trimming too much. Here are a few pics:
Let me know if these look about right.


-
Thanks for posting this thread. Puts my mind a bit at ease as I begin trimming my ATA lid.
-
Step 1 complete. Mostly anyway. Now on to the bucket!


-
I share your pain my friend.
-
Clips just about done so I should be able to put the TD aside as finished in a day or so. I still have to attach them to the detonator and paint the screw heads black. I also need to tweak the clips just a bit. I don't own, or have access to, a vise so I had to craft these by hand with a little bit of elbow grease. They aren't as good looking as the ones made by TK_LEPER or Vern, but they should get the job done as far as board approval.


-
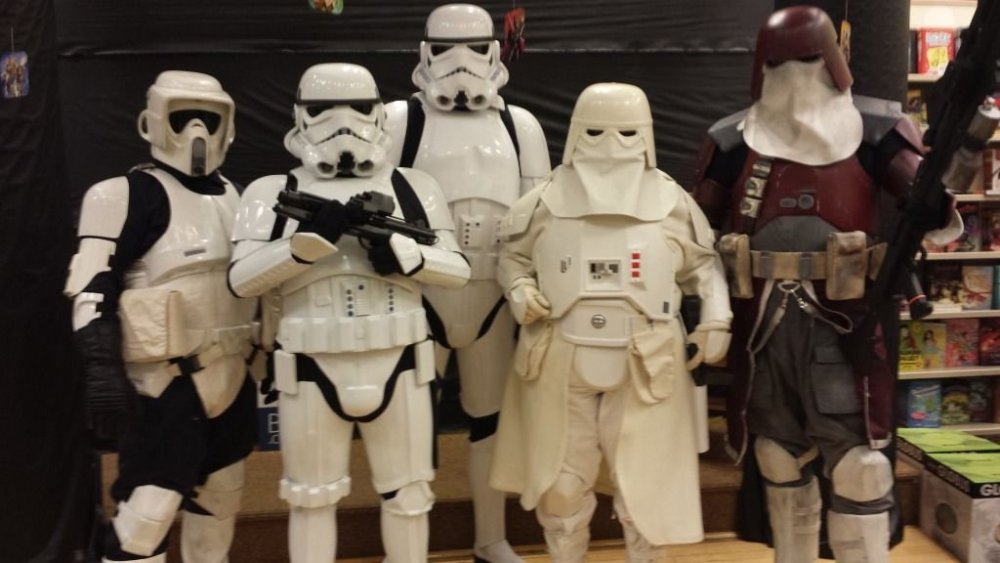
While I work on the earliest stages of my TK build, I squired an event at a local Barnes and Noble with my group, Garrison Carida. It was a great day for the kids and we managed to snag a potential new recruit or two along the way. Prizes were given out for best costumes. Unfortunatelly, the top two prizes went to rebel sympathizers.
 The winners were actually twins, a boy and girl dressed respectively as a young jedi and a princess in white... wait a minute... uh oh. Oh well, a great day was had by all and the troops suffered through some unusual October heat. Here are a few pics.
-
End caps not glued -- just pushed on. Only the panel is glued. Thankfully!
-
Glued my first piece. I was conservative with the E6000. The total length is just a hair over 7 1/2 inches and the gap between the panel and the caps is just over 1/2 inch.

-
Got it. I have my control panel down to about right between 4 1/2 and 4 3/4 inches. The end caps are cut (Dremel plus sanding) and the tube is painted. Now I just have to assemble. Problem is the end caps are a REALLY hard fit.


YEAH! What Glen said!!! With ATA's helmet, the side to watch is the right side (as you are wearing it). Take off the rough stuff on the face like you have marked. Just watch not to take too much off the cap on that side. It comes REALLY close, especially at the bottom, to NOT allowing you any overlap to rivet or attach the bottom screw of the ear.
I still have to trim like Panda Trooper shows here though, correct?
-
Here is the control panel trimmed down. Do I need to cut more off on the left? This is a little over 5 inches, and based upon the previous post, I'm guessing I should take off another 3/4 inch or so.


-
Thanks for the info guys. The Dremmel is my friend once again and I used it to start trimming out the control panel. As you can see, I need to trim a little more on the "bottom" and have not yet trimmed the top. I may have to bring the left in a little too, but not certain. I also started marking off cut lines on the helmet.


-
Is their a correct size for the TD control? Looked to me like trimming off the boarder was about right.
Hello from SW Pa.
in New Member Introductions Archive
Posted · Edited by Ibnzbass4
From one Pennsylvanian to another, welcome aboard. You can also check out the Garrison that covers PA at http://www.501stgarrisoncarida.org
As for getting started, you have probably seen this link, but in case you did not, it is invaluable.
http://www.whitearmor.net/forum/topic/11538-the-various-types-of-armor-and-where-to-find-them/